Import purchase orders from a spreadsheet
Importing lets you create many purchase orders (POs) at once from a spreadsheet instead of building each one by hand. There are two separate importers:
| Importer | Where it lives | What it does |
|---|---|---|
| Import Purchase Orders | The Import button on the PO list | Creates one or more brand-new POs from a file. Each new PO starts as a draft (unsent, still editable). |
| Import lines | The overflow (three-dot) menu on an open PO | Adds line items to the single PO you already have open. It never creates a PO. |
- Line item — one product row on a PO (a SKU, a quantity, and a unit price).
- Header columns — the values that describe the whole order (PO number, supplier, warehouse, currency), as opposed to a single line.
- Draft — a PO that has been created but not yet sent to the supplier. It stays fully editable until you approve and submit it.
Before you begin
- You need the Import purchase orders permission. Without it, the Import button and the Import lines menu item are hidden.
- The products you order must already exist in SKU.io as standard or kit products. The importer matches each row to a product by SKU (or by barcode for line imports) — it never creates products.
- The suppliers, destination warehouses, and currencies named in your file must already exist. The importer resolves them by name (or code) and doesn't create them.
The destination warehouse on a PO must be one of your warehouses — the place the stock is coming to. A warehouse that belongs to the supplier is rejected, both during validation and when the PO is saved.
Import purchase orders from a file
This flow creates one or more new POs from a spreadsheet. Each PO starts as a draft.
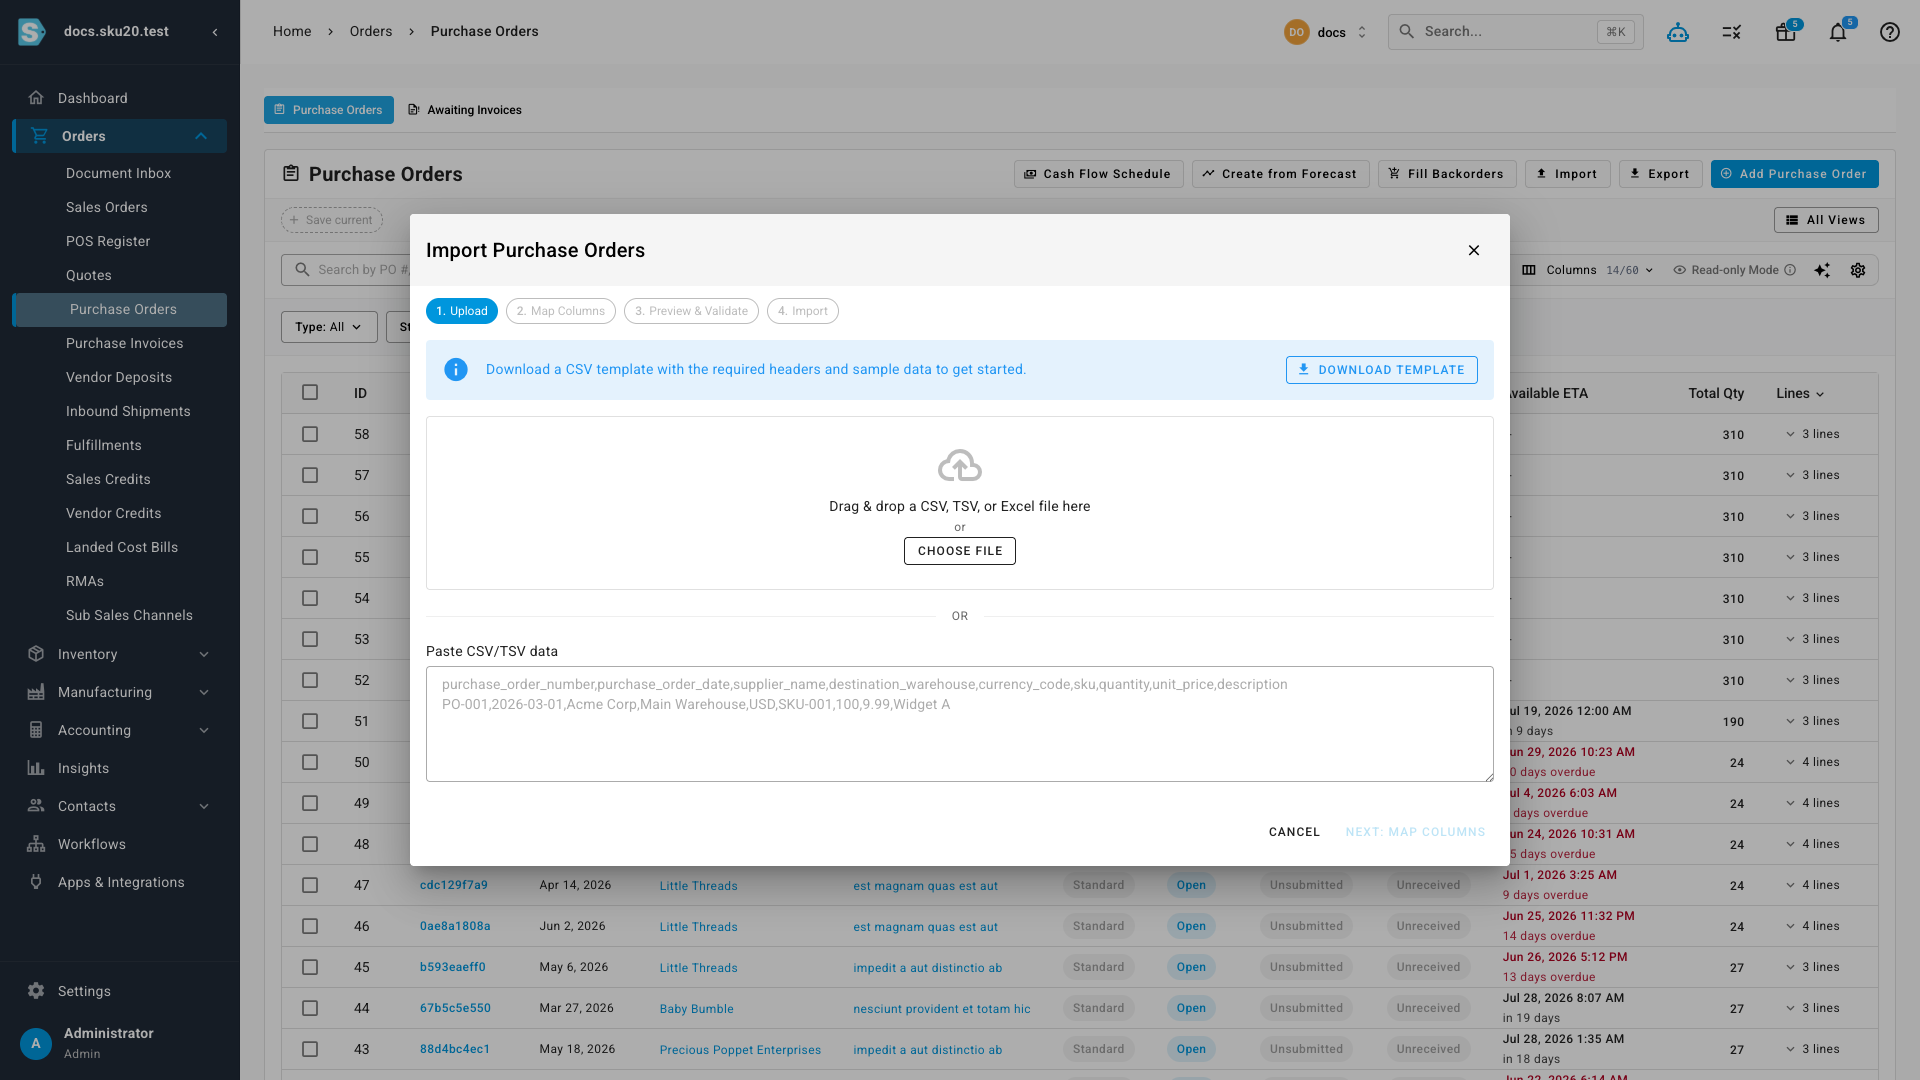
- Go to Orders → Purchase Orders.
- In the toolbar above the list, click Import. The Import Purchase Orders window opens on step 1, Upload.
- Click Download Template. SKU.io generates an Excel template pre-filled with sample rows and a reference sheet listing the exact supplier names, warehouse names, currency codes, payment terms, shipping methods, incoterms, tax rates, and nominal codes from your account. Copy those values verbatim so they match.
- Fill in your data. Use one row per line item, and repeat the header columns (PO Number, Supplier Name, Destination Warehouse, Currency Code) on every row that belongs to the same order. For example, three rows all carrying
PO-DOCS-0001/Acme Suppliesbecome a single three-line PO. - Load your data. Drag a CSV, TSV, or Excel file onto the drop zone, click Choose File, or paste rows directly into the Paste CSV/TSV data box. Confirm the First row is a header checkbox matches your file, then check the raw preview.
- Click Next: Map Columns. SKU.io auto-matches your headers to its fields; adjust any that are wrong, or set a column to Skip this column. Fields marked with an asterisk are required: Supplier Name, Currency Code, SKU, Quantity, and Unit Price. You can also map a column onto any custom field defined for purchase orders.
- Click Next: Validate. SKU.io checks every row and resolves names to records without saving anything — you can run this step as many times as you need.
- Review the grouped preview. The summary bar counts Purchase Orders, Line Items, and Errors. Each PO appears as a card; expand one to see its lines. When there are errors, use the All, Valid, and With Errors tabs to focus on the POs you still need to fix.
- Click Import N Purchase Orders. Only POs that have no errors are sent — POs and individual lines flagged with errors are skipped.
- Review the results. Created Purchase Orders lists each new PO with a link to open it; Errors lists any that failed to save. Click Import More to run another file, or Close to return to the list.
What you'll see: each successfully imported order appears under Created Purchase Orders as a clickable PO number, and every one of them lands in your PO list as a draft — nothing is sent to the supplier automatically.
The template's reference sheet holds the exact supplier, warehouse, currency, payment-term, incoterm, tax-rate, and nominal-code values from your account. Copy them verbatim. Because these are matched by name or code, a value that "looks right" but is spelled differently (for example Acme Supply instead of Acme Supplies) is reported as an error.
How rows group into purchase orders
Rows are grouped by their PO Number + Supplier Name. Every row that shares both values is merged into one PO with multiple lines. A row with a blank PO Number becomes its own separate order and is labeled Auto-numbered in the preview — SKU.io assigns the next number in your sequence when it's created.
Worked example. Suppose your file has five rows:
| PO Number | Supplier Name | SKU | Quantity | Unit Price |
|---|---|---|---|---|
PO-DOCS-0001 | Acme Supplies | WIDGET-A | 100 | $8.50 |
PO-DOCS-0001 | Acme Supplies | WIDGET-B | 50 | $12.00 |
PO-DOCS-0001 | Acme Supplies | WIDGET-C | 25 | $4.25 |
PO-DOCS-0002 | Globex Ltd | WIDGET-A | 200 | $8.10 |
| (blank) | Globex Ltd | WIDGET-D | 10 | $3.00 |
This produces three POs:
PO-DOCS-0001(Acme Supplies) — a single order with three lines totaling $1,556.25.PO-DOCS-0002(Globex Ltd) — one line, $1,620.00.- One auto-numbered PO (Globex Ltd) — the blank-numbered row becomes its own order and is given the next number in your sequence.
Which fields are required, and how the rest resolve
- Supplier Name and Currency Code are required on the header. The supplier is matched by name and the currency by code (both case-insensitive).
- SKU, Quantity, and Unit Price are required on every line. Quantity must be a positive whole number and unit price must be zero or greater.
- PO Date is optional in the file; a blank date defaults to today.
- Destination Warehouse is optional in the file. When you leave it blank, SKU.io falls back to the supplier's default warehouse, then to your account's default PO warehouse. If none of those resolve, the PO is flagged with an error.
- Optional look-ups — Payment Term, Shipping Method, Incoterm, and Nominal Code — are matched by their name or code. A value that doesn't match an existing record is reported as an error rather than skipped silently, so a typo is caught during validation.
An incoterm (International Commercial Term, for example FOB, DDP) is the standard shipping-and-liability agreement that says who pays freight and who owns the goods at each leg of the journey. A nominal code (also called a general-ledger or account code) is the accounting category the purchase is booked against, so it lands in the right place in your bookkeeping. Both are optional; leave the column out entirely if you don't use them.
What each column controls
For the complete, column-by-column list — every header and line-item column, its type, accepted values, and validation — see Importable purchase order columns reference. A few columns are worth calling out here:
supplier_notesprints on the PO;internal_notesnever does.supplier_notesare the notes the vendor reads on the purchase order you send them.internal_notesare private — they're stored on the PO for your team and are never printed and never emailed to the supplier. Both are fully supported by the importer. Note that onlysupplier_notesships as a column in the downloaded template; to import private notes, add aninternal_notescolumn to your file — the mapper recognises headers like Internal Notes, Notes, Memo, Comments, or Remarks, or you can map it by hand on the Map Columns step.unit_pricehere is the same asunit_costin the line importer. This file importer names the per-unit line costunit_price(and it's required). The separate Import lines tool (below) instead calls that same valueunit_cost(and it's optional). Different header, same meaning — don't let the naming trip you up.discountis a per-unit amount, not a percentage, andtax_rateis a percentage (for example,10for 10%). Leavetax_rateblank to apply the supplier's default tax rate.
When validation reports errors
Each PO card and line shows the specific problem, for example Supplier 'Acme Supplies' not found, SKU 'YOUR-SKU-1' not found, or Quantity must be a positive number. A SKU that exists but isn't a standard or kit product is rejected the same way. Fix the values in your file, re-upload, and validate again.
Validation checks and matches your rows without saving anything. Nothing is created until you click Import N Purchase Orders, so you can validate, fix, and re-validate as many times as you need.
What gets created
Every imported PO is created as a draft, so nothing is sent to the supplier automatically. Any tags in the file are applied, and — as noted above — a warehouse that resolves to a supplier warehouse is rejected at this stage.
Once you click Import N Purchase Orders, all the valid POs are saved together as one unit. If any single PO fails while saving, the entire import is undone and no orders are created at all — the window shows the failure message. This is deliberate: it stops a half-finished batch from leaving some orders created and others missing. See Common problems below for what to do when this happens.
Import line items into an existing PO
Use this when you already have a PO open and want to add its lines from a spreadsheet rather than typing each SKU. This flow doesn't create a PO — it edits the one you are viewing.
- Open the PO — for example
PO-DOCS-0001— and go to its line-item grid. - Open the grid's overflow (three-dot) menu and click Import lines. If the PO can no longer have its lines edited, the item is disabled and a tooltip explains why.
- On step Upload & Parse, click Download Template, or drag/choose a file, or paste rows. The only required value is a SKU; quantity and unit cost are optional.
- Confirm the column mapping. SKU / Barcode Column is required. Quantity Column is optional and defaults to
1when unmapped. Unit Cost Column is optional. When you leave quantity unmapped, you can tick Use product case pack qty as default quantity to seed each line from the product's case pack (falling back to1). - Click Validate. SKU.io matches each row against your products and moves to Validate & Import.
- Review the results. Matched Items lists the products it found, with editable Quantity and Unit Cost cells. Unmatched SKUs lists anything it couldn't match, with a Copy to clipboard button so you can correct them. If any matched product isn't yet linked to this PO's supplier, a warning lists the products that will be linked automatically on import.
- Choose how to apply the lines. Leave Replace all existing lines unchecked to add the imported lines to the PO. Check it to replace every existing line with the imported set — a warning confirms the existing lines will be removed.
- Click Import N Items.
What you'll see: the matched products appear as new lines on the PO's grid. If you ticked Replace all existing lines, the lines that were there before are gone and only the imported set remains.
A case pack is the number of units a product ships in per case (for example, 12 bottles to a case). If you don't map a quantity column, ticking Use product case pack qty as default quantity seeds each line with that case-pack number instead of 1 — handy when you always order by the case.
Ticking Replace all existing lines wipes every line already on the PO and swaps in the imported set. A confirmation warning appears first. If you only mean to add to the order, leave this unchecked.
How unit cost is filled in
When a row has no unit cost, SKU.io fills it in for you in this order:
- The value from the file (if present).
- The price from the selected supplier pricing tier — a named price list a supplier offers, for example, a wholesale or volume tier — or the supplier's default tier.
- The product's own unit cost.
0, if none of the above resolve.
You can override any value in the Matched Items table before importing. If the same SKU appears on more than one row, those rows are consolidated into a single line with their quantities combined.
Export a PO's lines to re-import
You can export an existing PO's lines to a CSV that the line importer can read back — useful for editing quantities or costs in bulk, or copying lines between orders.
- Open the PO and go to its line-item grid.
- Open the overflow (three-dot) menu and click Export lines. The item is disabled when the PO has no lines.
The downloaded file is named purchase_order_lines.csv. It contains eight columns — but only three of them are read back when you re-import through Import lines. The rest are exported for reference and are ignored on re-import:
| Column header in the file | What it holds | Re-imported by Import lines? |
|---|---|---|
purchase_order_number | The source PO's number | No |
sku | Product SKU | Yes |
barcode | Product barcode | Yes (matches by SKU or barcode) |
description | Line description (falls back to the product name) | No — ignored |
quantity | Ordered quantity | Yes |
unit_cost | Per-unit cost | Yes |
discount_rate | The line's discount rate | No — ignored |
tax_rate_id | The tax rate applied to the line | No — ignored |
Edit the file, then feed it back through Import lines on the target PO.
The Import lines tool reads only the SKU/Barcode, Quantity, and Unit Cost columns. Changes you make to description, discount_rate, or tax_rate_id in the exported file won't come back in — re-imported lines take their description from the product name and their tax and discount from the PO/supplier defaults. If you need to change a line's description, discount, or tax, do it on the line after importing (see Edit a PO and its line items). Editing quantities or unit costs in bulk works perfectly.
Spreadsheet apps often "help" by turning a long barcode into scientific notation (5.06E+11) or by dropping a leading zero, which then fails to match your product. If your SKUs or barcodes are long numbers, keep the file in Excel (.xlsx) format — which the importer also accepts — or format the column as Text before you type into it. That preserves every digit exactly as entered.
Common problems
| What you see | What's happening | What to do |
|---|---|---|
| "My whole import rolled back — nothing was created." | The file-level importer saves all valid POs together as one unit. If a single PO fails while saving, the entire batch is undone so you never end up with a half-created set. | Read the failure message in the results window, fix the flagged PO in your file, then re-run the import. Nothing was created, so you can safely re-upload the whole file. |
A long barcode or SKU became 5.06E+11, or lost a leading zero, and now reports SKU not found. | Your spreadsheet app reformatted a long number when saving to CSV. | Save the file as Excel (.xlsx) or set the SKU/barcode column format to Text first, then re-import. |
Supplier 'Acme Supply' not found (or a warehouse / currency / incoterm not found). | The name or code in your file doesn't exactly match a record in your account. | Copy the value verbatim from the template's reference sheet, then validate again. |
| A destination warehouse is rejected. | The warehouse you named belongs to the supplier, which can't be a PO destination. | Choose one of your own warehouses, or leave the column blank to fall back to the supplier's default, then your account's default PO warehouse. |
| A SKU exists but is still rejected. | The importer only accepts standard and kit products; other product types are rejected the same way as a missing SKU. | Order that item using a standard or kit product, or remove the row. |
After you import
Imported POs land as drafts, so the next steps are the same as for any PO you build by hand: edit the lines if you need to adjust tax, discounts, or pricing, then approve and submit to send it to the supplier. Only after a PO is open — and its destination is a real, non-supplier warehouse — can you receive stock against it; draft POs, Amazon AWD (Amazon Warehousing and Distribution) destinations, and Walmart WFS (Walmart Fulfillment Services) destinations follow their own receiving rules described in that guide.
Next steps
- Create a purchase order — build a single PO by hand instead of importing.
- Create POs from a demand forecast — another way to generate POs in bulk.
- Edit a PO and its line items — adjust imported lines, tax, and discounts.
- Approve and submit a PO — move an imported draft to open and send it.
- Browse and manage the PO list — where the Import button and list export live.
- Importable purchase order columns reference — the full column-by-column list, accepted values, and validation.
- Exportable purchase order columns reference — every column the list export produces.
- Purchase order fields reference — what each header and line field means.
Video transcript
To create many purchase orders at once, go to Orders, then Purchase Orders, and click Import. Start from the downloaded template so your values match.
Paste or upload your file, one row per line item, then click Next.
Your columns are matched automatically. Click Next to validate.
Validation groups your rows into orders and checks each one, without saving. Here: two purchase orders, three lines, no errors. Click Import.
Both orders are created as drafts, ready to review and send. A spreadsheet just became purchase orders.