<?xml version="1.0" encoding="utf-8"?>
<feed xmlns="http://www.w3.org/2005/Atom">
    <id>https://docs.sku.io/release-notes</id>
    <title>SKU.io Release Notes</title>
    <updated>2026-07-24T09:00:00.000Z</updated>
    <generator>https://github.com/jpmonette/feed</generator>
    <link rel="alternate" href="https://docs.sku.io/release-notes"/>
    <subtitle>New features, improvements, and fixes for the SKU.io platform.</subtitle>
    <icon>https://docs.sku.io/img/favicon.ico</icon>
    <rights>Copyright © 2026 SKU.io.</rights>
    <entry>
        <title type="html"><![CDATA[Airtable integration — two-way sync with no middleware]]></title>
        <id>https://docs.sku.io/release-notes/2026/07/24/airtable-integration</id>
        <link href="https://docs.sku.io/release-notes/2026/07/24/airtable-integration"/>
        <updated>2026-07-24T09:00:00.000Z</updated>
        <summary type="html"><![CDATA[Connect Airtable and sync products, inventory, orders, and suppliers both ways — no Zapier, no CSV round-trips, no paid connector in between.]]></summary>
        <content type="html"><![CDATA[<p>If your team plans in Airtable — merchandising calendars, purchasing boards, ops trackers — keeping it in step with SKU.io has meant CSV round-trips or a paid middleware subscription that breaks the moment either side changes. The new <strong>Airtable integration</strong> removes the bridge entirely: connect your Airtable account and SKU.io syncs your operational data <strong>both ways</strong>, on a schedule or in near-real-time. Push products, inventory, orders, purchase orders, and suppliers into your own Airtable base — or let SKU.io build a ready-made base for you in one click — and when someone edits a safe field in Airtable, review the change before it updates your catalog. It's a first-party, two-way connector with nothing in the middle.</p>
<p><strong>✨ What this means for you:</strong></p>
<ul>
<li class=""><strong>No middleware.</strong> Connect Airtable directly from SKU.io — no Zapier, no Make, no per-task billing, no third vendor to blame when a sync breaks.</li>
<li class=""><strong>Both directions.</strong> Push SKU.io data into Airtable, <em>and</em> let a narrow, safe set of Airtable edits flow back into your catalog for review.</li>
<li class=""><strong>A base in one click.</strong> Let SKU.io provision a ready-made "Ops Hub" base — the right tables and field types, pre-mapped and backfilled — so you're synced in minutes.</li>
<li class=""><strong>On your schedule.</strong> Sync every 15 minutes, hourly, daily, on demand, or in real time as records change.</li>
<li class=""><strong>Safe by design.</strong> Only fields you map are written, and inbound edits can never touch order status, inventory, costs, or pricing.</li>
</ul>
<h2 class="anchor anchorTargetStickyNavbar_Vzrq" id="connect-your-account--and-see-everything-in-one-place">Connect your account — and see everything in one place<a href="https://docs.sku.io/release-notes/2026/07/24/airtable-integration#connect-your-account--and-see-everything-in-one-place" class="hash-link" aria-label="Direct link to Connect your account — and see everything in one place" title="Direct link to Connect your account — and see everything in one place" translate="no">​</a></h2>
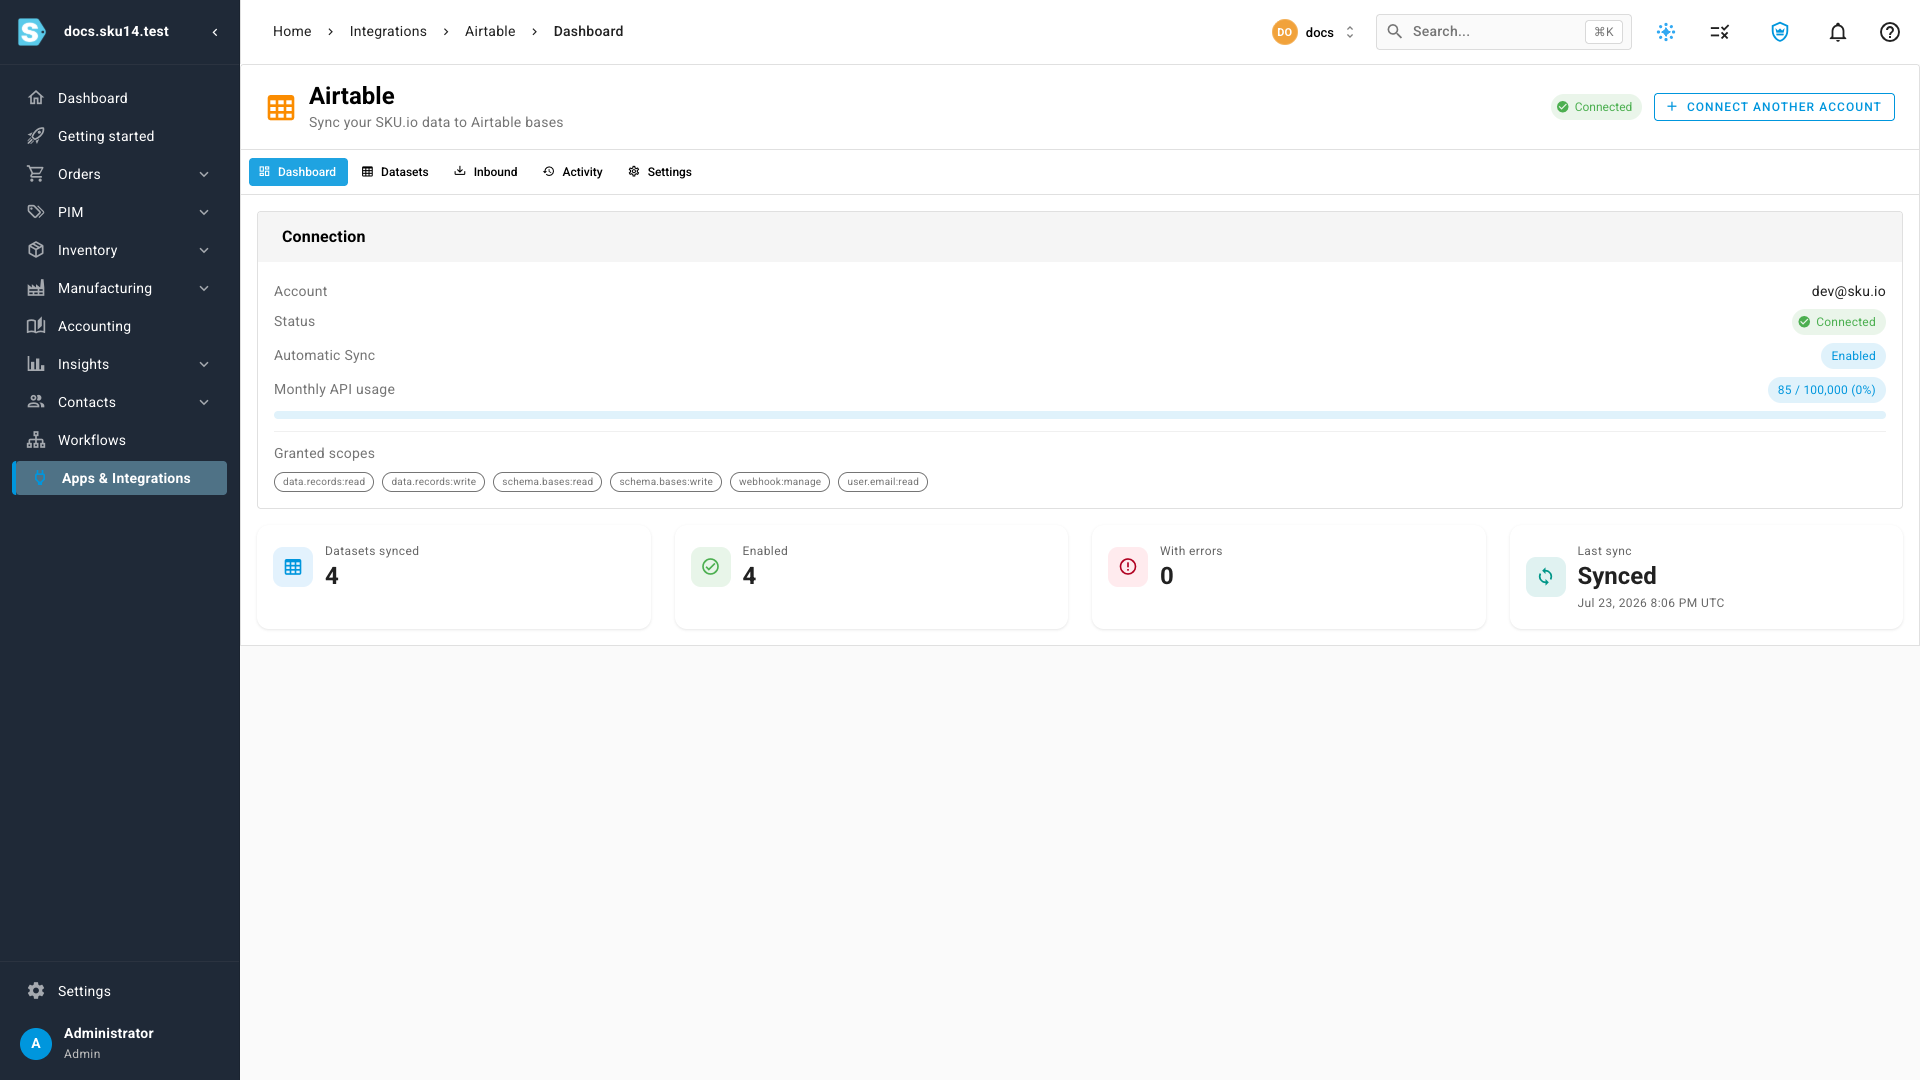
<p>Connecting is a single OAuth handshake: open <strong>Apps &amp; Integrations → Airtable</strong>, select <strong>Connect Airtable</strong>, and grant access in the Airtable window. Once connected, a dashboard shows your account, connection status, the exact scopes you granted, and your monthly Airtable API usage — so you always know the sync is healthy.</p>
<p><img decoding="async" loading="lazy" alt="The Airtable dashboard in SKU.io showing a connected account, connection status, monthly API usage meter, granted scopes, and quick stats for datasets synced and last sync" src="https://docs.sku.io/assets/images/connected-dashboard-e77db40394c2a6094b8884b5c0548d82.png" width="1920" height="1080" class="img_ev3q"></p>
<h2 class="anchor anchorTargetStickyNavbar_Vzrq" id="map-any-dataset--and-sync-it-your-way">Map any dataset — and sync it your way<a href="https://docs.sku.io/release-notes/2026/07/24/airtable-integration#map-any-dataset--and-sync-it-your-way" class="hash-link" aria-label="Direct link to Map any dataset — and sync it your way" title="Direct link to Map any dataset — and sync it your way" translate="no">​</a></h2>
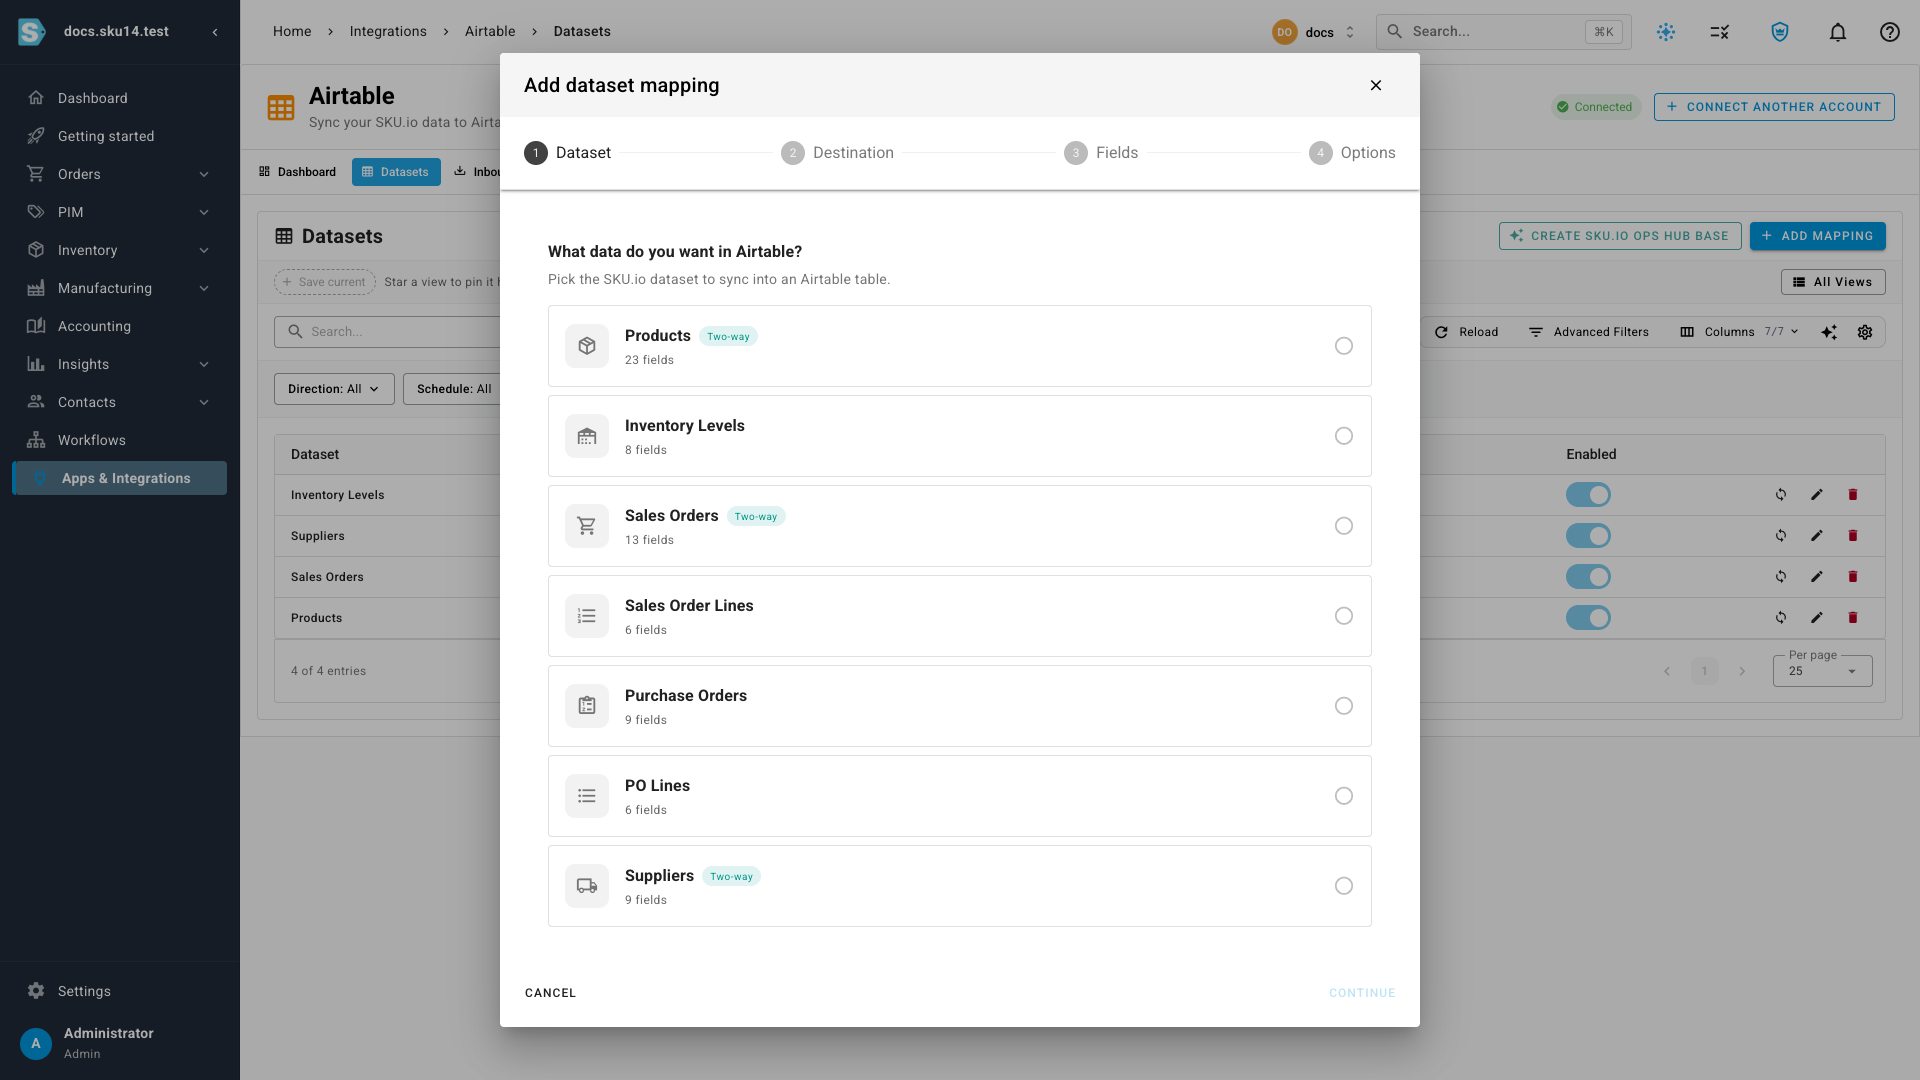
<p>Each row on the <strong>Datasets</strong> tab ties one SKU.io dataset to one Airtable table. A guided wizard walks you through the dataset, the destination base and table, the field mapping, and the options — sync direction, schedule, real-time push, and how deletions are handled. Seven datasets are available; <strong>Products</strong>, <strong>Sales Orders</strong>, and <strong>Suppliers</strong> can sync two ways.</p>
<p><img decoding="async" loading="lazy" alt="The Add dataset mapping wizard open on step one, listing the syncable datasets — Products, Inventory Levels, Sales Orders, and more — with two-way badges on the datasets that support inbound sync" src="https://docs.sku.io/assets/images/mapping-wizard-11a339bca71c2524a34fcecf87cbdedf.png" width="1920" height="1080" class="img_ev3q"></p>
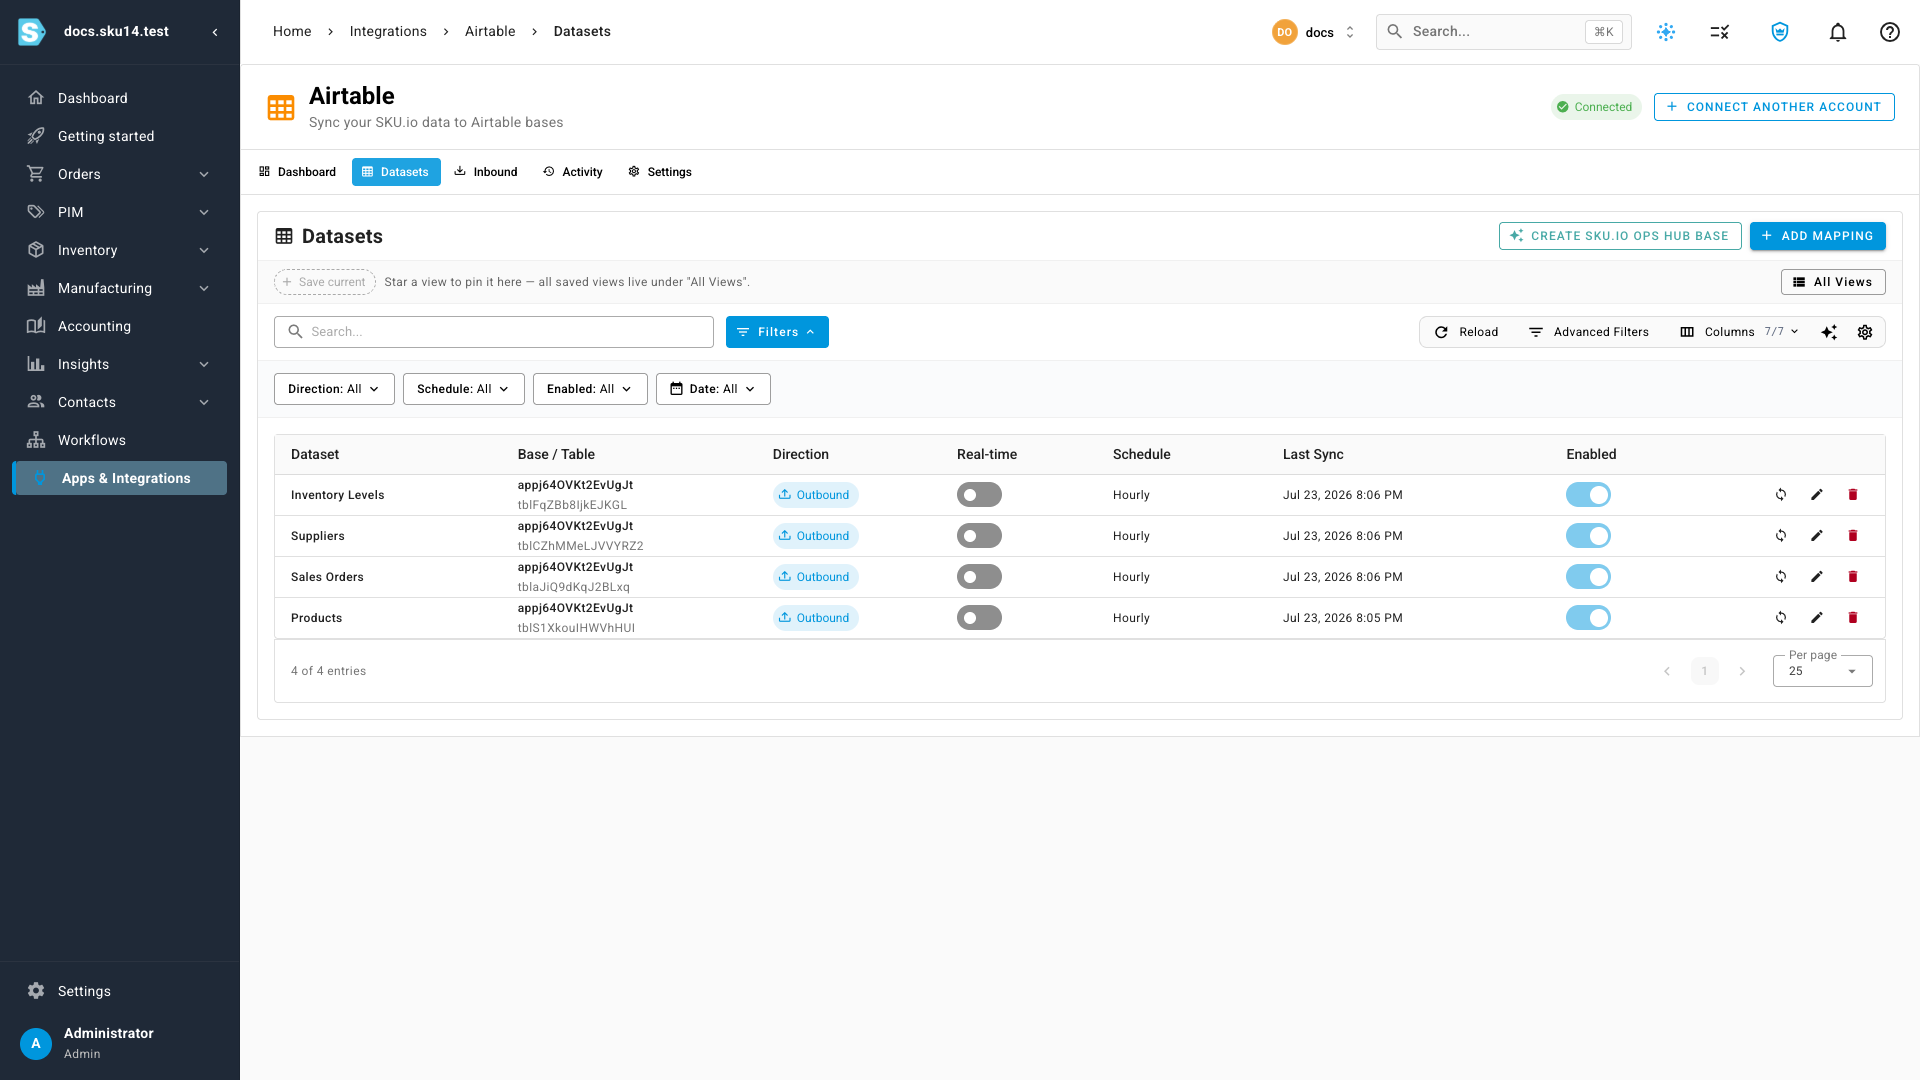
<p>Once a dataset is mapped, push the latest data any time with <strong>Sync now</strong>, or let it run on the schedule you chose. SKU.io matches records by a stable key, so repeat syncs update the same Airtable rows instead of creating duplicates.</p>
<p><img decoding="async" loading="lazy" alt="The Datasets tab listing mappings for Products, Sales Orders, Suppliers, and Inventory Levels — each showing its Airtable base and table, direction, schedule, real-time toggle, and last-sync time" src="https://docs.sku.io/assets/images/datasets-ec91ec46d67610bb350b8475b1d11dec.png" width="1920" height="1080" class="img_ev3q"></p>
<h2 class="anchor anchorTargetStickyNavbar_Vzrq" id="let-airtable-enrich-your-catalog--safely">Let Airtable enrich your catalog — safely<a href="https://docs.sku.io/release-notes/2026/07/24/airtable-integration#let-airtable-enrich-your-catalog--safely" class="hash-link" aria-label="Direct link to Let Airtable enrich your catalog — safely" title="Direct link to Let Airtable enrich your catalog — safely" translate="no">​</a></h2>
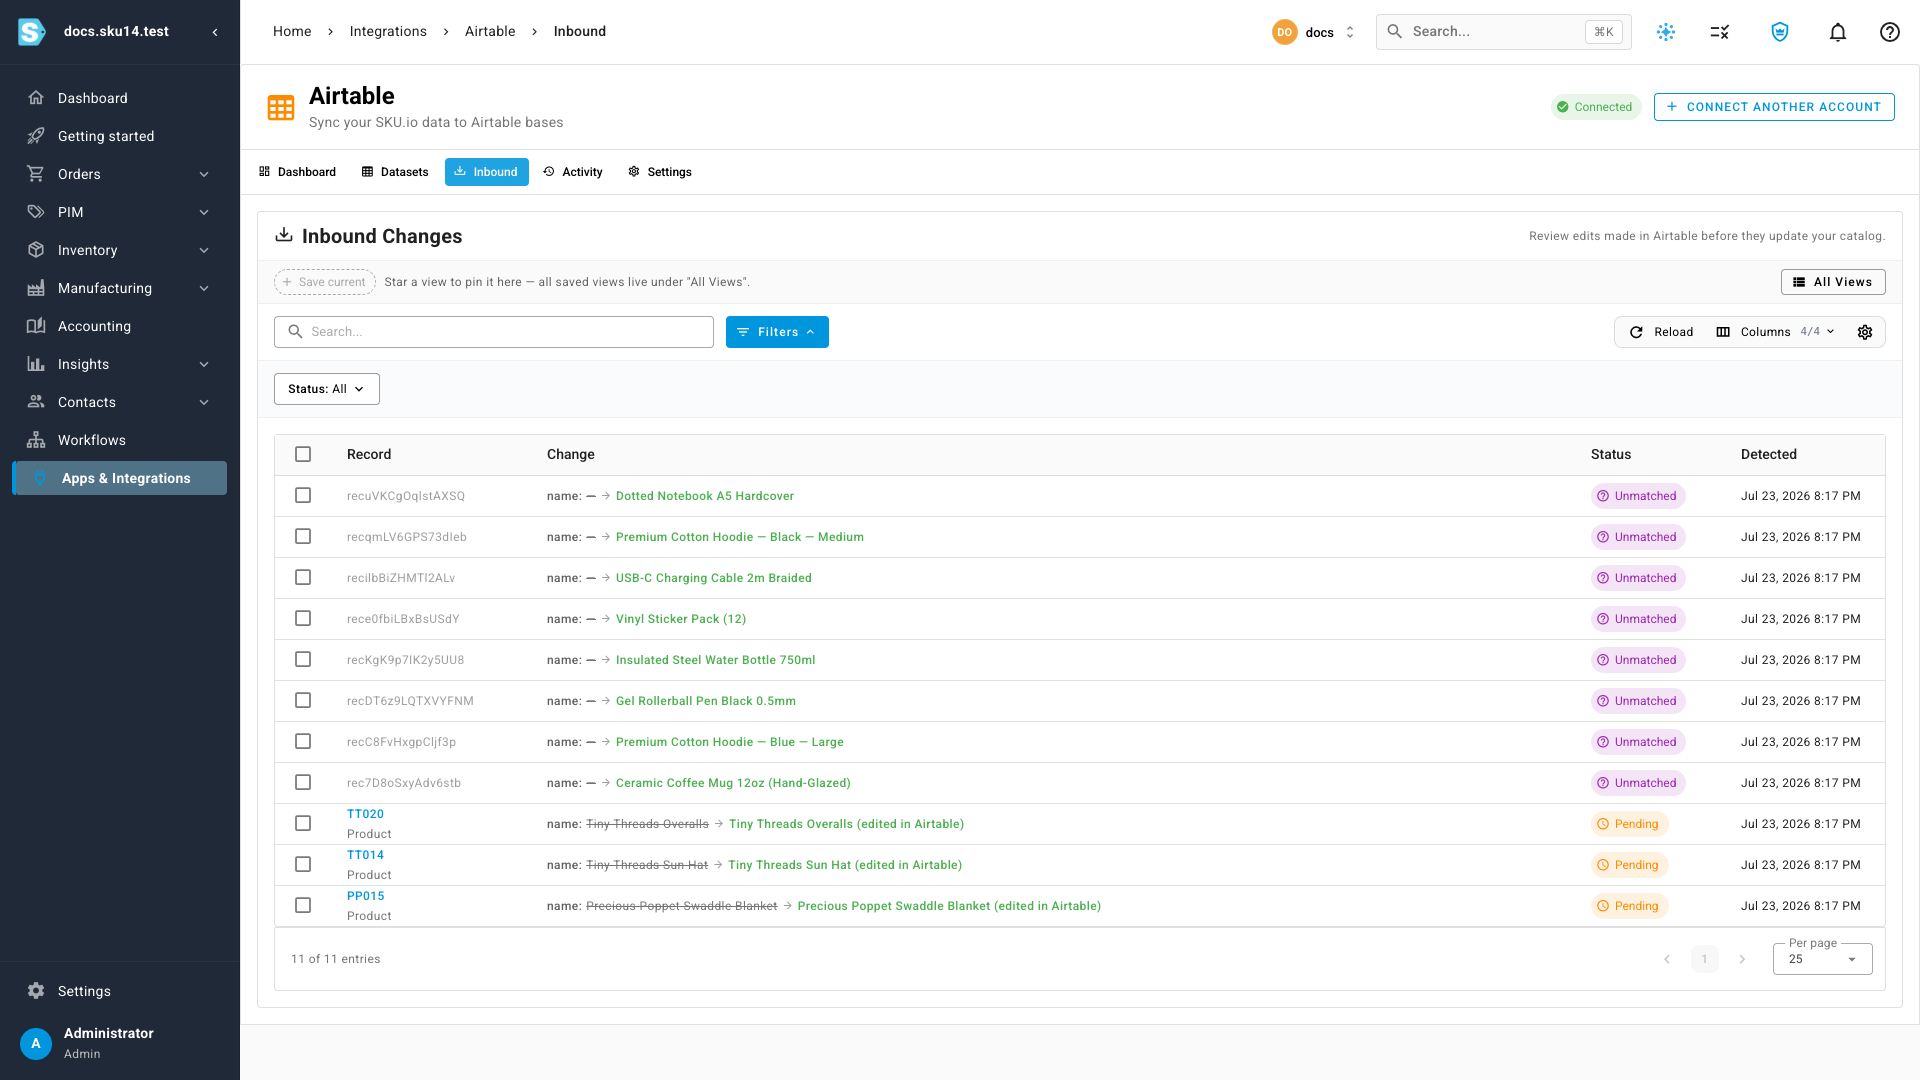
<p>Airtable is a great place for content and planning teams to work, so the integration lets a whitelisted set of edits flow <strong>back</strong> into SKU.io. When someone changes a safe field in Airtable, the change lands in an <strong>Inbound</strong> review queue — showing the record it affects, the old and new values, and a status — so you approve it before it updates your catalog. Operational fields like order status, inventory, costs, and pricing are never writable from Airtable.</p>
<p><img decoding="async" loading="lazy" alt="The Inbound review queue showing proposed changes from Airtable — pending edits with a before-and-after diff linked to their SKU.io product, alongside unmatched rows" src="https://docs.sku.io/assets/images/inbound-review-2dc16042944caa58ff725b07ed6bbd04.png" width="1920" height="1080" class="img_ev3q"></p>
<h2 class="anchor anchorTargetStickyNavbar_Vzrq" id="where-to-find-it">Where to find it<a href="https://docs.sku.io/release-notes/2026/07/24/airtable-integration#where-to-find-it" class="hash-link" aria-label="Direct link to Where to find it" title="Direct link to Where to find it" translate="no">​</a></h2>
<p>Open <strong>Apps &amp; Integrations → Airtable</strong> and select <strong>Connect Airtable</strong> to get started. For step-by-step guides and short walkthrough videos — connecting, mapping and syncing, reviewing inbound changes, and the full field reference — see the <a href="https://docs.sku.io/guides/integrations/airtable/" target="_blank" rel="noopener noreferrer" class="">Airtable integration documentation</a>.</p>]]></content>
        <author>
            <name>SKU.io Product Team</name>
            <uri>https://sku.io</uri>
        </author>
        <category label="Major Feature" term="Major Feature"/>
        <category label="New" term="New"/>
        <category label="Integrations" term="Integrations"/>
    </entry>
    <entry>
        <title type="html"><![CDATA[Customizable dashboards — build the view your business runs on]]></title>
        <id>https://docs.sku.io/release-notes/2026/07/24/customizable-dashboards</id>
        <link href="https://docs.sku.io/release-notes/2026/07/24/customizable-dashboards"/>
        <updated>2026-07-24T09:00:00.000Z</updated>
        <summary type="html"><![CDATA[Add, arrange and resize widgets on your home dashboard, keep several dashboards for different jobs, and switch between them in one click.]]></summary>
        <content type="html"><![CDATA[<p>Your home dashboard used to be one fixed layout — the same handful of cards for everyone, whether you live in sales, purchasing, or the warehouse. Now it's yours to shape. <strong>Customizable dashboards</strong> let you add any of 100+ widgets — KPIs, trend charts, gauges, leaderboards and live activity — then drag, resize and arrange them exactly how you want. Keep separate dashboards for different jobs (an Overview, a Sales view, an Operations view) and switch between them with one click. Everything is drawn from your live data, so the moment a widget lands on your board it's already showing real numbers.</p>
<p><strong>✨ What this means for you:</strong></p>
<ul>
<li class=""><strong>A dashboard per job.</strong> Build an <em>Overview</em>, a <em>Sales</em> board, an <em>Operations</em> board — as many as you need — and flip between them instantly.</li>
<li class=""><strong>100+ widgets, one picker.</strong> Browse by category or search, and drop in exactly the metrics you care about.</li>
<li class=""><strong>See it before you add it.</strong> A live preview renders each widget with <em>your</em> data, so you never add a card and hope.</li>
<li class=""><strong>Arrange it your way.</strong> Drag widgets to reorder, resize them from a third of the row up to full width, and reorder your dashboards themselves.</li>
<li class=""><strong>Works on your phone.</strong> Your dashboards follow you to mobile in a clean single-column view.</li>
</ul>
<h2 class="anchor anchorTargetStickyNavbar_Vzrq" id="add-exactly-the-widgets-you-want">Add exactly the widgets you want<a href="https://docs.sku.io/release-notes/2026/07/24/customizable-dashboards#add-exactly-the-widgets-you-want" class="hash-link" aria-label="Direct link to Add exactly the widgets you want" title="Direct link to Add exactly the widgets you want" translate="no">​</a></h2>
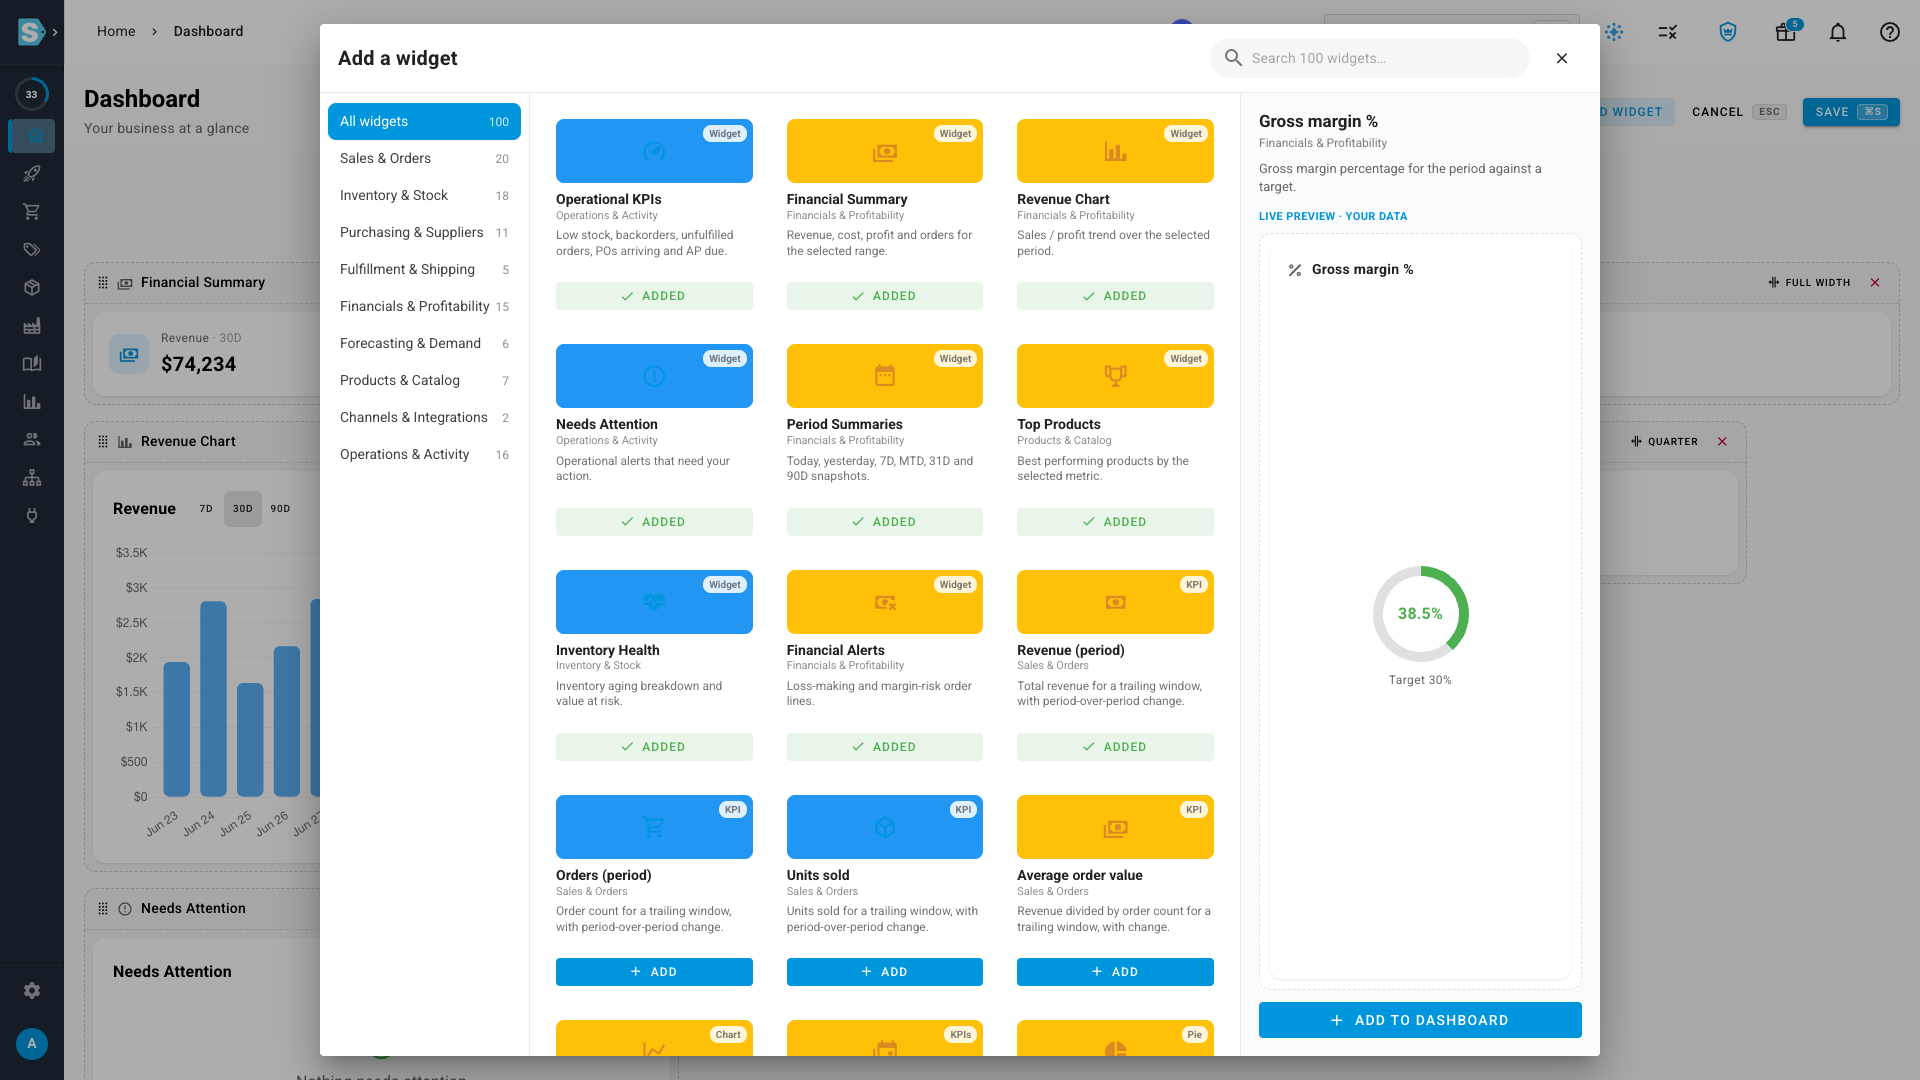
<p>Click <strong>Customize</strong>, then <strong>Add widget</strong>, and the widget picker opens. On the left, widgets are grouped by area — Sales &amp; Orders, Inventory &amp; Stock, Financials &amp; Profitability, Forecasting &amp; Demand, and more — or you can search all 100+ at once. Pick a card and the panel on the right shows a <strong>live preview built from your real data</strong>, so you know precisely what you're getting before it goes on the board.</p>
<p><img decoding="async" loading="lazy" alt="The widget picker with categories on the left, a searchable gallery of widgets, and a live preview of the selected widget on the right" src="https://docs.sku.io/assets/images/widget-picker-861115df05897d75b4d9eae03778396c.png" width="1920" height="1080" class="img_ev3q"></p>
<p>Add a widget and it drops onto your dashboard and scrolls into view. In edit mode you can drag any widget to reorder it, set its width, or remove it — then <strong>Save</strong> (or just press ⌘/Ctrl+S). Changed your mind? <strong>Cancel</strong> (or Esc) backs out, and you'll be asked before anything is discarded.</p>
<h2 class="anchor anchorTargetStickyNavbar_Vzrq" id="keep-several-dashboards-and-switch-in-a-click">Keep several dashboards and switch in a click<a href="https://docs.sku.io/release-notes/2026/07/24/customizable-dashboards#keep-several-dashboards-and-switch-in-a-click" class="hash-link" aria-label="Direct link to Keep several dashboards and switch in a click" title="Direct link to Keep several dashboards and switch in a click" translate="no">​</a></h2>
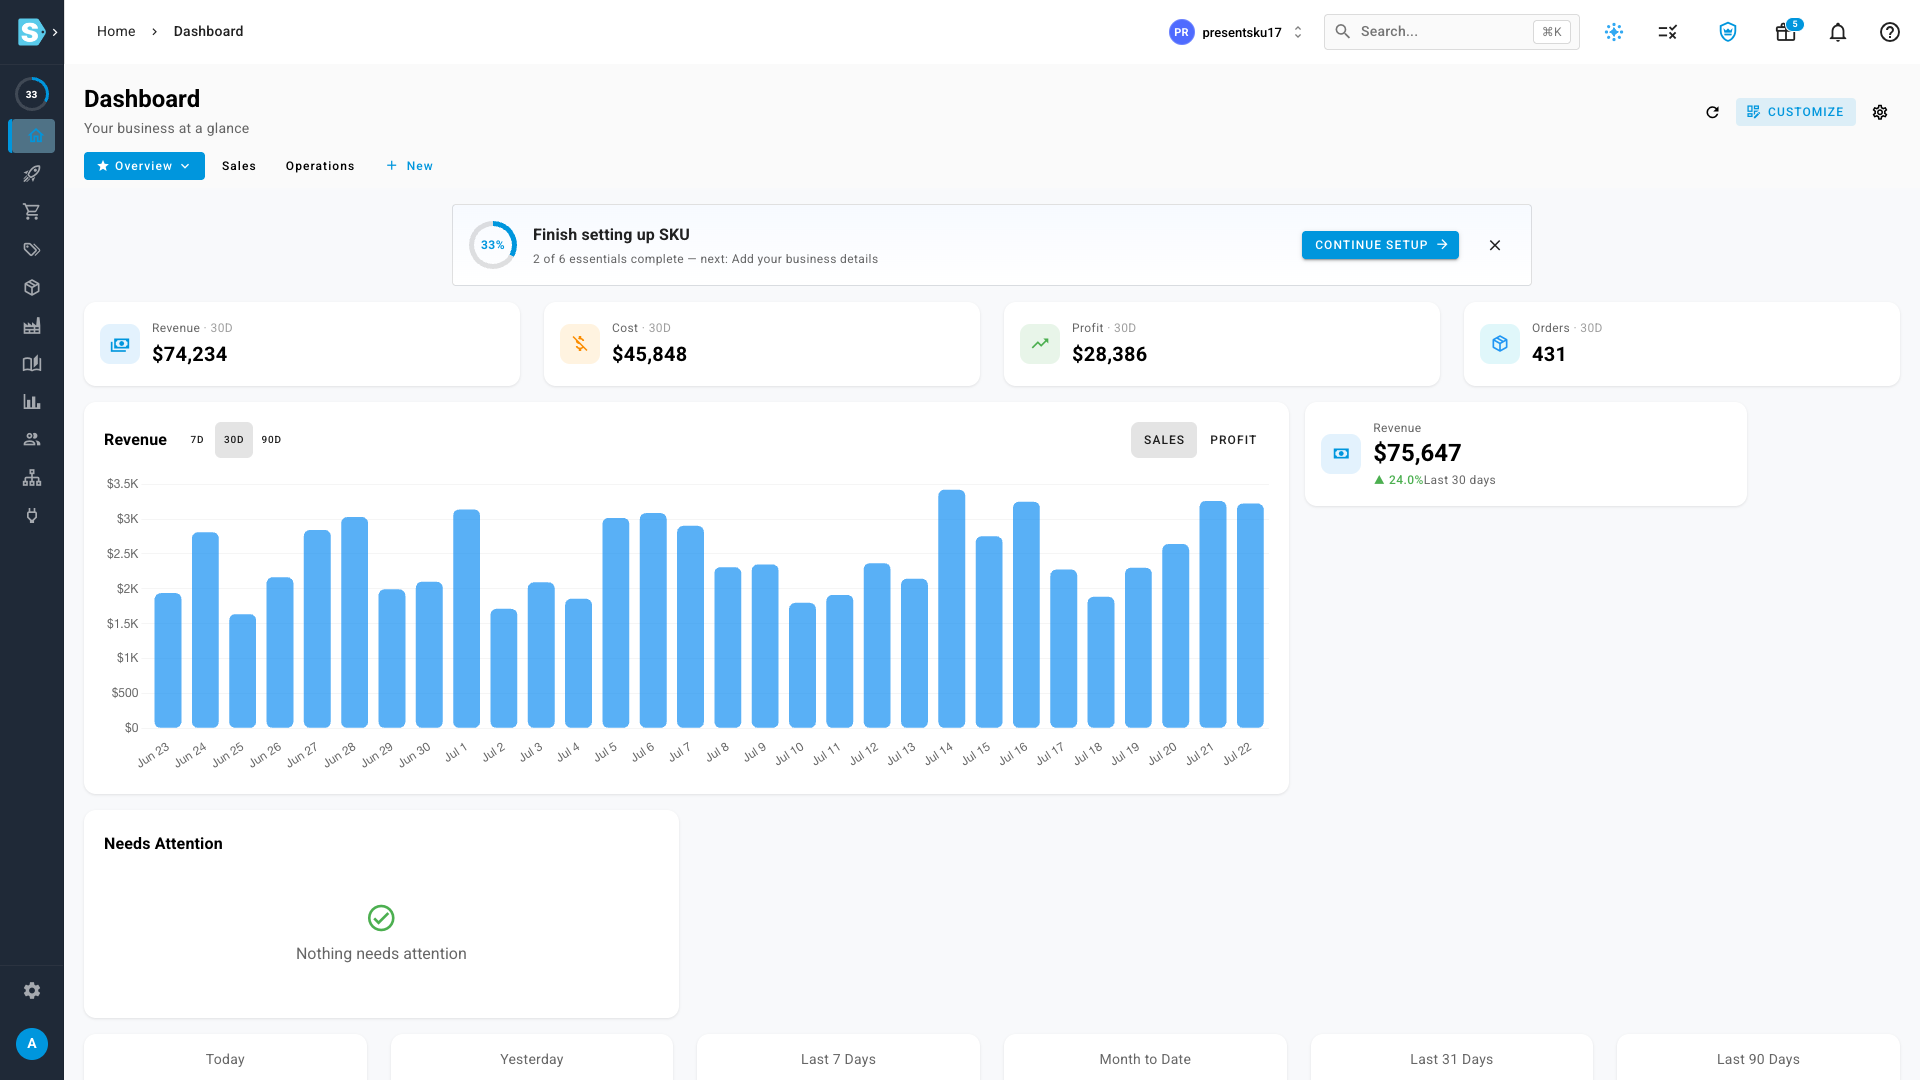
<p>One board rarely fits every role. Create as many named dashboards as you like and switch between them from the tabs at the top — each remembers its own set of widgets and layout. Rename them, set a default that opens when you sign in, drag the tabs to reorder them, and delete the ones you no longer need.</p>
<p><img decoding="async" loading="lazy" alt="The dashboard showing tabs for Overview, Sales and Operations, with revenue, cost, profit and orders KPIs and a revenue trend chart" src="https://docs.sku.io/assets/images/dashboard-d629703af139d44820c71c13146d7a1a.png" width="1920" height="1080" class="img_ev3q"></p>
<h2 class="anchor anchorTargetStickyNavbar_Vzrq" id="take-it-with-you">Take it with you<a href="https://docs.sku.io/release-notes/2026/07/24/customizable-dashboards#take-it-with-you" class="hash-link" aria-label="Direct link to Take it with you" title="Direct link to Take it with you" translate="no">​</a></h2>
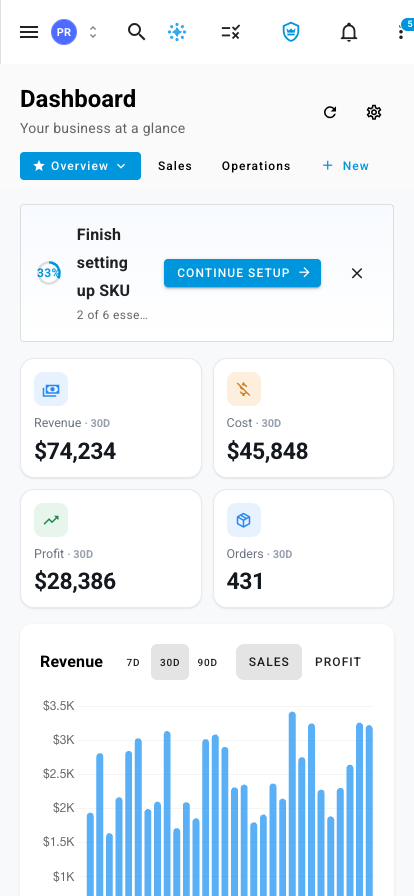
<p>Your dashboards aren't just a desktop thing. On a phone, the same board you built stacks into a clean single column, and the tab switcher comes along so you can jump between your Overview, Sales and Operations views on the go.</p>
<p><img decoding="async" loading="lazy" alt="The dashboard on a mobile phone, showing the dashboard tabs and widgets stacked in a single column" src="https://docs.sku.io/assets/images/mobile-f3a33a9751d1f9279cd37b8c4402aa7b.png" width="414" height="896" class="img_ev3q"></p>
<h2 class="anchor anchorTargetStickyNavbar_Vzrq" id="where-to-find-it">Where to find it<a href="https://docs.sku.io/release-notes/2026/07/24/customizable-dashboards#where-to-find-it" class="hash-link" aria-label="Direct link to Where to find it" title="Direct link to Where to find it" translate="no">​</a></h2>
<p>It's your home screen. Open <strong>Dashboard</strong> from the main menu, then click <strong>Customize</strong> in the top-right to add, arrange and resize widgets, and use the tabs beneath the title to create and switch between dashboards.</p>
<p><strong>Full guide:</strong> <a href="https://docs.sku.io/guides/dashboard/customize-your-dashboard" target="_blank" rel="noopener noreferrer" class="">Customize your dashboard</a></p>]]></content>
        <author>
            <name>SKU.io Product Team</name>
            <uri>https://sku.io</uri>
        </author>
        <category label="Major Feature" term="Major Feature"/>
        <category label="New" term="New"/>
        <category label="Reporting" term="Reporting"/>
    </entry>
    <entry>
        <title type="html"><![CDATA[Trend-aware forecasting — your baseline keeps up with growth, and promotions scale with it]]></title>
        <id>https://docs.sku.io/release-notes/2026/07/23/trend-aware-forecasting</id>
        <link href="https://docs.sku.io/release-notes/2026/07/23/trend-aware-forecasting"/>
        <updated>2026-07-23T17:00:00.000Z</updated>
        <summary type="html"><![CDATA[Demand planning can now follow a product's growth instead of a flat average, show exactly how each number is built, and turn a past promotion into a lift that re-applies at today's volume.]]></summary>
        <content type="html"><![CDATA[<p>Your demand-planning forecast has always turned recent sales into a reorder quantity — but it treated every product as if it sold at one steady pace. A SKU that has tripled over the last quarter was still planned off its flat average, so you under-bought your fastest movers and over-bought the ones winding down. And when you wanted to plan for a promotion you'd run before, you had to eyeball last year's numbers and mentally scale them up. <strong>Trend-aware forecasting</strong> changes both: the baseline can now follow a product's trend instead of a flat mean, every recommendation shows exactly how it was built, and a promotion you measured once becomes a reusable lift that automatically scales with how much your business has grown.</p>
<p><strong>✨ What this means for you:</strong></p>
<ul>
<li class="">Choose <strong>how each baseline is calculated</strong> — a flat average, a recency-weighted average, or a <strong>damped trend</strong> that projects recent growth forward without overshooting.</li>
<li class="">A <strong>growing</strong> product is planned closer to its <em>current</em> pace, not a stale average; a <strong>declining</strong> one winds down instead of over-ordering.</li>
<li class="">Every recommendation now shows its <strong>decomposition</strong> — base velocity, the trend applied, and the final daily rate — so you can see exactly <em>why</em> the number moved.</li>
<li class=""><strong>One-off spikes</strong> — a past promotion, a data glitch — can be <strong>excluded from the baseline automatically</strong>, so they don't inflate your everyday demand.</li>
<li class="">Turn a <strong>past promotion into a reusable lift</strong>: measure it once, and it re-applies at <em>today's</em> volume — a promo that lifted you 2.5× still lifts 2.5× after you've doubled.</li>
<li class=""><strong>Promo windows are suggested for you</strong> from detected sales spikes, so you confirm a date range instead of typing one.</li>
<li class="">The <strong>full decomposition downloads with your export</strong>, alongside the confidence and rationale you already get.</li>
</ul>
<h2 class="anchor anchorTargetStickyNavbar_Vzrq" id="pick-how-your-baseline-is-calculated">Pick how your baseline is calculated<a href="https://docs.sku.io/release-notes/2026/07/23/trend-aware-forecasting#pick-how-your-baseline-is-calculated" class="hash-link" aria-label="Direct link to Pick how your baseline is calculated" title="Direct link to Pick how your baseline is calculated" translate="no">​</a></h2>
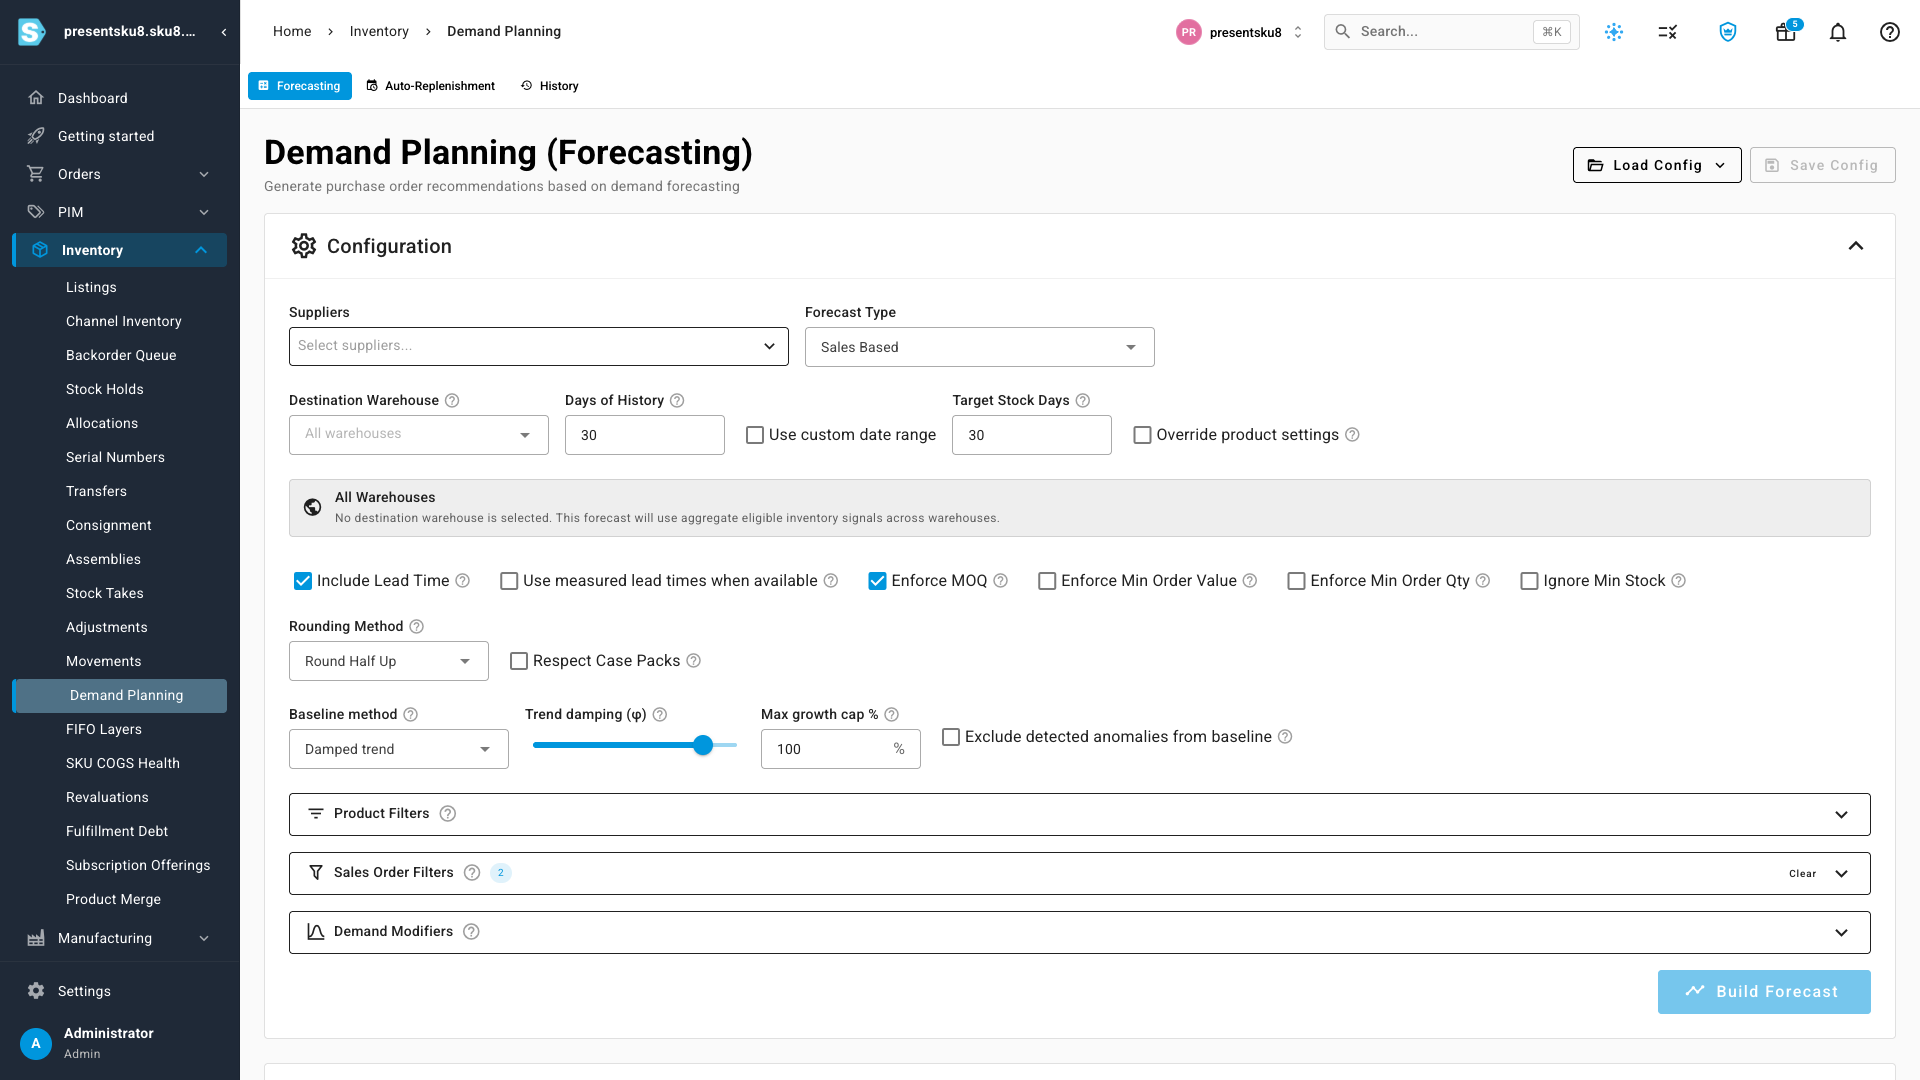
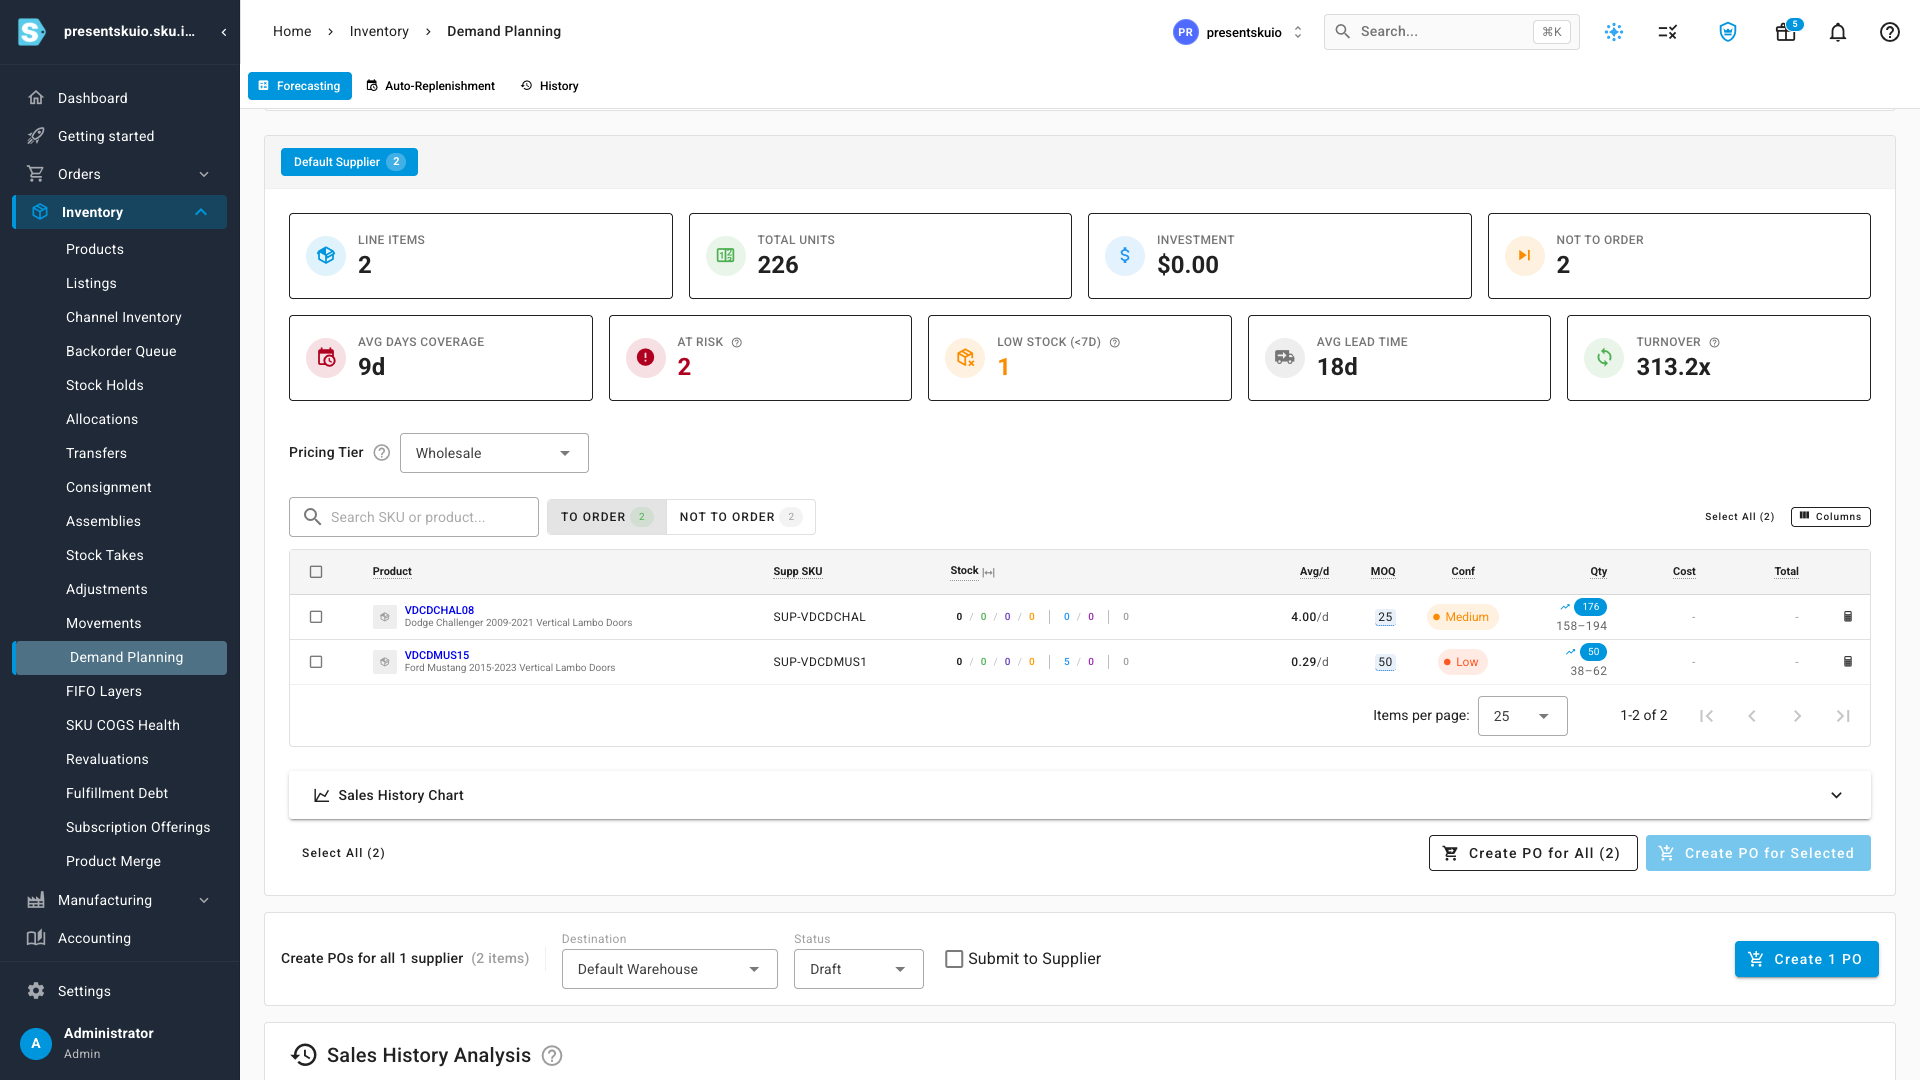
<p>Open <strong>Inventory → Demand Planning</strong> and you'll find a new <strong>Baseline method</strong> control in the forecast configuration. Leave it on <strong>Flat mean</strong> for the classic behavior, or switch to <strong>Recency-weighted</strong> to lean on your most recent sales, or <strong>Damped trend</strong> to project a product's recent growth forward. Choosing Damped trend reveals two dials — <strong>Trend damping</strong>, which controls how strongly the trend carries forward, and a <strong>Max growth cap</strong> so a short-term surge can't run away with your order. There's also an <strong>Exclude detected anomalies from baseline</strong> option that keeps one-off spikes out of your everyday demand.</p>
<p><img decoding="async" loading="lazy" alt="The demand-planning configuration with a new Baseline method selector set to &amp;quot;Damped trend&amp;quot;, showing the Trend damping slider, a Max growth cap, and an &amp;quot;Exclude detected anomalies from baseline&amp;quot; option" src="https://docs.sku.io/assets/images/baseline-method-ee67f722c26f73f7481597511bcce092.png" width="1920" height="1080" class="img_ev3q"></p>
<h2 class="anchor anchorTargetStickyNavbar_Vzrq" id="see-the-number-build-step-by-step">See the number build, step by step<a href="https://docs.sku.io/release-notes/2026/07/23/trend-aware-forecasting#see-the-number-build-step-by-step" class="hash-link" aria-label="Direct link to See the number build, step by step" title="Direct link to See the number build, step by step" translate="no">​</a></h2>
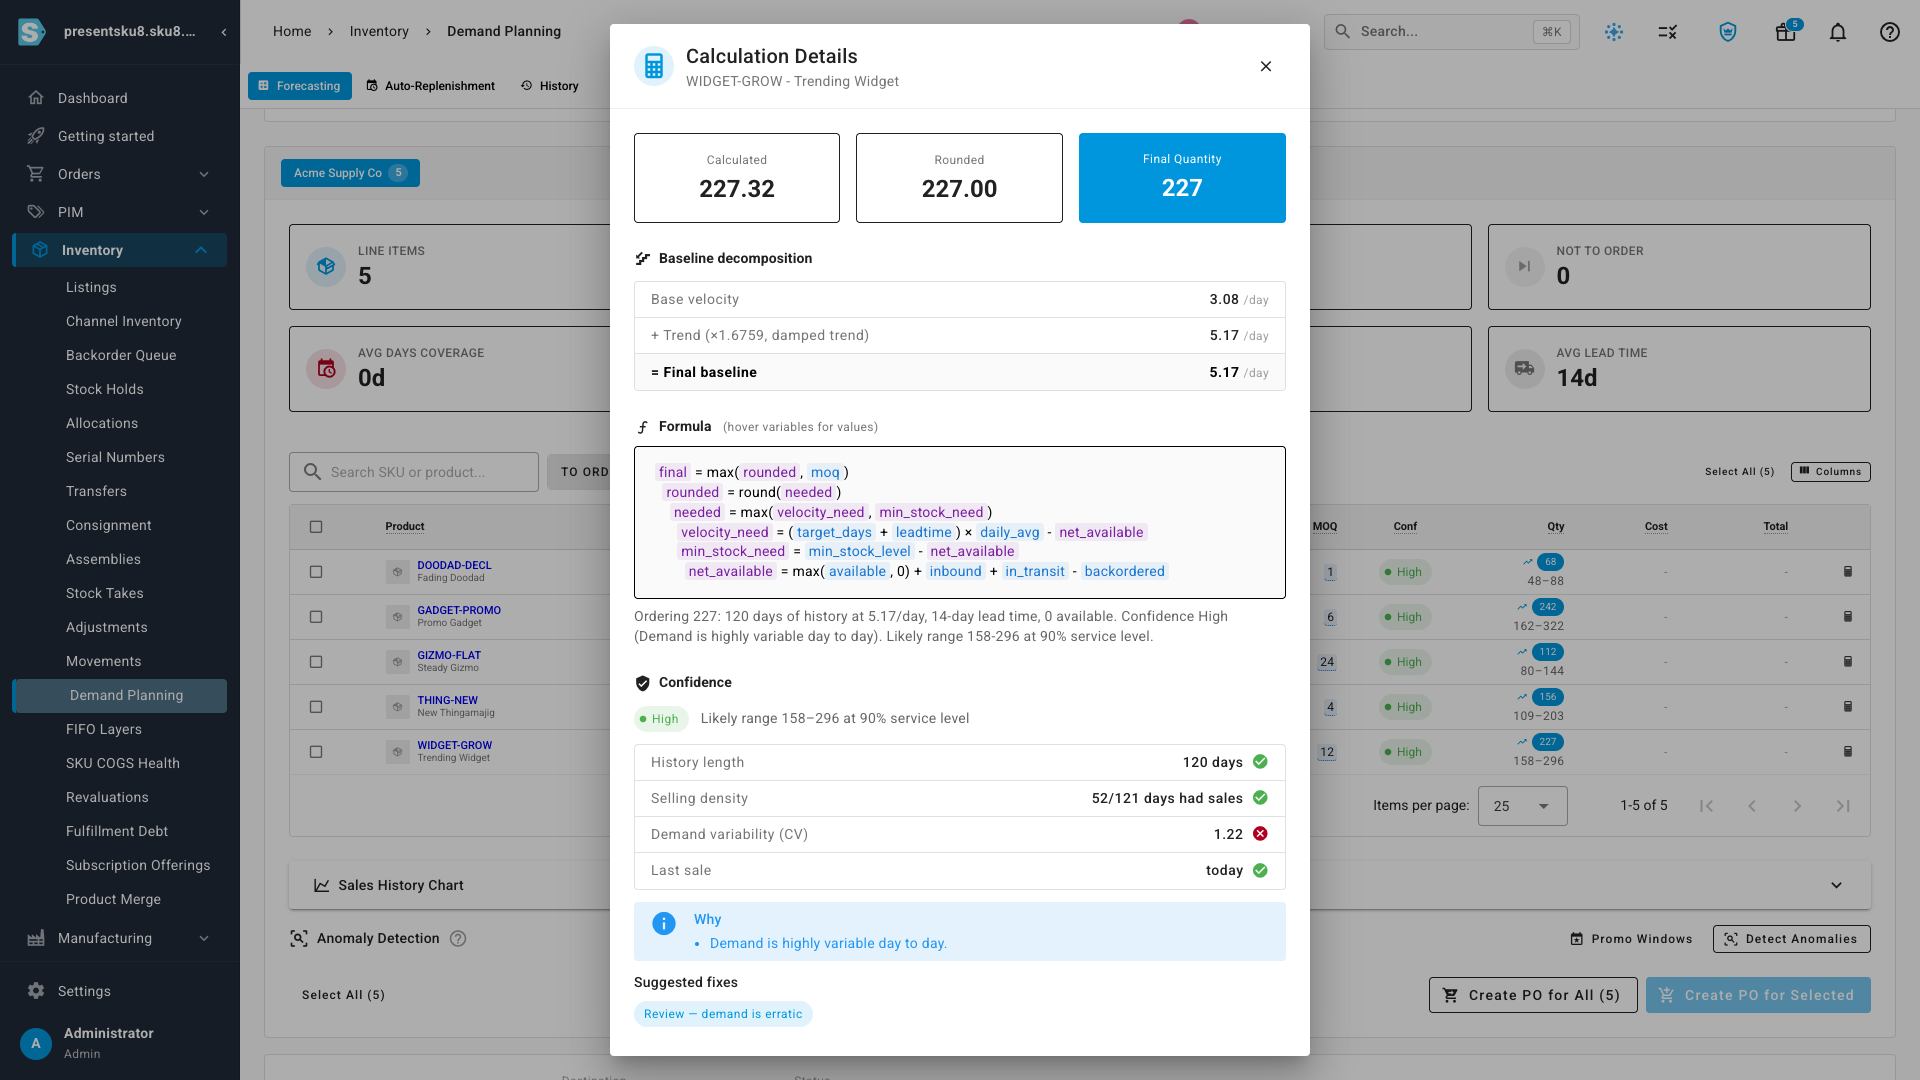
<p>Build the forecast and each line's daily rate now reflects its trend — a fast-growing product reads noticeably higher than its flat average, a fading one reads lower. Click the <strong>calculator icon</strong> on any row and the calculation detail opens with a new <strong>Baseline decomposition</strong>: it shows the <strong>base velocity</strong> the product would sell at flat, the <strong>trend</strong> that was applied (and whether the growth cap kicked in), and the <strong>final baseline</strong> the order is built from — so the reason behind every recommendation is right there, not hidden in an average.</p>
<p><img decoding="async" loading="lazy" alt="The calculation detail showing a Baseline decomposition: base velocity 3.08/day, a damped trend factor lifting it to 5.17/day, and the final baseline — above the interactive formula" src="https://docs.sku.io/assets/images/decomposition-73ccc21023dc6964f10a86f9f09738f0.png" width="1920" height="1080" class="img_ev3q"></p>
<h2 class="anchor anchorTargetStickyNavbar_Vzrq" id="re-use-a-promotion--and-let-it-grow-with-you">Re-use a promotion — and let it grow with you<a href="https://docs.sku.io/release-notes/2026/07/23/trend-aware-forecasting#re-use-a-promotion--and-let-it-grow-with-you" class="hash-link" aria-label="Direct link to Re-use a promotion — and let it grow with you" title="Direct link to Re-use a promotion — and let it grow with you" translate="no">​</a></h2>
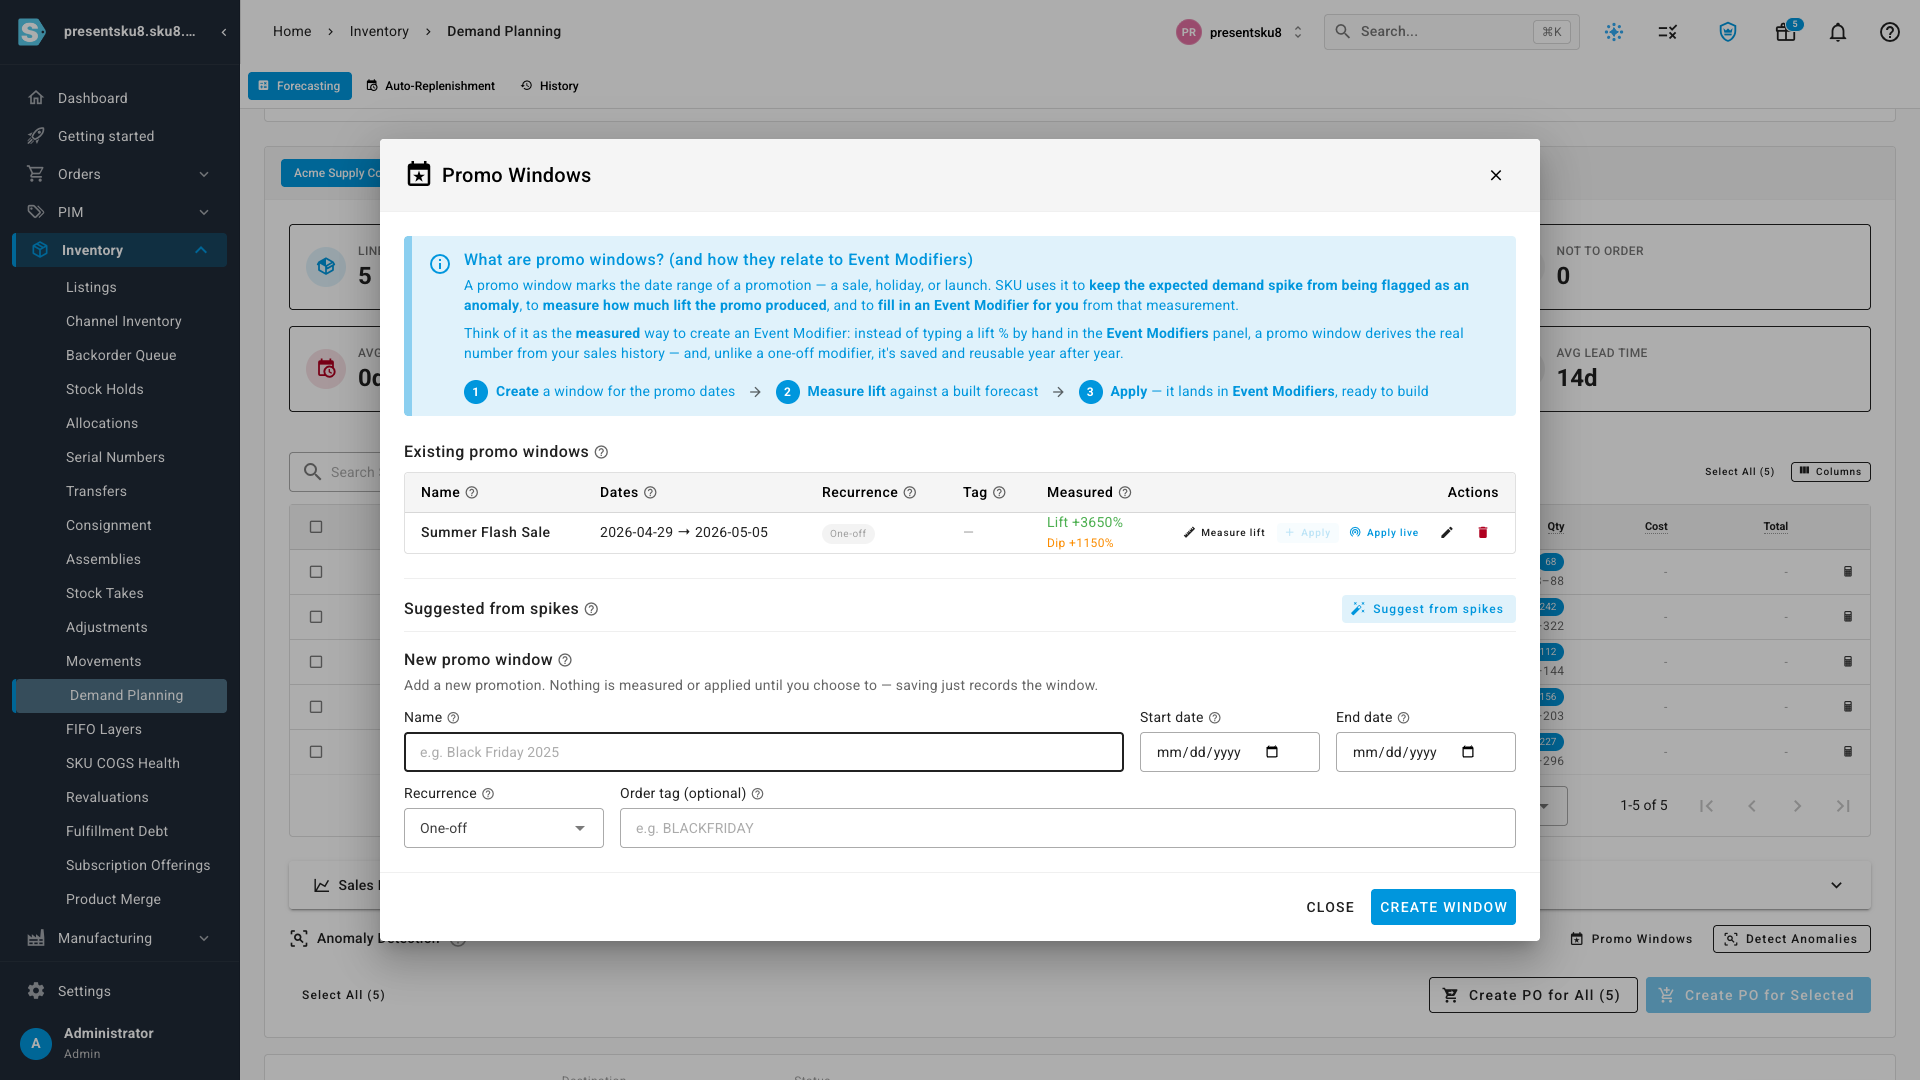
<p>Ran a sale last year and want to plan for it again? Open <strong>Promo Windows</strong>, mark the promotion's dates, and <strong>measure the lift</strong> it produced against your real sales history. From there you can <strong>apply</strong> that lift to your forecast — and because it's stored as a <em>multiplier</em> rather than a fixed number of units, it re-applies at today's volume automatically. A promotion that lifted demand 2.5× still lifts it 2.5× after your baseline has doubled, with nothing to recalculate. To make setup easier, <strong>Suggest from spikes</strong> scans your sales history and proposes the promotion's date range for you.</p>
<p><img decoding="async" loading="lazy" alt="The Promo Windows workspace showing a measured promotion with its lift, an &amp;quot;Apply&amp;quot; action to add it to the forecast, and a &amp;quot;Suggest from spikes&amp;quot; button" src="https://docs.sku.io/assets/images/promo-windows-ebb2f14f1e77d021eb099b73ba1e8327.png" width="1920" height="1080" class="img_ev3q"></p>
<h2 class="anchor anchorTargetStickyNavbar_Vzrq" id="where-to-find-it">Where to find it<a href="https://docs.sku.io/release-notes/2026/07/23/trend-aware-forecasting#where-to-find-it" class="hash-link" aria-label="Direct link to Where to find it" title="Direct link to Where to find it" translate="no">​</a></h2>
<ul>
<li class=""><strong>Choose your baseline:</strong> open <strong>Inventory → Demand Planning</strong>, and in the <strong>Configuration</strong> panel set the <strong>Baseline method</strong> (and, for Damped trend, the damping and growth cap).</li>
<li class=""><strong>See the decomposition:</strong> after you <strong>Build Forecast</strong>, click the <strong>calculator icon</strong> on any line and read the <strong>Baseline decomposition</strong> at the top of the calculation detail.</li>
<li class=""><strong>Re-use a promotion:</strong> open <strong>Promo Windows</strong> from the forecast results, create or <strong>Suggest</strong> a window, <strong>Measure lift</strong>, then <strong>Apply</strong> it — it lands as a demand modifier ready to build.</li>
<li class=""><strong>Take it with you:</strong> click <strong>Export</strong> and keep <strong>Include calculation details</strong> switched on to download the full baseline and promo breakdown for every line.</li>
</ul>]]></content>
        <author>
            <name>SKU.io Product Team</name>
            <uri>https://sku.io</uri>
        </author>
        <category label="Major Feature" term="Major Feature"/>
        <category label="New" term="New"/>
        <category label="Inventory" term="Inventory"/>
    </entry>
    <entry>
        <title type="html"><![CDATA[Per-warehouse lead times — how long each supplier takes to reach each location]]></title>
        <id>https://docs.sku.io/release-notes/2026/07/22/supplier-warehouse-lead-times</id>
        <link href="https://docs.sku.io/release-notes/2026/07/22/supplier-warehouse-lead-times"/>
        <updated>2026-07-22T00:05:00.000Z</updated>
        <summary type="html"><![CDATA[Set a different lead time per warehouse on any supplier, so demand planning orders on the real delivery time for each destination instead of one blended average.]]></summary>
        <content type="html"><![CDATA[<p>Your suppliers rarely reach every one of your warehouses in the same number of days. The same vendor might land stock at your main warehouse in two weeks but take six by sea to a warehouse in another region — yet SKU.io applied a single lead time to every destination, so one of those reorder recommendations was always built on the wrong number. <strong>Per-warehouse lead times</strong> let you set a default lead time on a supplier and then override it for individual warehouses, and demand planning automatically uses the right one for each destination you forecast.</p>
<p><strong>✨ What this means for you:</strong></p>
<ul>
<li class="">Add an <strong>Advanced lead times</strong> override on any supplier — a specific number of days for a specific warehouse — right on its Purchasing settings.</li>
<li class="">Warehouses you don't override simply <strong>inherit the supplier's default</strong> lead time, so you only configure the exceptions.</li>
<li class="">Demand planning and reorder suggestions use the <strong>lead time for the destination warehouse you're forecasting</strong> — so multi-region and multi-warehouse buys stop sharing one blended (and usually wrong) number.</li>
<li class="">Every forecast tells you <strong>which lead time it used</strong> — the supplier's default, a per-warehouse override, or a measured actual from your own receiving history — so the number is always traceable.</li>
</ul>
<h2 class="anchor anchorTargetStickyNavbar_Vzrq" id="set-lead-times-per-warehouse-right-on-the-supplier">Set lead times per warehouse, right on the supplier<a href="https://docs.sku.io/release-notes/2026/07/22/supplier-warehouse-lead-times#set-lead-times-per-warehouse-right-on-the-supplier" class="hash-link" aria-label="Direct link to Set lead times per warehouse, right on the supplier" title="Direct link to Set lead times per warehouse, right on the supplier" translate="no">​</a></h2>
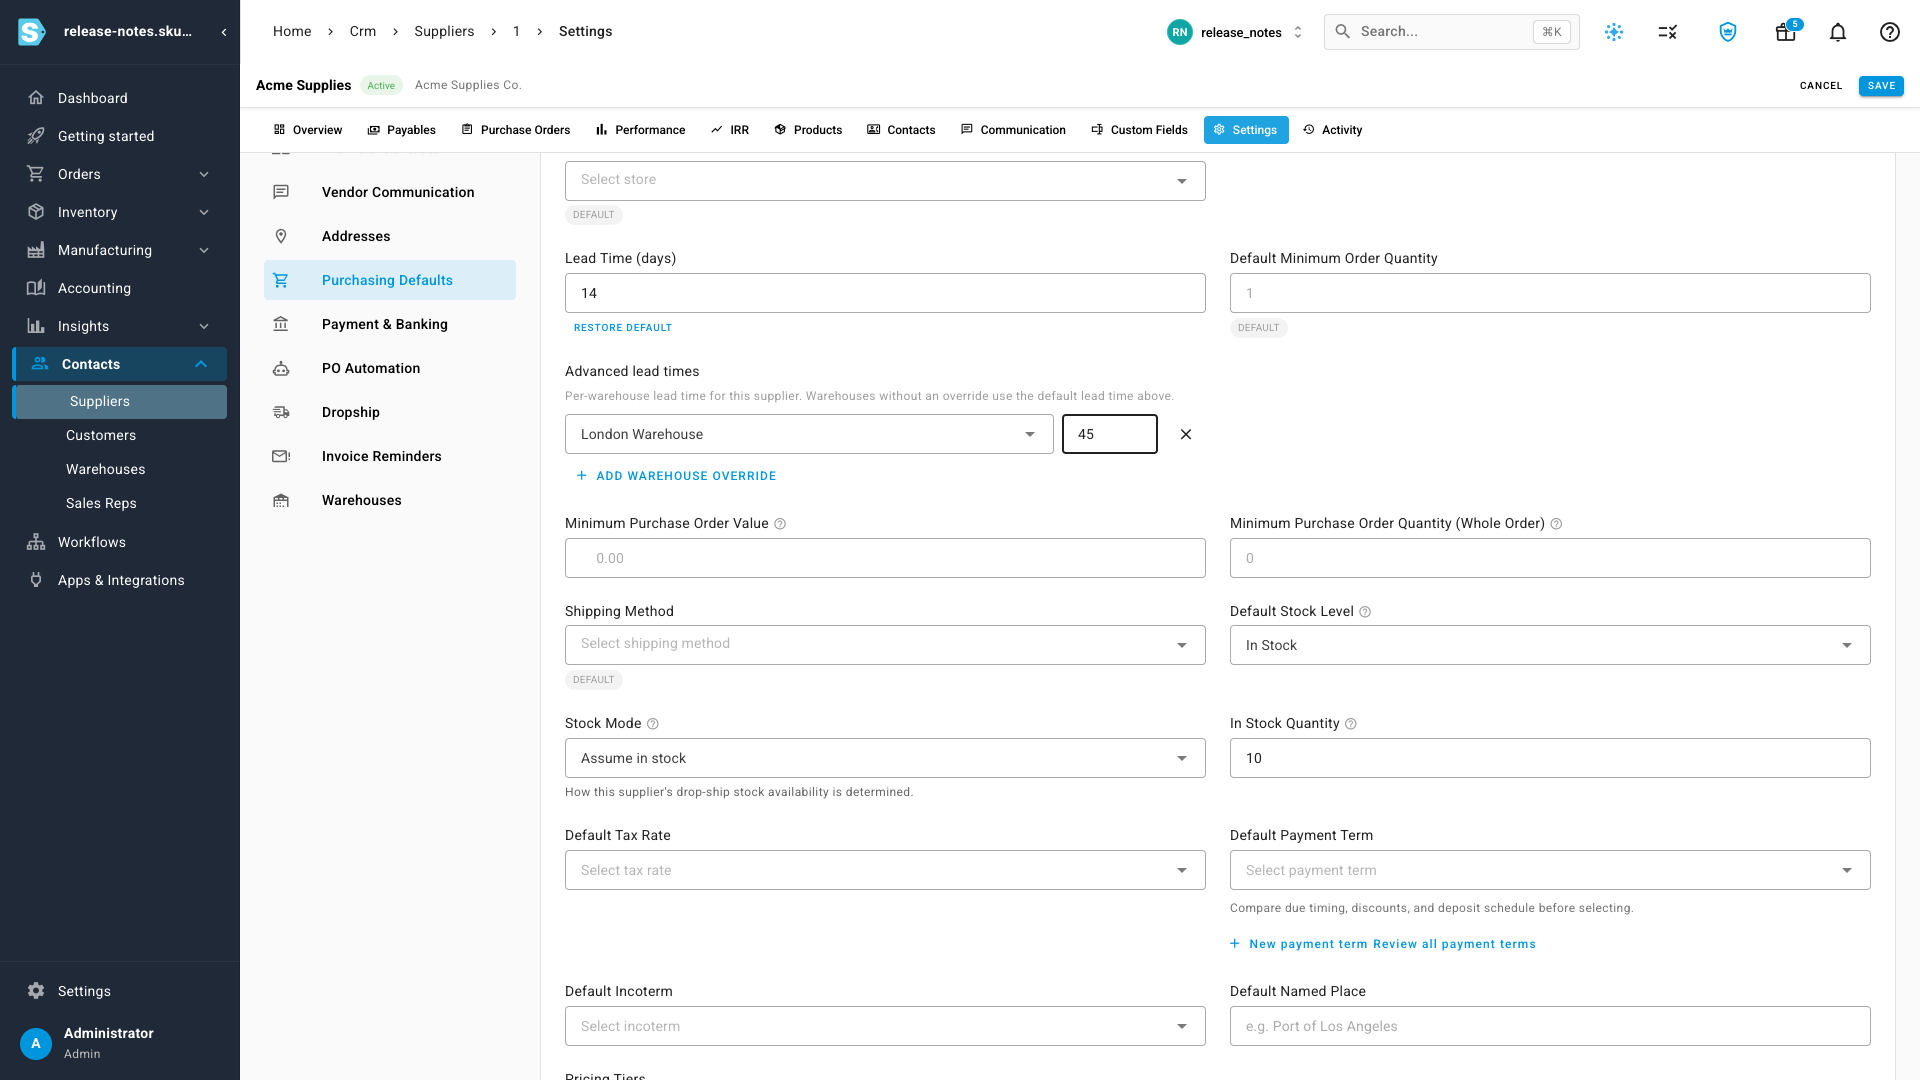
<p>Open a supplier and go to <strong>Purchasing Defaults</strong>. The <strong>Lead Time</strong> field is the supplier's default — used everywhere unless you say otherwise. Just below it, the new <strong>Advanced lead times</strong> section lets you add an override: pick a warehouse, enter the number of days, and add another for each exception you have. In the example below, this supplier normally takes <strong>14 days</strong>, but reaches the <strong>London Warehouse</strong> in <strong>45</strong>.</p>
<p><img decoding="async" loading="lazy" alt="The supplier&amp;#39;s Purchasing Defaults in edit mode: a default Lead Time of 14 days, and a new Advanced lead times section with a per-warehouse override of 45 days set for the London Warehouse" src="https://docs.sku.io/assets/images/advanced-lead-times-911bf82eef0a8176cb3ce66a79c3554f.png" width="1920" height="1080" class="img_ev3q"></p>
<h2 class="anchor anchorTargetStickyNavbar_Vzrq" id="only-configure-the-exceptions">Only configure the exceptions<a href="https://docs.sku.io/release-notes/2026/07/22/supplier-warehouse-lead-times#only-configure-the-exceptions" class="hash-link" aria-label="Direct link to Only configure the exceptions" title="Direct link to Only configure the exceptions" translate="no">​</a></h2>
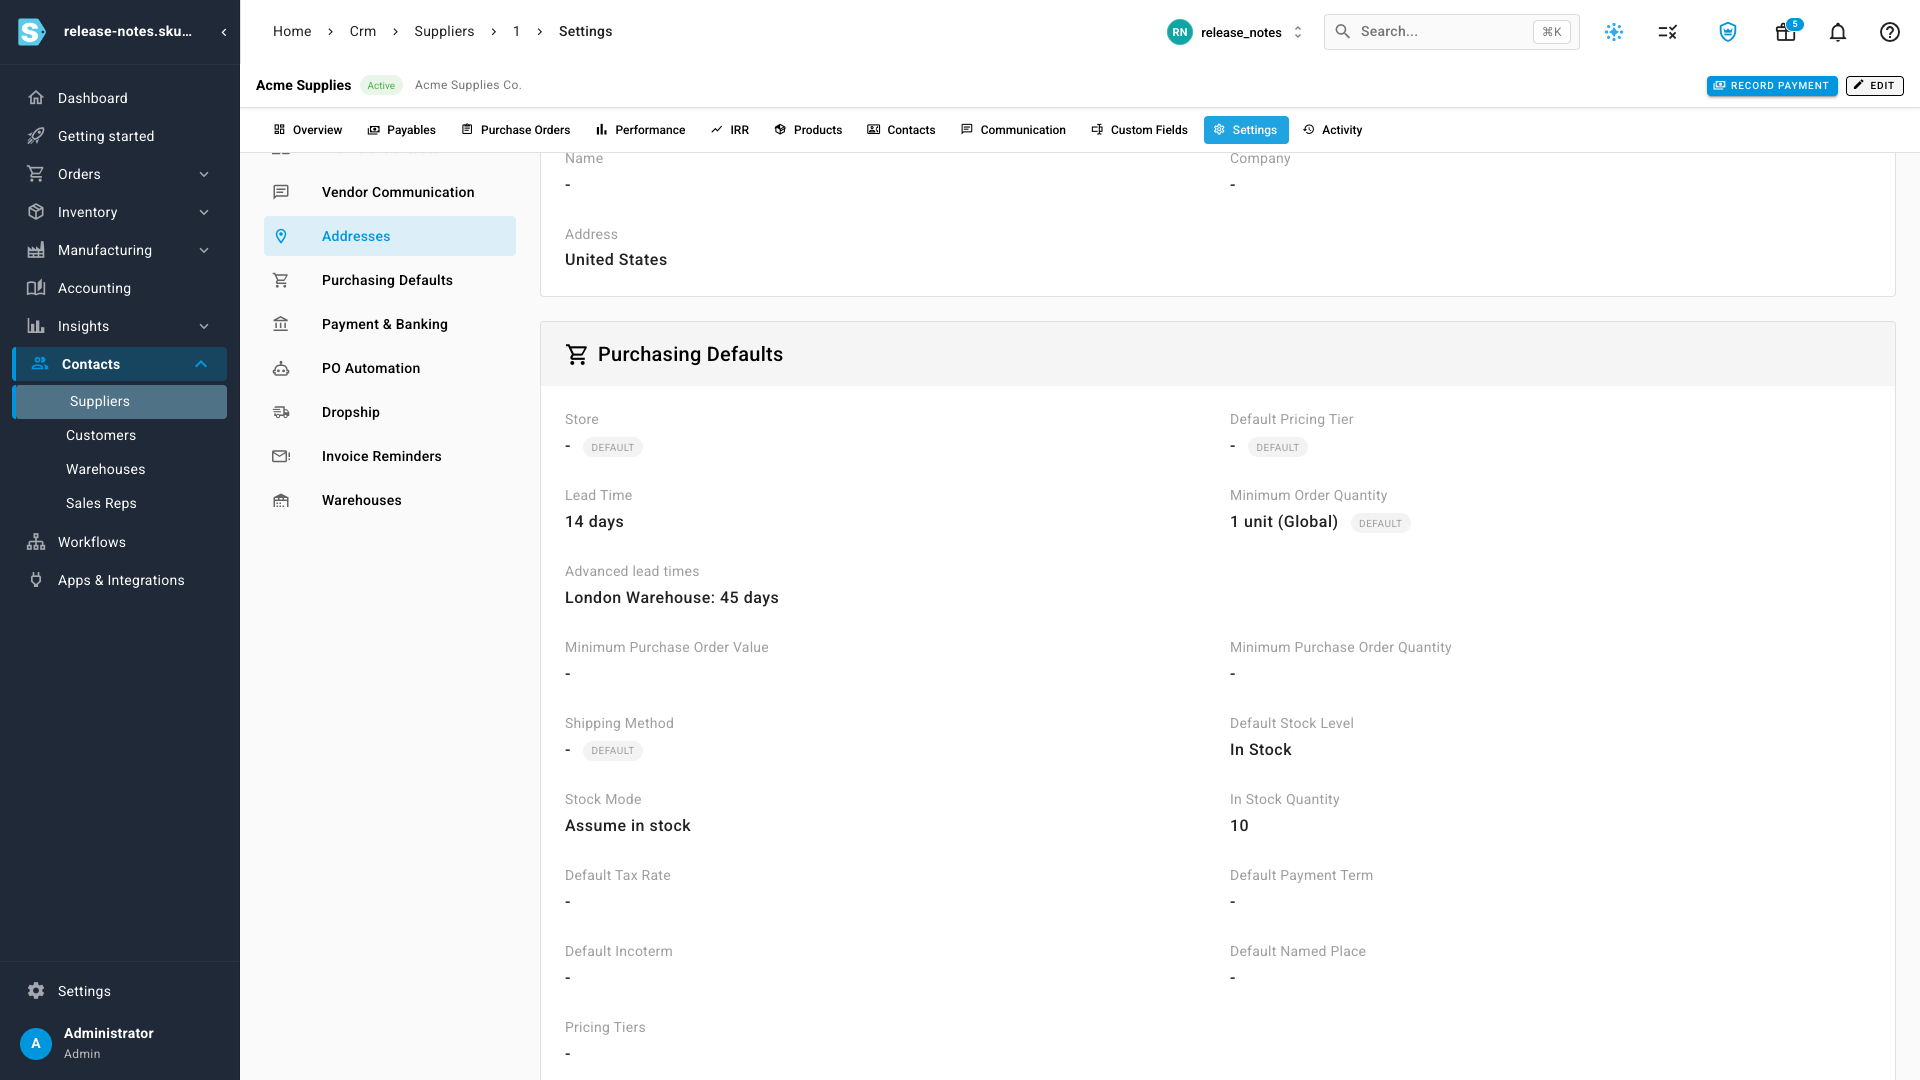
<p>There's no need to fill in a row for every warehouse. The overrides you set are listed clearly on the supplier, and every other location quietly falls back to the default lead time above — so a vendor that's slower to just one region takes a single line to configure, not a table full of duplicates.</p>
<p><img decoding="async" loading="lazy" alt="The saved supplier settings showing a Lead Time of 14 days and an Advanced lead times line reading &amp;quot;London Warehouse: 45 days&amp;quot;" src="https://docs.sku.io/assets/images/per-warehouse-view-940fdd383479db106581d61de60ad9de.png" width="1920" height="1080" class="img_ev3q"></p>
<h2 class="anchor anchorTargetStickyNavbar_Vzrq" id="the-forecast-uses-the-right-one--and-shows-you-which">The forecast uses the right one — and shows you which<a href="https://docs.sku.io/release-notes/2026/07/22/supplier-warehouse-lead-times#the-forecast-uses-the-right-one--and-shows-you-which" class="hash-link" aria-label="Direct link to The forecast uses the right one — and shows you which" title="Direct link to The forecast uses the right one — and shows you which" translate="no">​</a></h2>
<p>When you build a demand-planning forecast with a <strong>destination warehouse</strong> selected, SKU.io resolves the lead time for <em>that</em> warehouse: a per-warehouse override wins first, then a measured actual learned from your own purchase-order history, then the supplier's default. Because each destination now plans on its own real lead time, a US buy and a UK buy for the same vendor no longer share one figure — and the <strong>Lead</strong> column on every line tells you exactly which source drove the number, so a longer overseas lead time is never a mystery.</p>
<h2 class="anchor anchorTargetStickyNavbar_Vzrq" id="where-to-find-it">Where to find it<a href="https://docs.sku.io/release-notes/2026/07/22/supplier-warehouse-lead-times#where-to-find-it" class="hash-link" aria-label="Direct link to Where to find it" title="Direct link to Where to find it" translate="no">​</a></h2>
<ul>
<li class=""><strong>Set the overrides:</strong> open <strong>Contacts → Suppliers</strong>, choose a supplier, then <strong>Settings → Purchasing Defaults</strong>, and add rows under <strong>Advanced lead times</strong>.</li>
<li class=""><strong>See it applied:</strong> open <strong>Inventory → Demand Planning</strong>, build a forecast with a <strong>destination warehouse</strong> selected, and check the <strong>Lead</strong> column — hover it to see which lead time the forecast used for that location.</li>
</ul>]]></content>
        <author>
            <name>SKU.io Product Team</name>
            <uri>https://sku.io</uri>
        </author>
        <category label="Major Feature" term="Major Feature"/>
        <category label="New" term="New"/>
        <category label="Purchasing" term="Purchasing"/>
        <category label="Inventory" term="Inventory"/>
    </entry>
    <entry>
        <title type="html"><![CDATA[Forecast confidence — know which reorder numbers to trust, and prove why]]></title>
        <id>https://docs.sku.io/release-notes/2026/07/21/forecast-confidence</id>
        <link href="https://docs.sku.io/release-notes/2026/07/21/forecast-confidence"/>
        <updated>2026-07-21T18:30:00.000Z</updated>
        <summary type="html"><![CDATA[Every demand-planning recommendation now shows a confidence level and a likely range, explains the number in plain English, and exports the full audit trail.]]></summary>
        <content type="html"><![CDATA[<p>Your demand-planning forecast has always given you a reorder quantity — but not a way to tell whether that number was built on two years of steady sales or two days of noise. A brand-new SKU with almost no history looked exactly as authoritative as a proven bestseller, and once you exported the results, the reasoning behind each number disappeared. <strong>Forecast confidence</strong> fixes that: every recommendation now carries a <strong>confidence level</strong>, a <strong>likely range</strong> around the quantity, and a plain-English explanation of how it was calculated — right in the results table, in the calculation detail, and in the export you hand to finance.</p>
<p><strong>✨ What this means for you:</strong></p>
<ul>
<li class="">Every forecast line shows a <strong>confidence tier</strong> — High, Medium, Low, or New — so you can see at a glance which recommendations to trust and which to review.</li>
<li class="">A <strong>likely range</strong> sits under each quantity (for example, <em>158–194</em>), so you see the uncertainty, not just a single point number.</li>
<li class="">Brand-new and thin-history products are flagged <strong>New</strong> instead of quietly emitting a confident-looking figure you can't rely on.</li>
<li class="">The calculation detail explains the score — the <strong>drivers</strong> behind it, plain-English <strong>reasons</strong>, and a <strong>suggested fix</strong> when confidence is low.</li>
<li class="">A one-line <strong>rationale</strong> puts the whole calculation in words anyone can read — no formula-decoding required.</li>
<li class="">The <strong>export now matches what you see on screen</strong> — confidence, the likely range, the input sources, and the rationale all download to CSV or Excel for a complete, defensible audit trail.</li>
</ul>
<h2 class="anchor anchorTargetStickyNavbar_Vzrq" id="see-which-numbers-to-trust--at-a-glance">See which numbers to trust — at a glance<a href="https://docs.sku.io/release-notes/2026/07/21/forecast-confidence#see-which-numbers-to-trust--at-a-glance" class="hash-link" aria-label="Direct link to See which numbers to trust — at a glance" title="Direct link to See which numbers to trust — at a glance" translate="no">​</a></h2>
<p>Build a forecast and each line now has a <strong>Conf</strong> column. A colored chip tells you the confidence tier for that recommendation, and just below the recommended quantity you'll see the likely range the forecast expects demand to fall within. A steady, well-established product reads <strong>Medium</strong> or <strong>High</strong>; an intermittent seller with sparse history reads <strong>Low</strong>; a product with almost no sales in the window reads <strong>New</strong> — so a thin-data guess never masquerades as a sure thing.</p>
<p><img decoding="async" loading="lazy" alt="The demand-planning results table with a new Conf column showing Medium and Low confidence chips, and a likely-range figure under each recommended quantity" src="https://docs.sku.io/assets/images/results-0c6a85c20a2c404b6de9490781242e87.png" width="1920" height="1080" class="img_ev3q"></p>
<h2 class="anchor anchorTargetStickyNavbar_Vzrq" id="understand-the-why--and-what-to-do-about-it">Understand the <em>why</em> — and what to do about it<a href="https://docs.sku.io/release-notes/2026/07/21/forecast-confidence#understand-the-why--and-what-to-do-about-it" class="hash-link" aria-label="Direct link to understand-the-why--and-what-to-do-about-it" title="Direct link to understand-the-why--and-what-to-do-about-it" translate="no">​</a></h2>
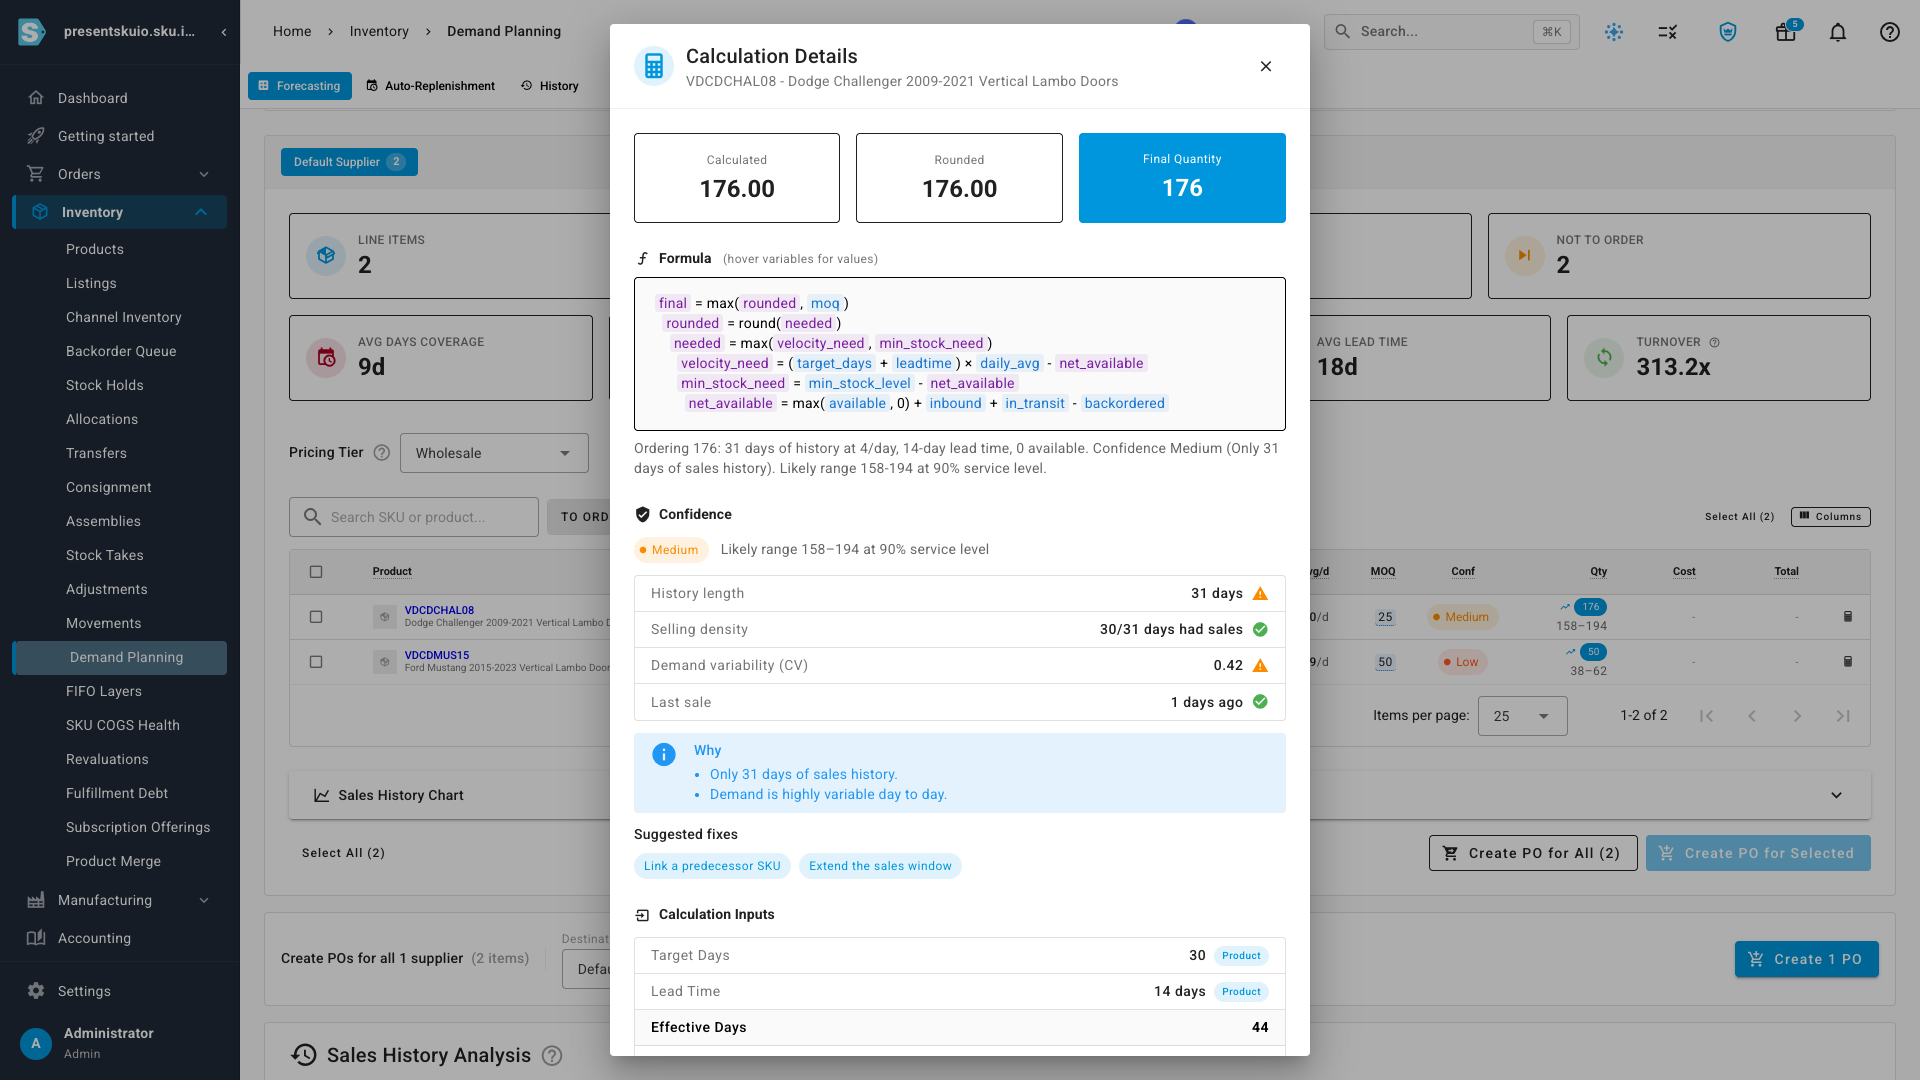
<p>Open any line's calculation detail and the new <strong>Confidence</strong> section shows exactly how the score was reached. Four drivers are laid out plainly — how much sales <strong>history</strong> the product has, how <strong>densely</strong> it actually sold, how <strong>variable</strong> demand is day to day, and how <strong>recently</strong> it last sold — each marked good or flagged. Below that, a short <strong>Why</strong> explains the tier in one or two sentences, and <strong>Suggested fixes</strong> point you at the next step (for example, <em>link a predecessor product</em> or <em>extend the sales window</em>). The likely range is stated as a service level, and a plain-language rationale summarizes the whole thing: <em>"Ordering 176: 31 days of history at 4/day, 14-day lead time… Confidence Medium… Likely range 158–194 at 90% service level."</em></p>
<p><img decoding="async" loading="lazy" alt="The calculation detail drawer showing the Confidence section: a Medium tier with a likely range, four drivers with statuses, a plain-English &amp;quot;Why&amp;quot;, and suggested fixes" src="https://docs.sku.io/assets/images/confidence-drawer-dfcaa49871add65d357da99500f830dd.png" width="1920" height="1080" class="img_ev3q"></p>
<h2 class="anchor anchorTargetStickyNavbar_Vzrq" id="export-the-whole-story">Export the whole story<a href="https://docs.sku.io/release-notes/2026/07/21/forecast-confidence#export-the-whole-story" class="hash-link" aria-label="Direct link to Export the whole story" title="Direct link to Export the whole story" translate="no">​</a></h2>
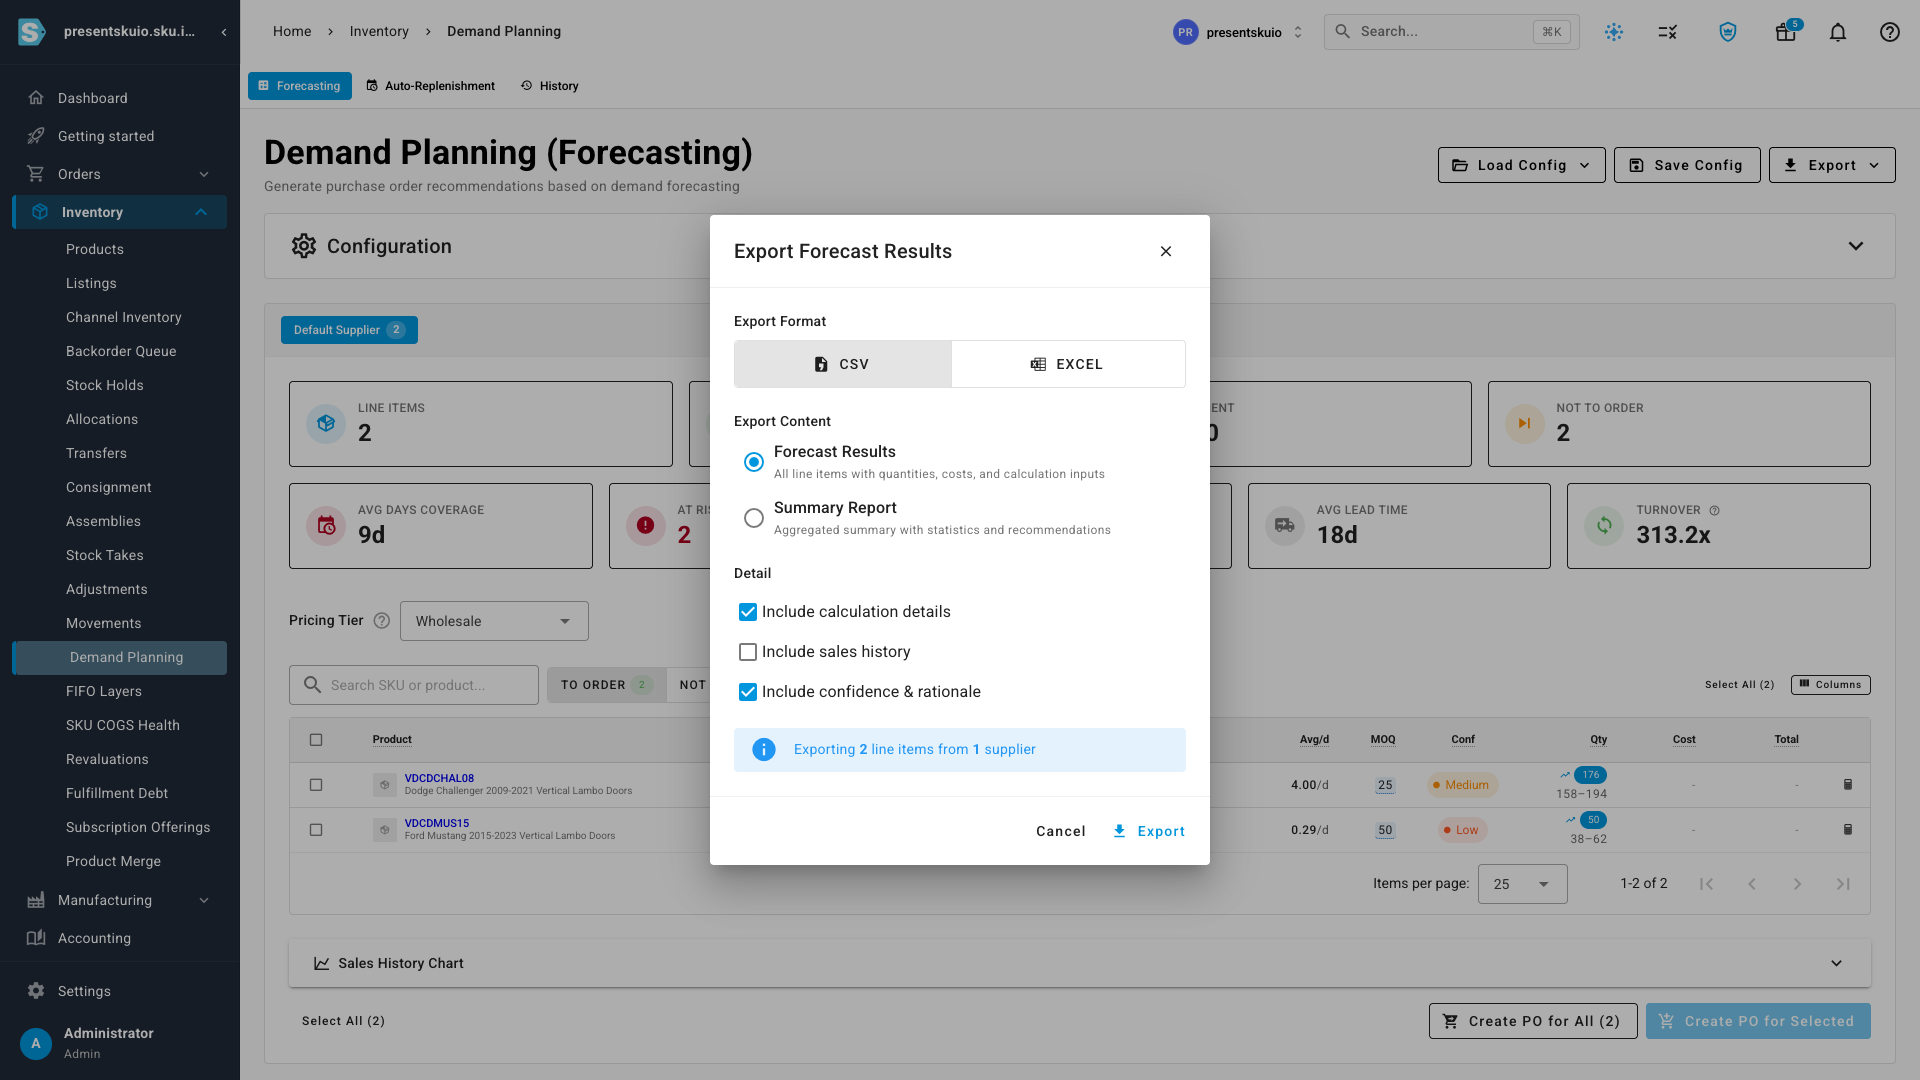
<p>When you export the forecast, a new <strong>Detail</strong> section lets you choose exactly how much of the calculation to include. Keep <strong>calculation details</strong> and <strong>confidence &amp; rationale</strong> switched on and the download carries everything you see in the app — the confidence tier and score, the likely range, the input sources, and the plain-language rationale for every line. The file you hand to finance is now a complete, self-explanatory record of how each reorder number was reached.</p>
<p><img decoding="async" loading="lazy" alt="The Export Forecast Results dialog with a new Detail section offering &amp;quot;Include calculation details&amp;quot;, &amp;quot;Include sales history&amp;quot;, and &amp;quot;Include confidence &amp;amp; rationale&amp;quot; toggles" src="https://docs.sku.io/assets/images/export-da7af0ac7dac865740f0536c8af878c8.png" width="1920" height="1080" class="img_ev3q"></p>
<h2 class="anchor anchorTargetStickyNavbar_Vzrq" id="where-to-find-it">Where to find it<a href="https://docs.sku.io/release-notes/2026/07/21/forecast-confidence#where-to-find-it" class="hash-link" aria-label="Direct link to Where to find it" title="Direct link to Where to find it" translate="no">​</a></h2>
<ul>
<li class=""><strong>See it on your forecast:</strong> open <strong>Inventory → Demand Planning</strong>, choose your suppliers, and click <strong>Build Forecast</strong> — the <strong>Conf</strong> column and the likely-range figures appear on every line.</li>
<li class=""><strong>Dig into a number:</strong> click the <strong>calculator icon</strong> on any row to open the calculation detail, then read the <strong>Confidence</strong> section, the drivers, and the rationale.</li>
<li class=""><strong>Take it with you:</strong> click <strong>Export</strong> (top right) and, under <strong>Detail</strong>, keep <strong>Include confidence &amp; rationale</strong> switched on before downloading your CSV or Excel file.</li>
</ul>]]></content>
        <author>
            <name>SKU.io Product Team</name>
            <uri>https://sku.io</uri>
        </author>
        <category label="Major Feature" term="Major Feature"/>
        <category label="New" term="New"/>
        <category label="Inventory" term="Inventory"/>
    </entry>
    <entry>
        <title type="html"><![CDATA[Recipe History — know what's inside every bundle and kit, on any date]]></title>
        <id>https://docs.sku.io/release-notes/2026/07/21/recipe-history</id>
        <link href="https://docs.sku.io/release-notes/2026/07/21/recipe-history"/>
        <updated>2026-07-21T15:30:00.000Z</updated>
        <summary type="html"><![CDATA[See what any bundle or kit contained on any past date, schedule a recipe change for the future without touching today's, and correct a past recipe when something was recorded wrong.]]></summary>
        <content type="html"><![CDATA[<p>You tweak a kit's recipe — swap a component, bump a quantity — and suddenly your history and your forecasts look different, as if the previous version never existed. Worse, you can't answer a simple question: <em>what was actually in this bundle back in the spring?</em> Until now, a bundle or kit had exactly one recipe — whatever it happens to be right now. <strong>Recipe History</strong> changes that. Every bundle and kit now keeps a full, dated history of its recipe, so you can see what it contained on any date, edit it without rewriting the past, schedule a change ahead of time, and correct a past recipe when something was recorded wrong.</p>
<p><strong>✨ What this means for you:</strong></p>
<ul>
<li class=""><strong>A full timeline of every recipe change</strong> — every version of a bundle or kit's recipe, with what changed, when, and who made it.</li>
<li class=""><strong>See the recipe as of any date</strong> — pick a date and SKU.io shows exactly what the product contained then.</li>
<li class=""><strong>Editing no longer rewrites the past</strong> — a change applies from today forward, so last quarter's records stay exactly as they were.</li>
<li class=""><strong>Schedule a change ahead of time</strong> — set a new recipe to take effect on a future date; today's recipe stays live until then, then switches over automatically.</li>
<li class=""><strong>Correct the past when you need to</strong> — fix a recipe that was recorded wrong for a stretch of time, clearly flagged as a correction, and bring the affected orders back in line.</li>
</ul>
<h2 class="anchor anchorTargetStickyNavbar_Vzrq" id="a-full-history-of-every-recipe">A full history of every recipe<a href="https://docs.sku.io/release-notes/2026/07/21/recipe-history#a-full-history-of-every-recipe" class="hash-link" aria-label="Direct link to A full history of every recipe" title="Direct link to A full history of every recipe" translate="no">​</a></h2>
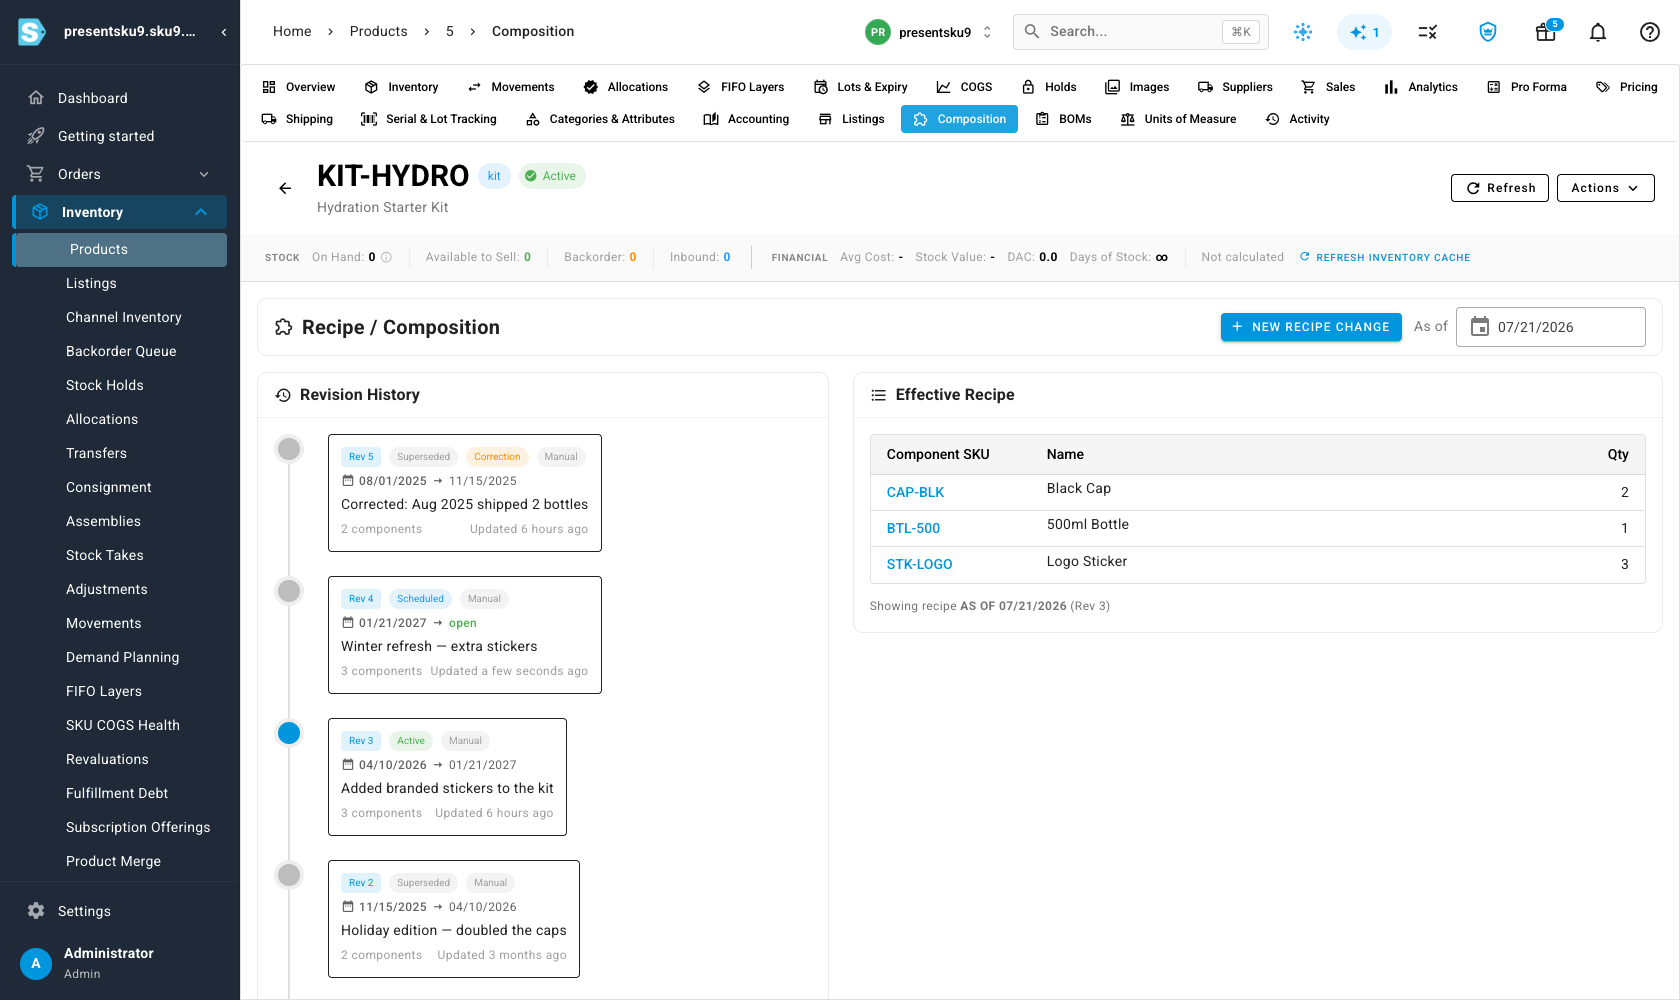
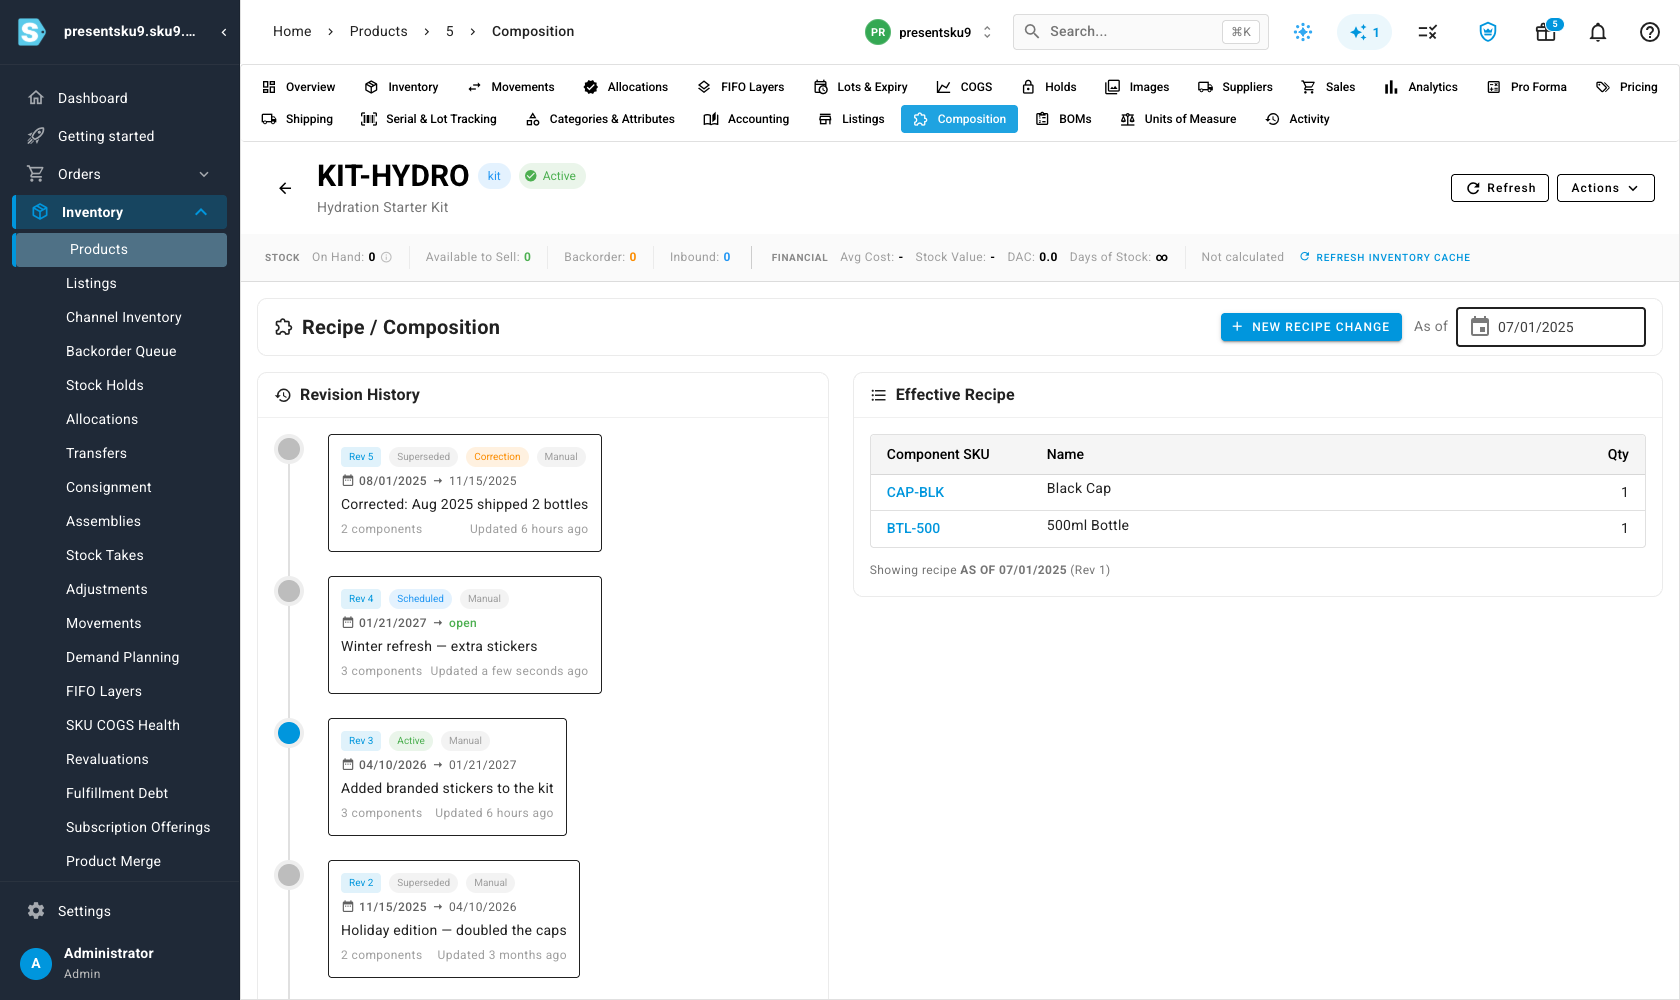
<p>Every bundle and kit now has a <strong>Composition</strong> tab that shows its recipe as a timeline. Each entry is a dated version — active now, superseded, scheduled for later, or a correction — with a plain-language note of what changed and who made it. Alongside it, the <strong>Effective Recipe</strong> panel shows exactly what's in the product today. No more guessing whether the recipe you're looking at is the one that was in effect last season.</p>
<p><img decoding="async" loading="lazy" alt="The Composition tab for a kit, showing a Revision History timeline of dated recipe versions on the left and the current Effective Recipe on the right" src="https://docs.sku.io/assets/images/composition-timeline-a3a4f718843ebb75a44e7c0db7d910ad.png" width="1680" height="1000" class="img_ev3q"></p>
<h2 class="anchor anchorTargetStickyNavbar_Vzrq" id="see-the-recipe-as-of-any-date">See the recipe as of any date<a href="https://docs.sku.io/release-notes/2026/07/21/recipe-history#see-the-recipe-as-of-any-date" class="hash-link" aria-label="Direct link to See the recipe as of any date" title="Direct link to See the recipe as of any date" translate="no">​</a></h2>
<p>Set the <strong>As of</strong> date and the Effective Recipe updates to show what the product contained on that day. A kit that ships with three components today might have had two last summer — and now that's a single click to confirm, not an archaeology project. Because the history is real, a recipe you edit today never changes what the product looked like on an earlier date.</p>
<p><img decoding="async" loading="lazy" alt="The Effective Recipe panel resolved as of a past date, showing the two components the kit contained then — before a later component was added" src="https://docs.sku.io/assets/images/as-of-viewer-a67465afcfc160639edcf3fb7d96142a.png" width="1680" height="1000" class="img_ev3q"></p>
<h2 class="anchor anchorTargetStickyNavbar_Vzrq" id="schedule-a-change-ahead-of-time">Schedule a change ahead of time<a href="https://docs.sku.io/release-notes/2026/07/21/recipe-history#schedule-a-change-ahead-of-time" class="hash-link" aria-label="Direct link to Schedule a change ahead of time" title="Direct link to Schedule a change ahead of time" translate="no">​</a></h2>
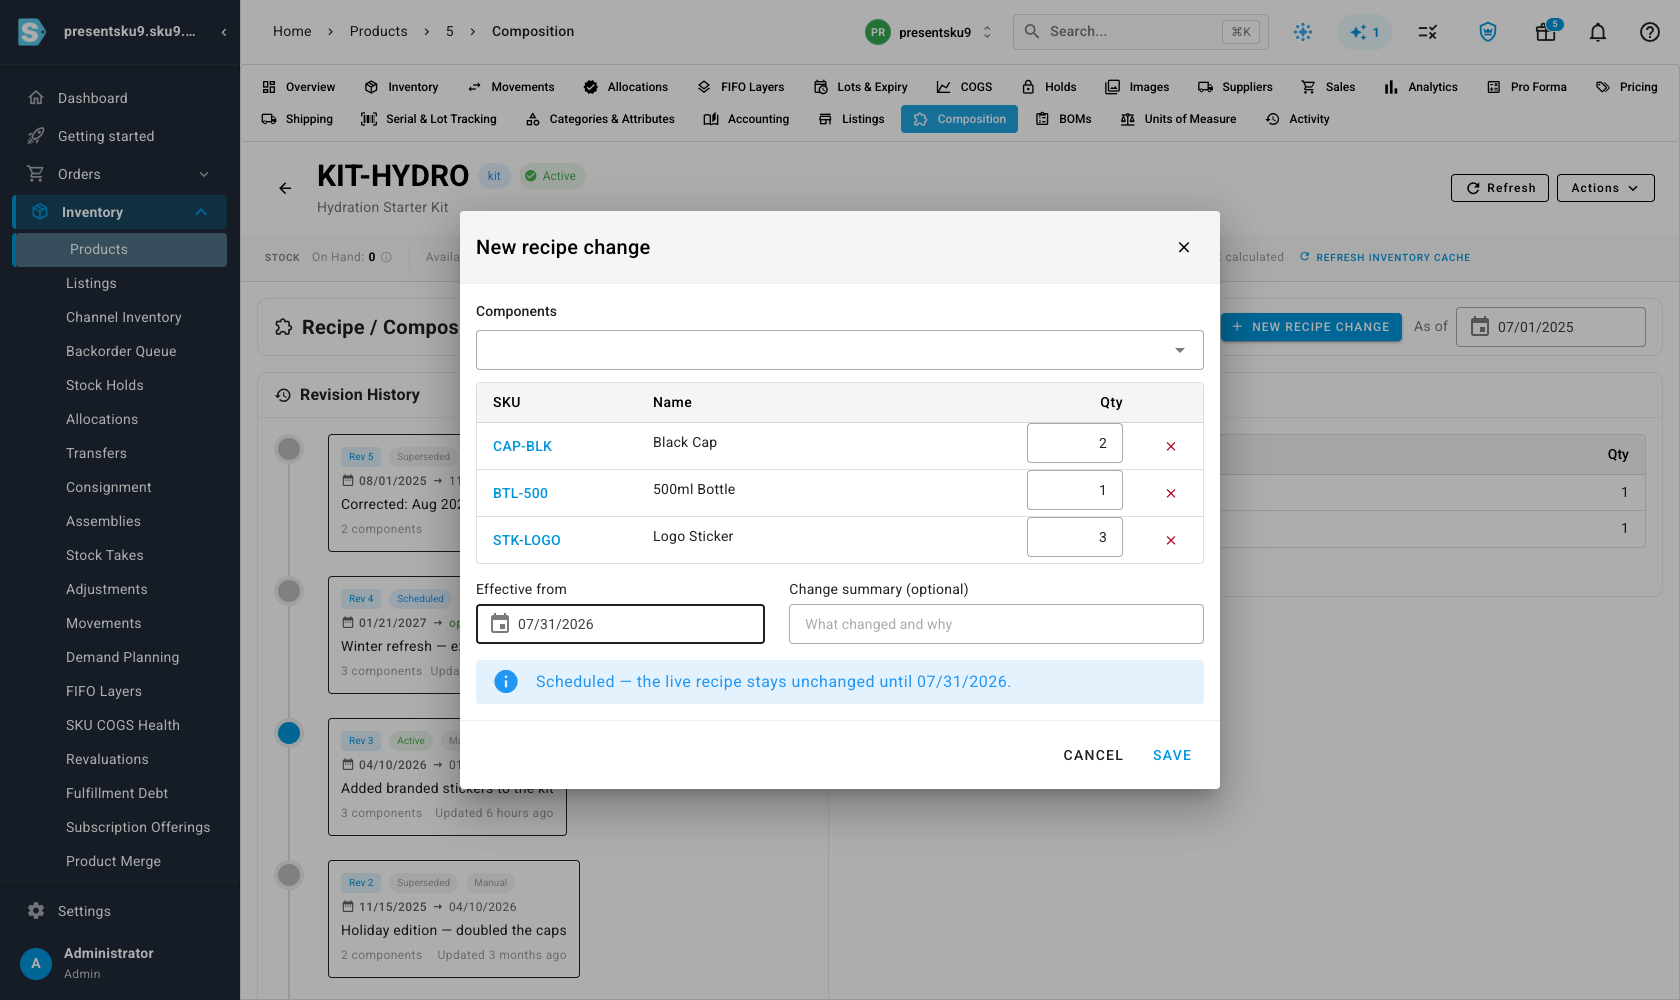
<p>Planning a formulation update or a seasonal edition? Open <strong>New recipe change</strong>, adjust the components, and set the <strong>effective date</strong> in the future. SKU.io schedules it: the live recipe stays exactly as it is until that day arrives, then the new one takes over on its own. You can line up a change weeks ahead without it affecting anything you sell today.</p>
<p><img decoding="async" loading="lazy" alt="The New recipe change dialog with a future effective date, showing a &amp;quot;Scheduled — the live recipe stays unchanged until then&amp;quot; confirmation" src="https://docs.sku.io/assets/images/schedule-change-2638bd1f8d825653d97d251eff8f4c2b.png" width="1680" height="1000" class="img_ev3q"></p>
<h2 class="anchor anchorTargetStickyNavbar_Vzrq" id="correct-the-past-when-you-need-to">Correct the past when you need to<a href="https://docs.sku.io/release-notes/2026/07/21/recipe-history#correct-the-past-when-you-need-to" class="hash-link" aria-label="Direct link to Correct the past when you need to" title="Direct link to Correct the past when you need to" translate="no">​</a></h2>
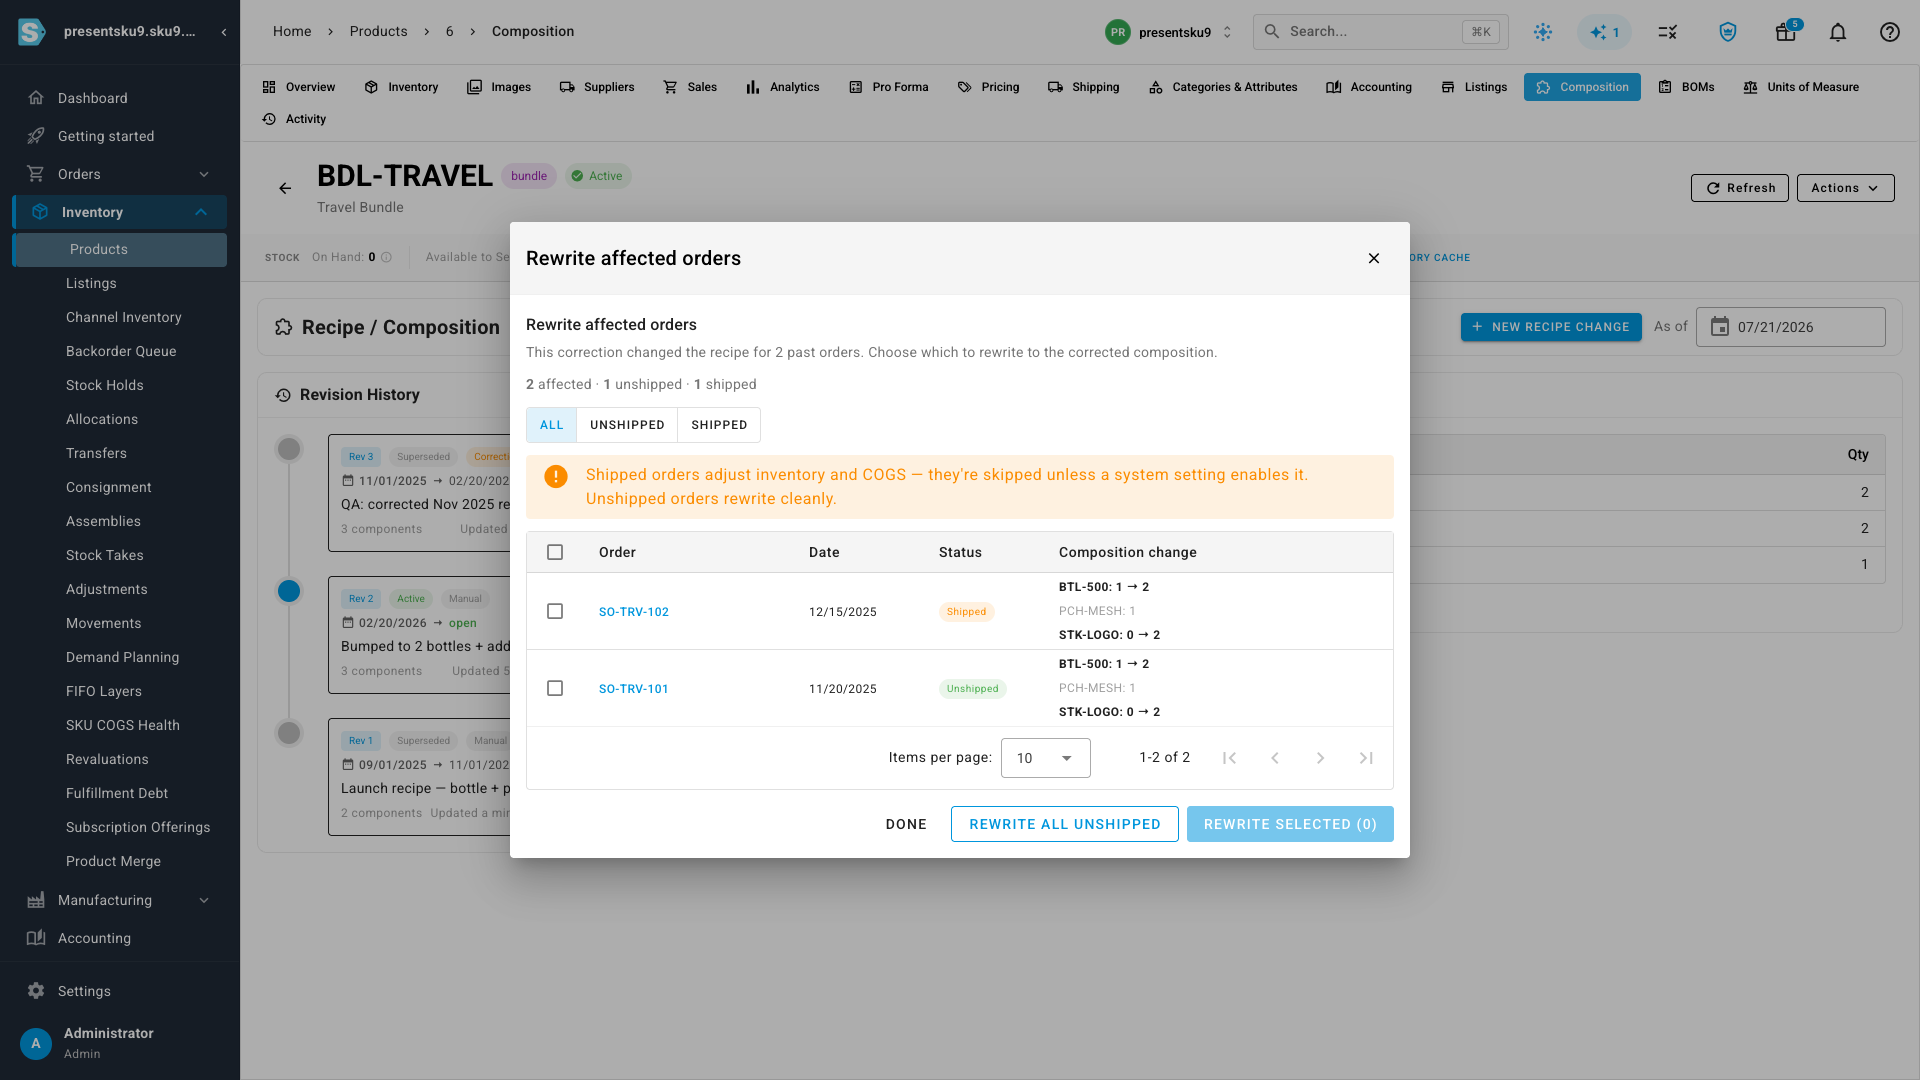
<p>Sometimes a recipe was simply recorded wrong for a stretch of time. Set the effective date in the <strong>past</strong> and confirm, and SKU.io files it as a correction — changing only that window's history, and marking it clearly so the change is always attributable. For bundles, you can take it a step further: SKU.io lists every order placed in that window — with each one's status and the exact <strong>before → after</strong> for each component — so you can bring the affected orders in line with the corrected recipe.</p>
<p><img decoding="async" loading="lazy" alt="The affected-orders step after a back-dated bundle correction, listing the orders in that window with their status and a before-to-after change for each component" src="https://docs.sku.io/assets/images/rewrite-orders-993b048272b3d655a9997988ac83a216.png" width="1920" height="1080" class="img_ev3q"></p>
<h2 class="anchor anchorTargetStickyNavbar_Vzrq" id="where-to-find-it">Where to find it<a href="https://docs.sku.io/release-notes/2026/07/21/recipe-history#where-to-find-it" class="hash-link" aria-label="Direct link to Where to find it" title="Direct link to Where to find it" translate="no">​</a></h2>
<p>Open any <strong>bundle</strong> or <strong>kit</strong> product and select the <strong>Composition</strong> tab. Your product's current recipe is on the right; its full history is on the left; and <strong>New recipe change</strong> lets you edit it now, schedule it for later, or correct it in the past.</p>]]></content>
        <author>
            <name>SKU.io Product Team</name>
            <uri>https://sku.io</uri>
        </author>
        <category label="Major Feature" term="Major Feature"/>
        <category label="New" term="New"/>
        <category label="Inventory" term="Inventory"/>
    </entry>
    <entry>
        <title type="html"><![CDATA[Drop-ship automation — hands-off supplier fulfillment that actually routes]]></title>
        <id>https://docs.sku.io/release-notes/2026/07/21/drop-ship-automation</id>
        <link href="https://docs.sku.io/release-notes/2026/07/21/drop-ship-automation"/>
        <updated>2026-07-21T08:45:00.000Z</updated>
        <summary type="html"><![CDATA[Out-of-stock orders now auto-route to your drop-ship supplier, create and send the purchase order for you, and show exactly where each shipment stands.]]></summary>
        <content type="html"><![CDATA[<p>Drop-shipping should be the easiest kind of fulfillment — your supplier ships straight to the customer and you never touch the stock. In practice, an out-of-stock order would quietly backorder against your own warehouse instead of routing to the supplier, and when it <em>didn't</em> drop-ship there was no single place to see why. <strong>Drop-ship automation</strong> brings the whole flow together: a <strong>Drop-ship Status</strong> panel that shows exactly why an order will (or won't) route to a supplier, automatic routing of eligible out-of-stock orders, a purchase order created and sent on your behalf, and a clear view of whether that PO actually reached the supplier. No more guessing, no more silent backorders.</p>
<p><strong>✨ What this means for you:</strong></p>
<ul>
<li class="">A <strong>Drop-ship Status</strong> checklist tells you at a glance whether a product will drop-ship — and, if not, exactly <strong>what's missing</strong> — so you never wonder why an order backordered.</li>
<li class="">Out-of-stock orders for eligible drop-ship products <strong>route to your supplier automatically</strong> — no manual warehouse assignment.</li>
<li class="">The supplier <strong>purchase order is created and sent for you</strong>, either the moment the order is placed or batched at times you choose.</li>
<li class="">You can see whether a drop-ship PO has been <strong>sent to the supplier</strong> right on the order — and the fulfillment step reads <strong>"Mark Shipped,"</strong> so it's clear the supplier, not your warehouse, is doing the shipping.</li>
<li class="">One clear place to configure drop-ship on a supplier, with a <strong>per-supplier stock setting</strong> instead of a hidden fixed number.</li>
</ul>
<h2 class="anchor anchorTargetStickyNavbar_Vzrq" id="see-exactly-why-an-order-will--or-wont--drop-ship">See exactly why an order will — or won't — drop-ship<a href="https://docs.sku.io/release-notes/2026/07/21/drop-ship-automation#see-exactly-why-an-order-will--or-wont--drop-ship" class="hash-link" aria-label="Direct link to See exactly why an order will — or won't — drop-ship" title="Direct link to See exactly why an order will — or won't — drop-ship" translate="no">​</a></h2>
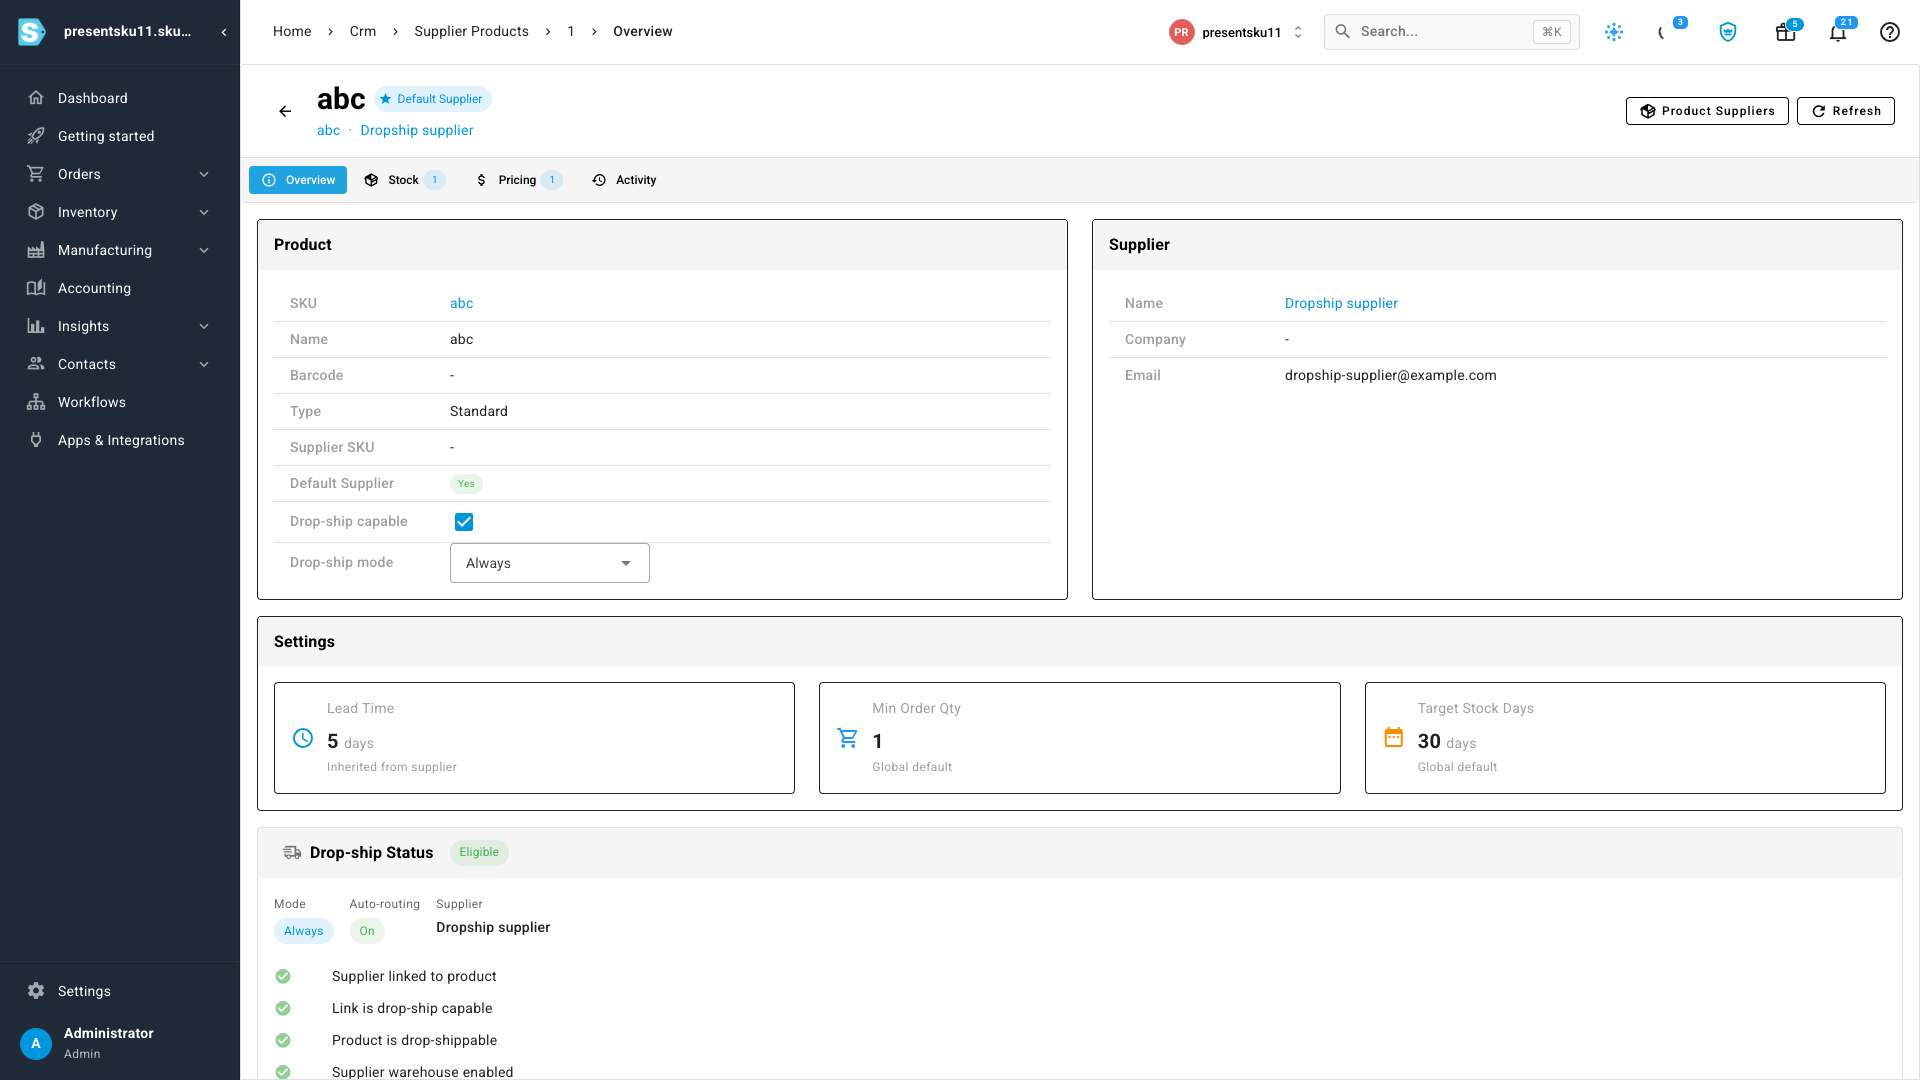
<p>Drop-shipping is deliberately explicit: an order only routes to a supplier when the product, the supplier link, the supplier's warehouse and its stock feed are all in place, so nothing is ever sent to a supplier by accident. The new <strong>Drop-ship Status</strong> panel makes those requirements legible in one spot. Open a supplier's product and it shows an <strong>Eligible / Not eligible</strong> badge and a checklist of every requirement, each ticked green or flagged, with anything <strong>missing</strong> called out so you know precisely what to fix.</p>
<p><img decoding="async" loading="lazy" alt="The Drop-ship Status panel on a supplier product, showing an &amp;quot;Eligible&amp;quot; badge and a green checklist: supplier linked to product, link is drop-ship capable, product is drop-shippable, supplier warehouse enabled, supplier stock feed" src="https://docs.sku.io/assets/images/dropship-status-panel-d95e76b81d57378fac7840043d8eb615.png" width="1920" height="1080" class="img_ev3q"></p>
<h2 class="anchor anchorTargetStickyNavbar_Vzrq" id="route-out-of-stock-orders-to-your-supplier--automatically">Route out-of-stock orders to your supplier — automatically<a href="https://docs.sku.io/release-notes/2026/07/21/drop-ship-automation#route-out-of-stock-orders-to-your-supplier--automatically" class="hash-link" aria-label="Direct link to Route out-of-stock orders to your supplier — automatically" title="Direct link to Route out-of-stock orders to your supplier — automatically" translate="no">​</a></h2>
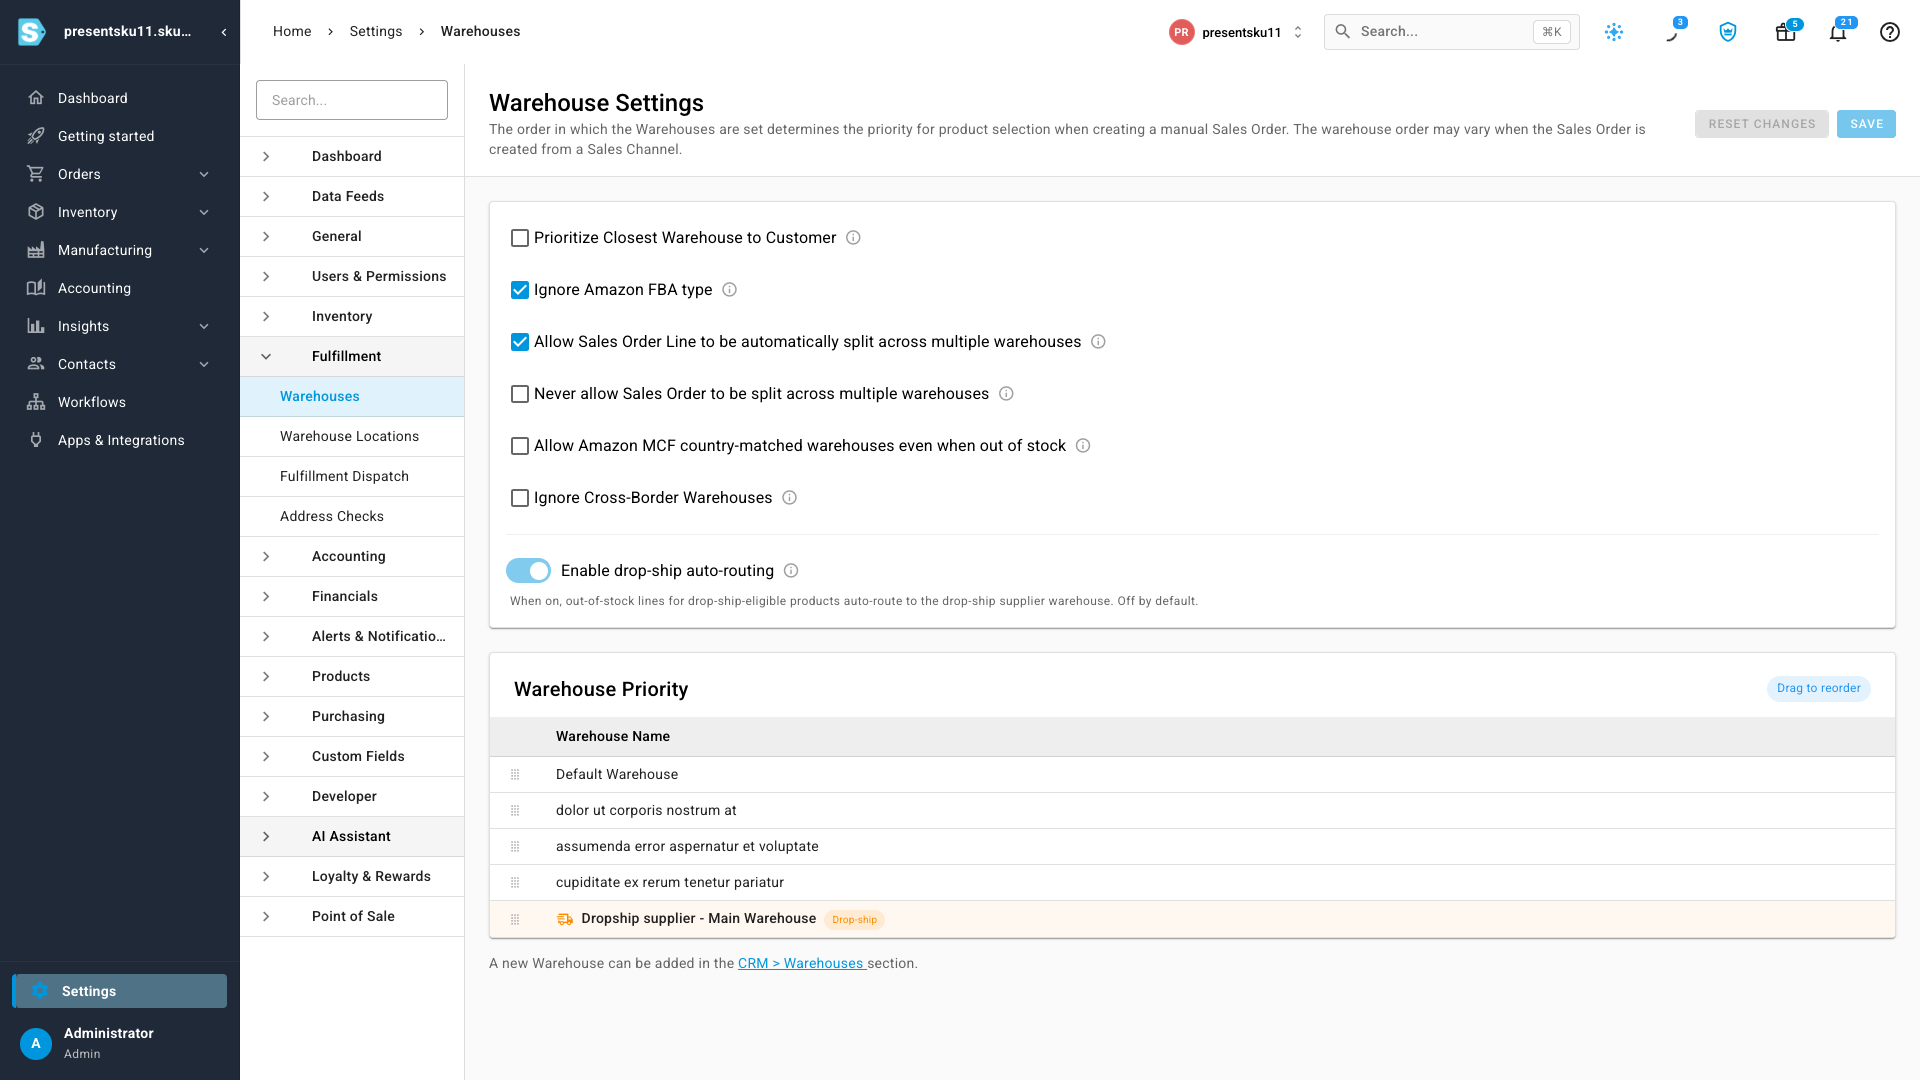
<p>Turn on <strong>Enable drop-ship auto-routing</strong> and your drop-ship supplier becomes a stop in your warehouse priority list — drag it wherever it belongs. When an order can't be filled from your own stock, SKU.io routes the eligible lines to that supplier instead of backordering them against your primary warehouse.</p>
<p>You stay in control: a line only ever drop-ships when the product, the supplier, and the supplier's warehouse are all opted in — so nothing gets sent to a supplier by accident.</p>
<p><img decoding="async" loading="lazy" alt="Warehouse settings with a drop-ship auto-routing toggle and the drop-ship supplier pinned in the warehouse priority list" src="https://docs.sku.io/assets/images/warehouse-priority-522fd73dd99ae0641888e096c0565163.png" width="1920" height="1080" class="img_ev3q"></p>
<h2 class="anchor anchorTargetStickyNavbar_Vzrq" id="set-up-drop-ship-in-one-place--and-choose-when-pos-go-out">Set up drop-ship in one place — and choose when POs go out<a href="https://docs.sku.io/release-notes/2026/07/21/drop-ship-automation#set-up-drop-ship-in-one-place--and-choose-when-pos-go-out" class="hash-link" aria-label="Direct link to Set up drop-ship in one place — and choose when POs go out" title="Direct link to Set up drop-ship in one place — and choose when POs go out" translate="no">​</a></h2>
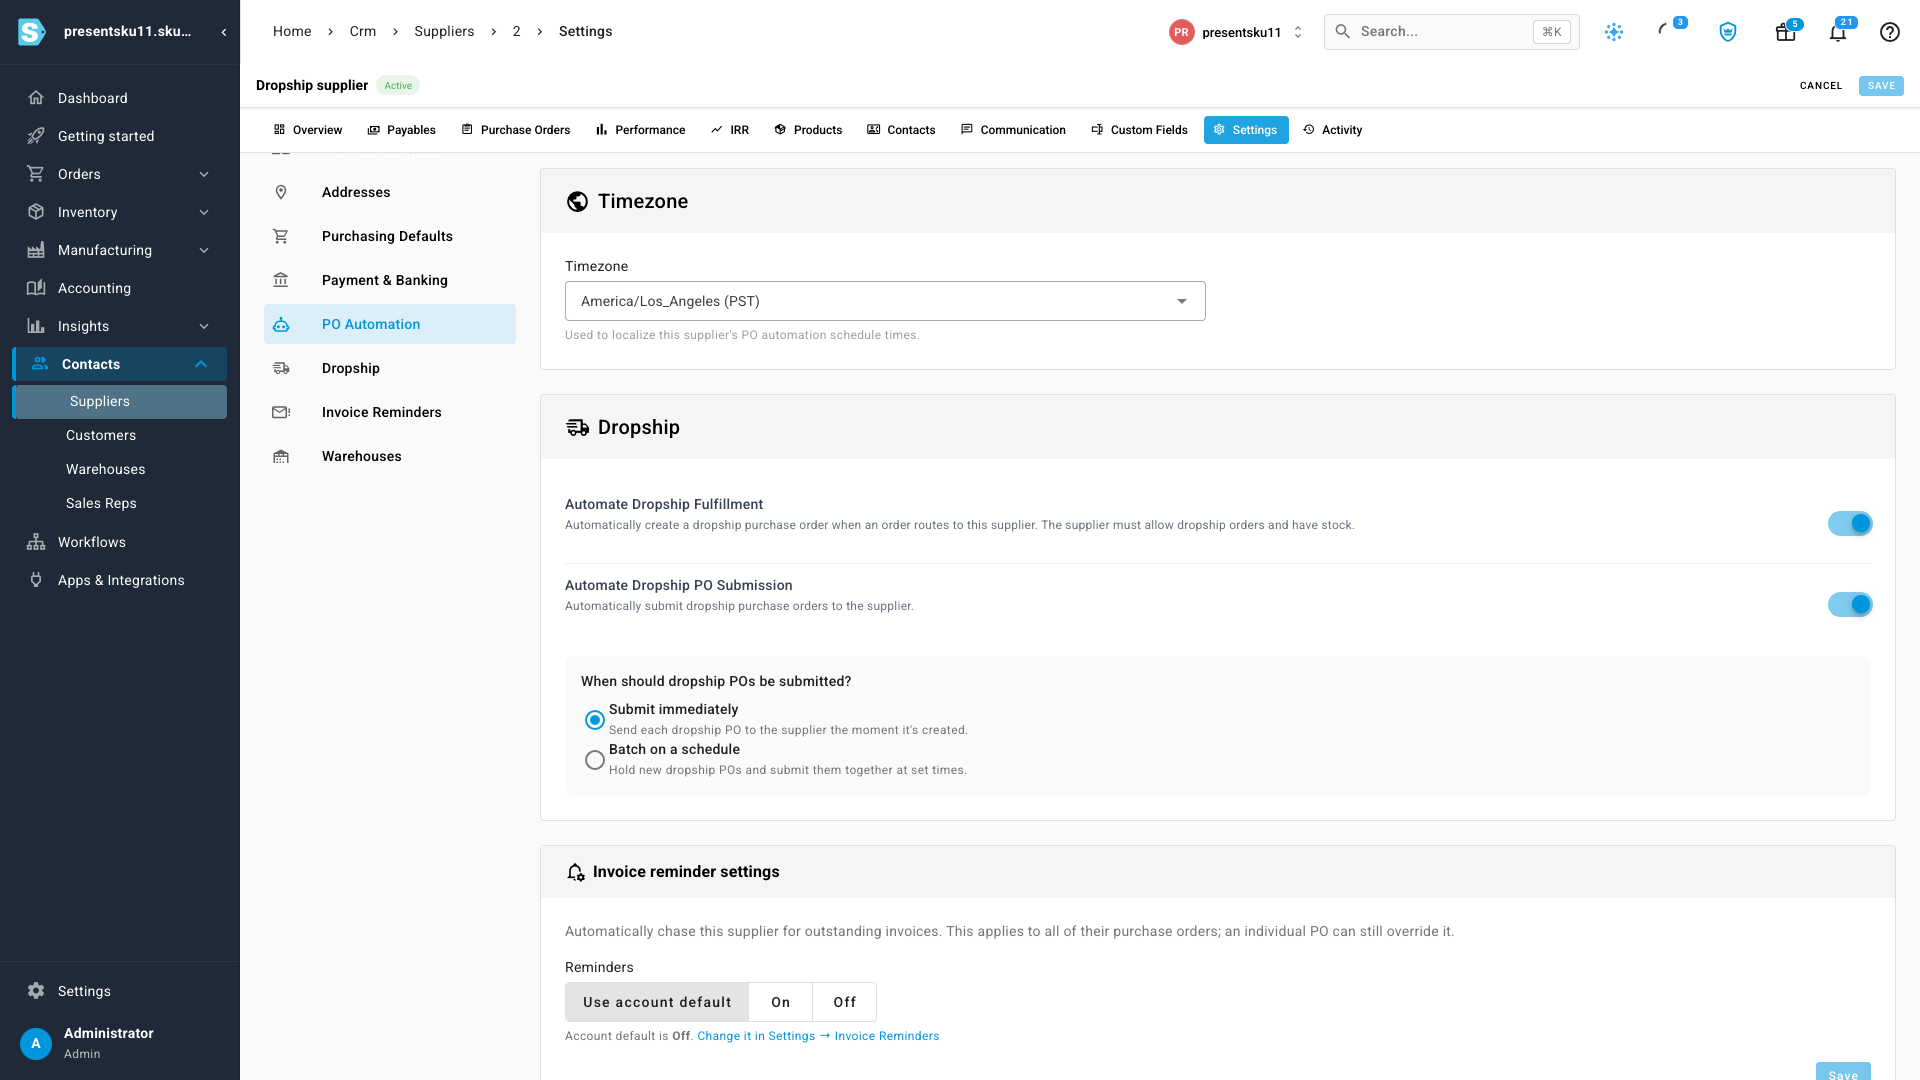
<p>Every supplier now has a dedicated <strong>Dropship</strong> section. Switch on <strong>Automate Dropship Fulfillment</strong> to create the purchase order automatically when an order routes to that supplier, and <strong>Automate Dropship PO Submission</strong> to send it to them.</p>
<p>You decide the timing. <strong>Submit immediately</strong> sends each PO to the supplier the moment it's created. <strong>Batch on a schedule</strong> holds new POs and sends them together at the times you set — handy when a supplier prefers one consolidated order a day.</p>
<p><img decoding="async" loading="lazy" alt="The supplier Dropship settings section with automate-fulfillment and automate-submission toggles and an immediate-vs-batch choice" src="https://docs.sku.io/assets/images/supplier-dropship-settings-fe6d006a4348877663469164a21dfa47.png" width="1920" height="1080" class="img_ev3q"></p>
<h2 class="anchor anchorTargetStickyNavbar_Vzrq" id="always-know-where-the-order-stands">Always know where the order stands<a href="https://docs.sku.io/release-notes/2026/07/21/drop-ship-automation#always-know-where-the-order-stands" class="hash-link" aria-label="Direct link to Always know where the order stands" title="Direct link to Always know where the order stands" translate="no">​</a></h2>
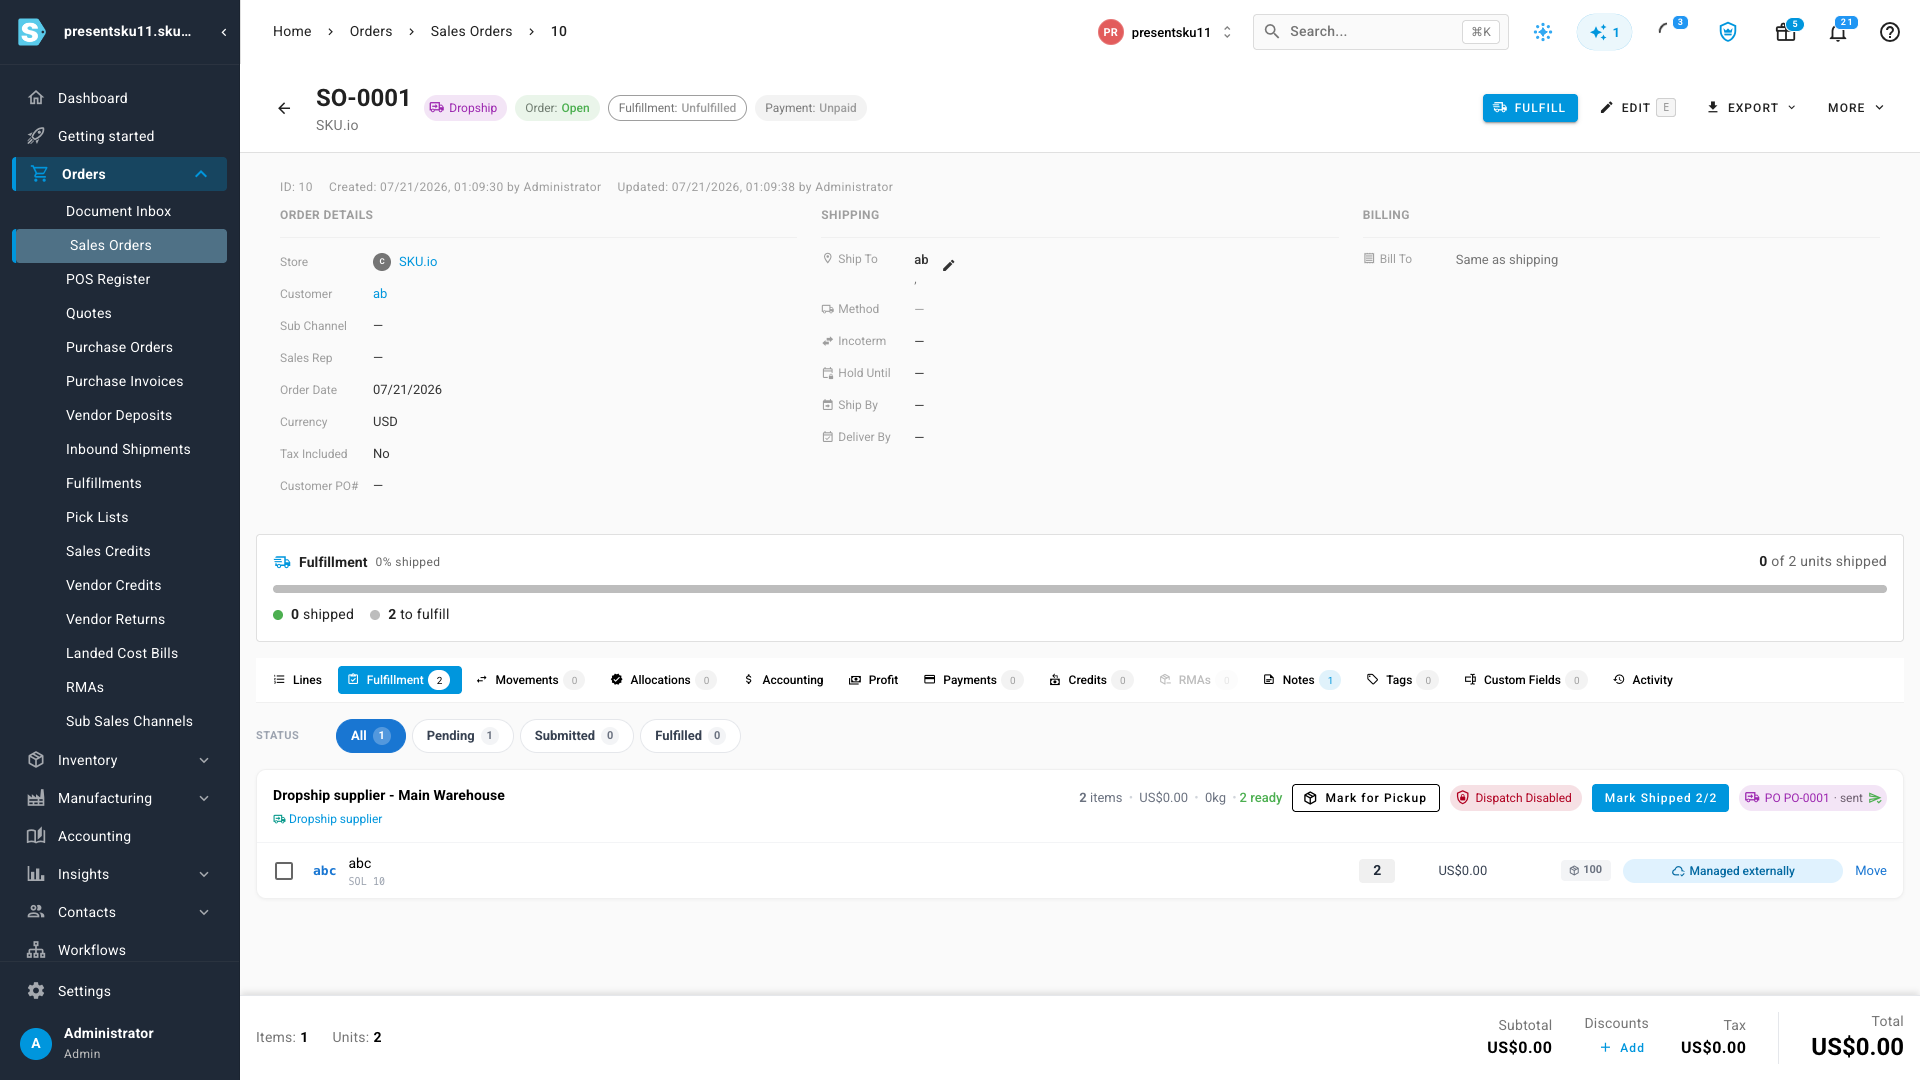
<p>On an order's <strong>Fulfillment</strong> view, a drop-ship line clearly shows its supplier purchase order and whether it's been <strong>sent</strong>. Because the supplier is doing the shipping, the action reads <strong>Mark Shipped</strong> rather than a generic "fulfill" — so it's obvious what's happening and who's shipping.</p>
<p>And if a supplier is missing a purchase-order email, SKU.io flags it up front — on the supplier and on the PO — instead of silently failing to send, so a drop-ship order never sits waiting on a notification that was never going to arrive.</p>
<p><img decoding="async" loading="lazy" alt="A drop-ship fulfillment card showing the linked supplier PO marked &amp;quot;sent&amp;quot; and a &amp;quot;Mark Shipped&amp;quot; action" src="https://docs.sku.io/assets/images/fulfillment-mark-shipped-443b57850c89c8a27f37fbc916f23d95.png" width="1920" height="1080" class="img_ev3q"></p>
<h2 class="anchor anchorTargetStickyNavbar_Vzrq" id="where-to-find-it">Where to find it<a href="https://docs.sku.io/release-notes/2026/07/21/drop-ship-automation#where-to-find-it" class="hash-link" aria-label="Direct link to Where to find it" title="Direct link to Where to find it" translate="no">​</a></h2>
<ul>
<li class=""><strong>Check what's needed (start here):</strong> open the supplier's product under <strong>Contacts → Suppliers → <em>(your supplier)</em> → Products</strong> — the <strong>Drop-ship Status</strong> panel shows the Eligible / Not eligible badge and ticks off each requirement, so you can see at a glance what's set and what's still missing.</li>
<li class=""><strong>Mark a product drop-shippable for a supplier:</strong> on that same supplier-product page, set the link's <strong>Drop-ship / Always</strong> option (this is the master switch — the product's own drop-ship flag and the supplier warehouse must also be enabled, and the status panel tells you if either isn't).</li>
<li class=""><strong>Turn on auto-routing:</strong> <strong>Settings → Fulfillment → Warehouses → Enable drop-ship auto-routing</strong>, then order your <strong>Warehouse Priority</strong> list.</li>
<li class=""><strong>Configure a supplier's automation:</strong> <strong>Contacts → Suppliers → <em>(your supplier)</em> → Settings → Dropship</strong> — automate fulfillment, automate submission, and choose immediate vs. batched sending.</li>
<li class=""><strong>Track an order:</strong> open any drop-ship sales order and switch to the <strong>Fulfillment</strong> tab.</li>
</ul>]]></content>
        <author>
            <name>SKU.io Product Team</name>
            <uri>https://sku.io</uri>
        </author>
        <category label="Major Feature" term="Major Feature"/>
        <category label="New" term="New"/>
        <category label="Purchasing" term="Purchasing"/>
        <category label="Fulfillment" term="Fulfillment"/>
    </entry>
    <entry>
        <title type="html"><![CDATA[Serial Number Tracking — full traceability, unit by unit]]></title>
        <id>https://docs.sku.io/release-notes/2026/07/21/serial-number-tracking</id>
        <link href="https://docs.sku.io/release-notes/2026/07/21/serial-number-tracking"/>
        <updated>2026-07-21T02:40:00.000Z</updated>
        <summary type="html"><![CDATA[Track individual serial numbers end to end — capture them at receipt, pick the exact units at fulfillment, print them on your documents, and trace any unit's full history.]]></summary>
        <content type="html"><![CDATA[<p>If you sell regulated, high-value, or warranty-backed goods — electronics, medical devices, cosmetics, anything with a recall or authenticity requirement — "how many do we have" was never enough. You needed to know <em>which one</em>, and where it went. Until now SKU.io tracked quantities but not the individual units behind them. <strong>Serial Number Tracking</strong> closes that gap — and now follows each unit end to end: opt in per product, capture a serial as stock arrives, choose the exact units when you fulfill, print them on your pick lists and packing slips, and trace any serial's full history.</p>
<p><strong>✨ What this means for you:</strong></p>
<ul>
<li class=""><strong>Opt in per product</strong> — enable serial tracking only where you need it, so the rest of your catalog stays simple.</li>
<li class=""><strong>Capture a serial for every unit</strong> as you receive stock — type, scan, or paste in bulk, with automatic uniqueness checks.</li>
<li class=""><strong>Choose the exact units at fulfillment</strong> — SKU.io suggests the oldest-received serials first and won't let you ship until every unit is confirmed.</li>
<li class=""><strong>See serials on your documents</strong> — pick lists and packing slips list the exact units to grab, each with a check-off box.</li>
<li class=""><strong>Trace any unit end to end</strong> — search by serial, follow its full Received → Shipped timeline, and quarantine a unit in one click when it has to come off the shelf.</li>
</ul>
<h2 class="anchor anchorTargetStickyNavbar_Vzrq" id="turn-it-on-only-where-you-need-it">Turn it on only where you need it<a href="https://docs.sku.io/release-notes/2026/07/21/serial-number-tracking#turn-it-on-only-where-you-need-it" class="hash-link" aria-label="Direct link to Turn it on only where you need it" title="Direct link to Turn it on only where you need it" translate="no">​</a></h2>
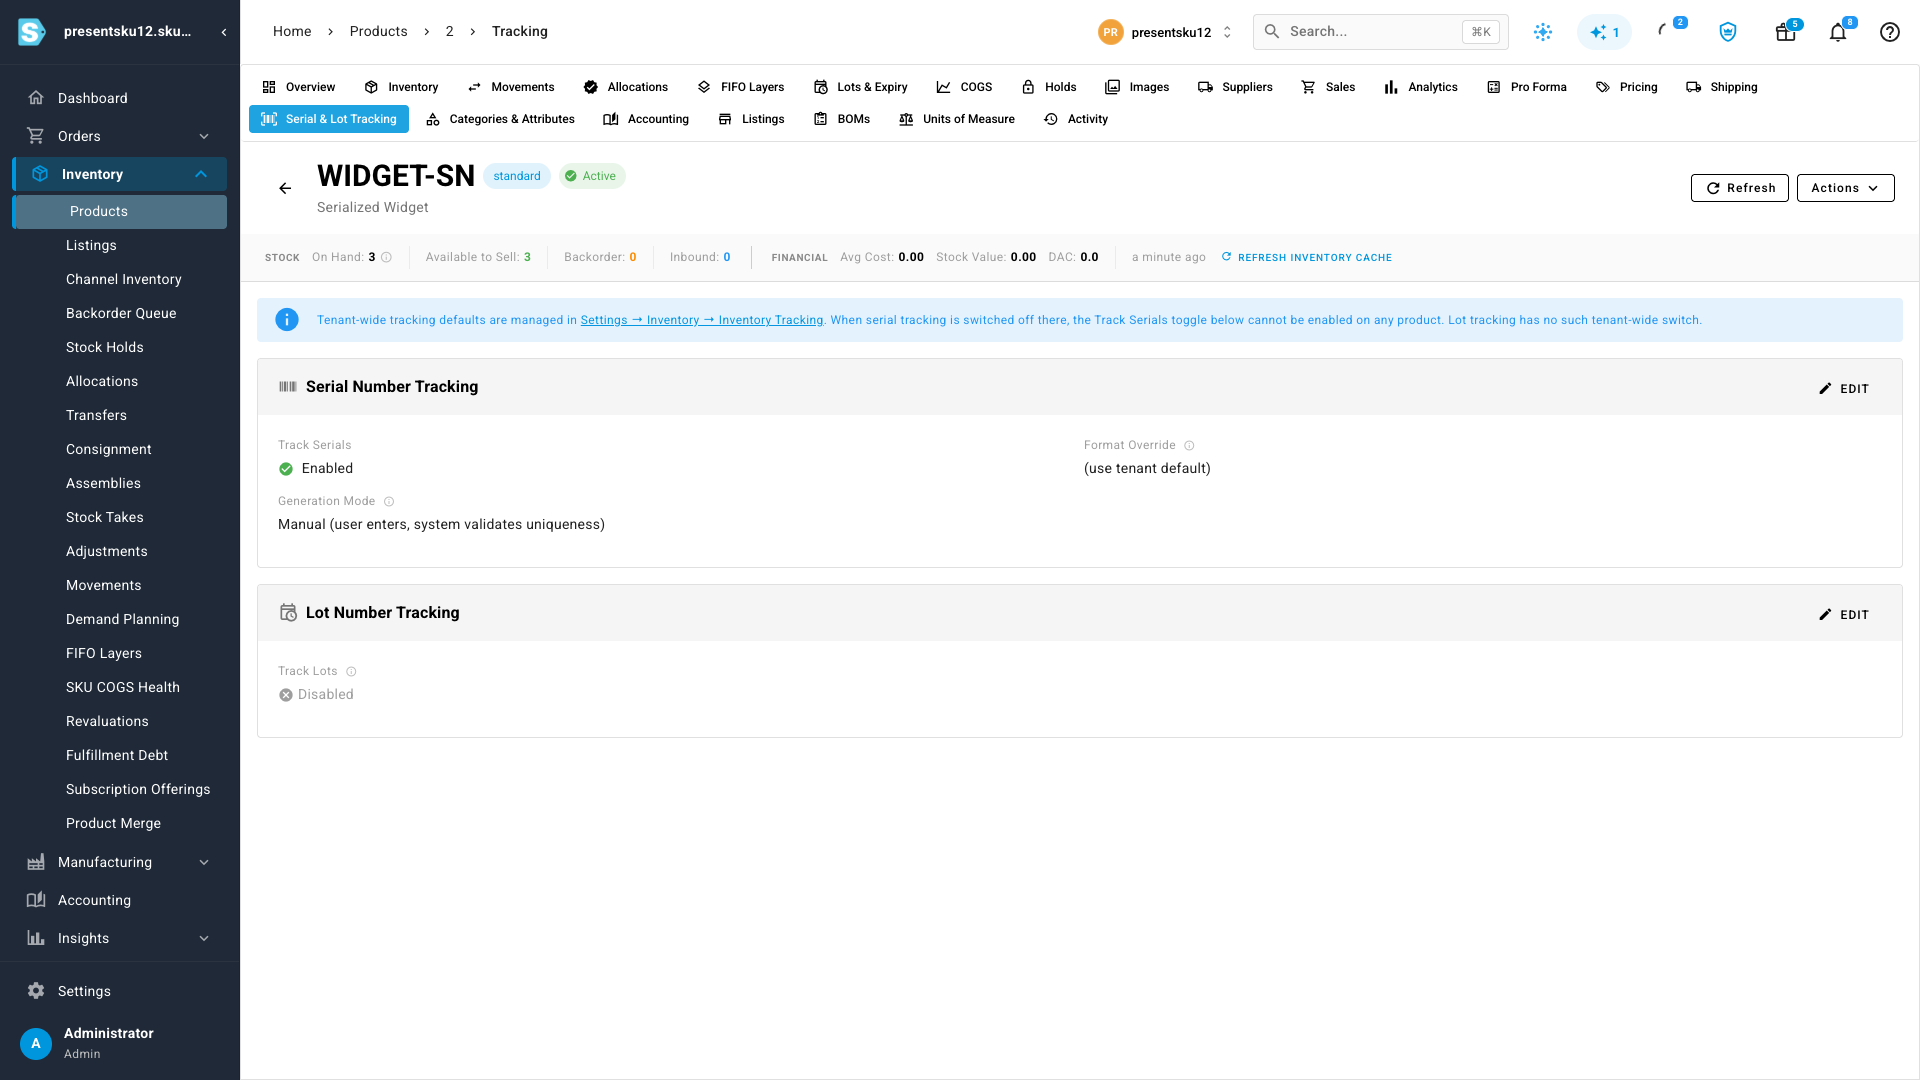
<p>Serial tracking is a two-step opt-in, so it never gets in the way of products that don't need it. First an admin flips the tenant-wide switch in <strong>Settings → Inventory → Inventory Tracking</strong>; then each product that should be serialized gets its own <strong>Track Serials</strong> toggle on its <strong>Serial &amp; Lot Tracking</strong> tab. You also choose how serials are created — type or scan each one yourself, with SKU.io validating uniqueness for you.</p>
<p><img decoding="async" loading="lazy" alt="A product&amp;#39;s Serial &amp;amp; Lot Tracking tab, with Track Serials enabled and the generation mode set to manual entry with automatic uniqueness validation" src="https://docs.sku.io/assets/images/product-tracking-toggle-9bdaec59c0e46784ef4cc1005530173e.png" width="1920" height="1080" class="img_ev3q"></p>
<h2 class="anchor anchorTargetStickyNavbar_Vzrq" id="capture-serials-as-stock-comes-in">Capture serials as stock comes in<a href="https://docs.sku.io/release-notes/2026/07/21/serial-number-tracking#capture-serials-as-stock-comes-in" class="hash-link" aria-label="Direct link to Capture serials as stock comes in" title="Direct link to Capture serials as stock comes in" translate="no">​</a></h2>
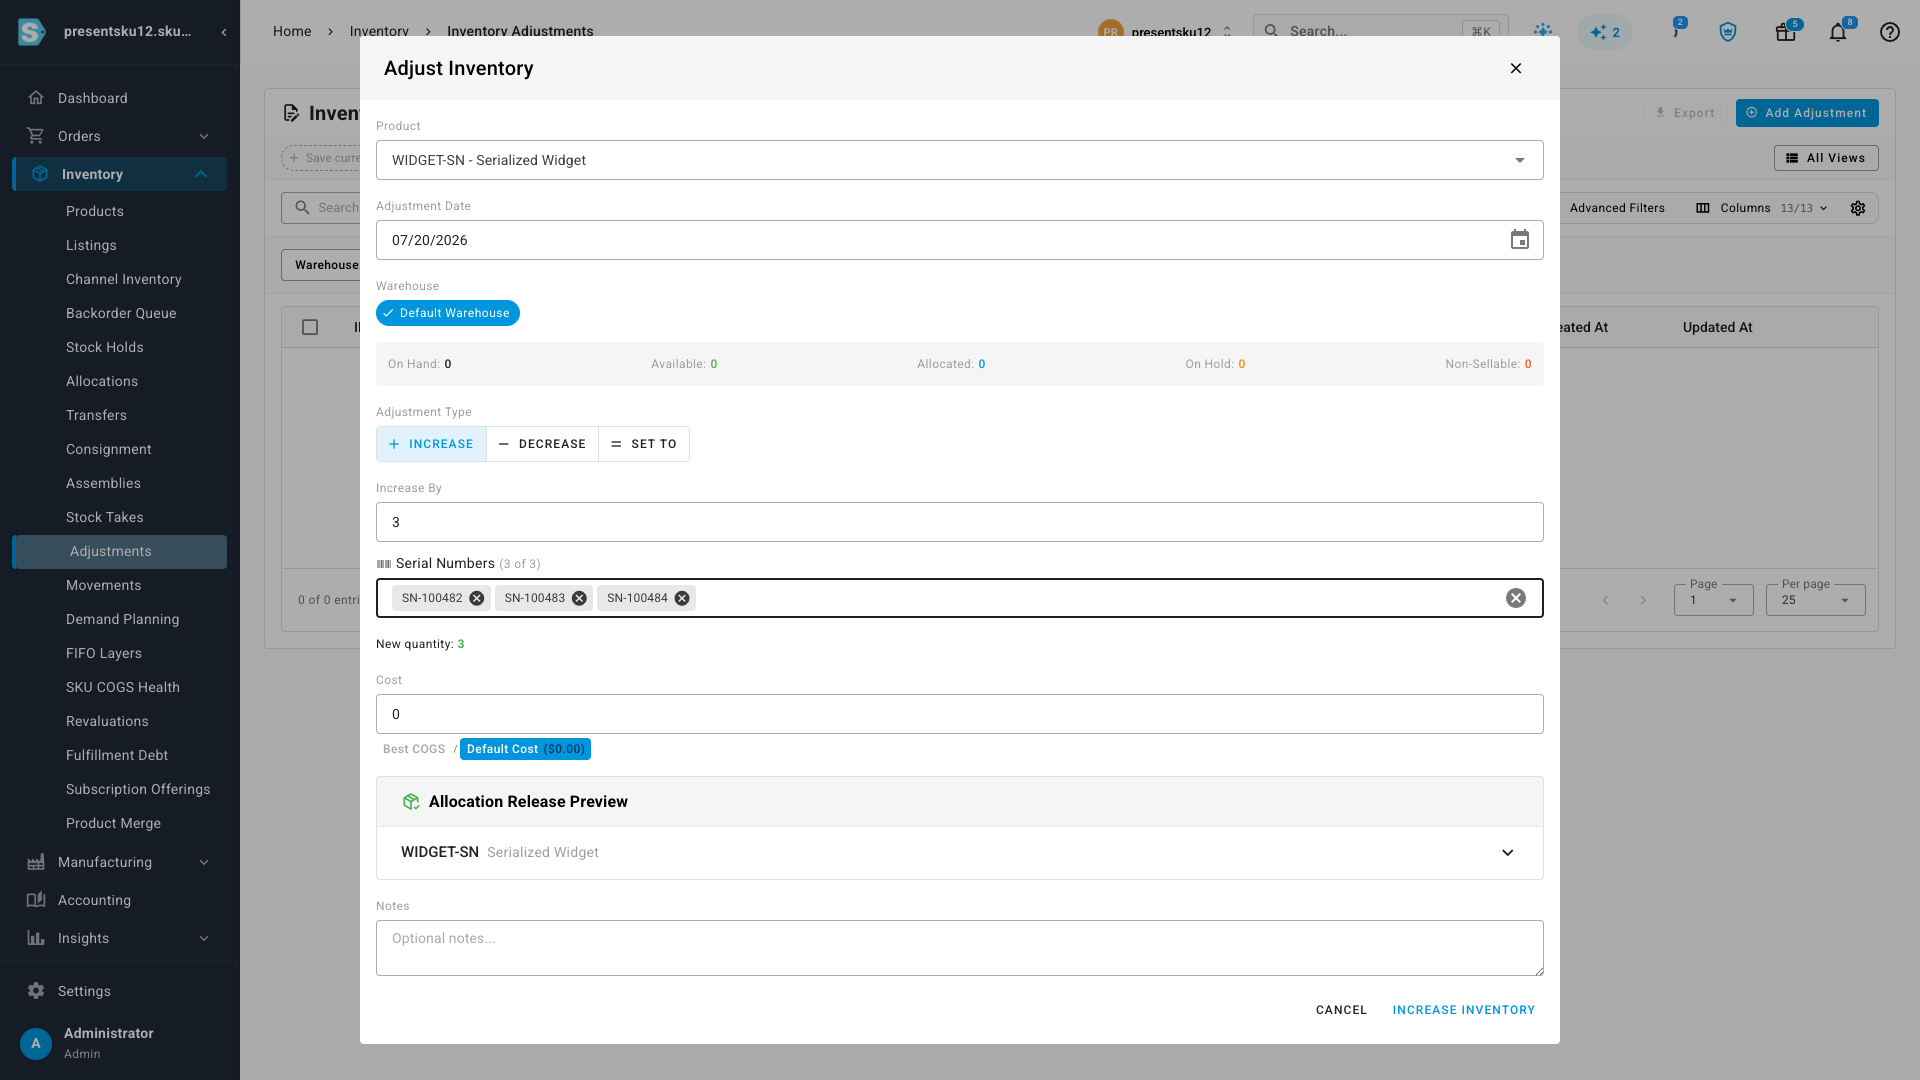
<p>Once a product is serialized, receiving stock asks for the detail that matters. Add inventory as usual and a <strong>Serial Numbers</strong> field appears, keeping a running count against the quantity — "3 of 3" — so you can't commit a receipt that's missing a unit. Scan them one at a time, type them, or paste a whole list at once; each serial becomes a chip you can review and remove before you commit.</p>
<p><img decoding="async" loading="lazy" alt="The Adjust Inventory dialog receiving three units of a serialized product, with all three serial numbers captured and a 3-of-3 counter" src="https://docs.sku.io/assets/images/serial-capture-79f9d4c24a2e7ed48fafa20234549b61.png" width="1920" height="1080" class="img_ev3q"></p>
<h2 class="anchor anchorTargetStickyNavbar_Vzrq" id="pick-the-exact-units-when-you-fulfill">Pick the exact units when you fulfill<a href="https://docs.sku.io/release-notes/2026/07/21/serial-number-tracking#pick-the-exact-units-when-you-fulfill" class="hash-link" aria-label="Direct link to Pick the exact units when you fulfill" title="Direct link to Pick the exact units when you fulfill" translate="no">​</a></h2>
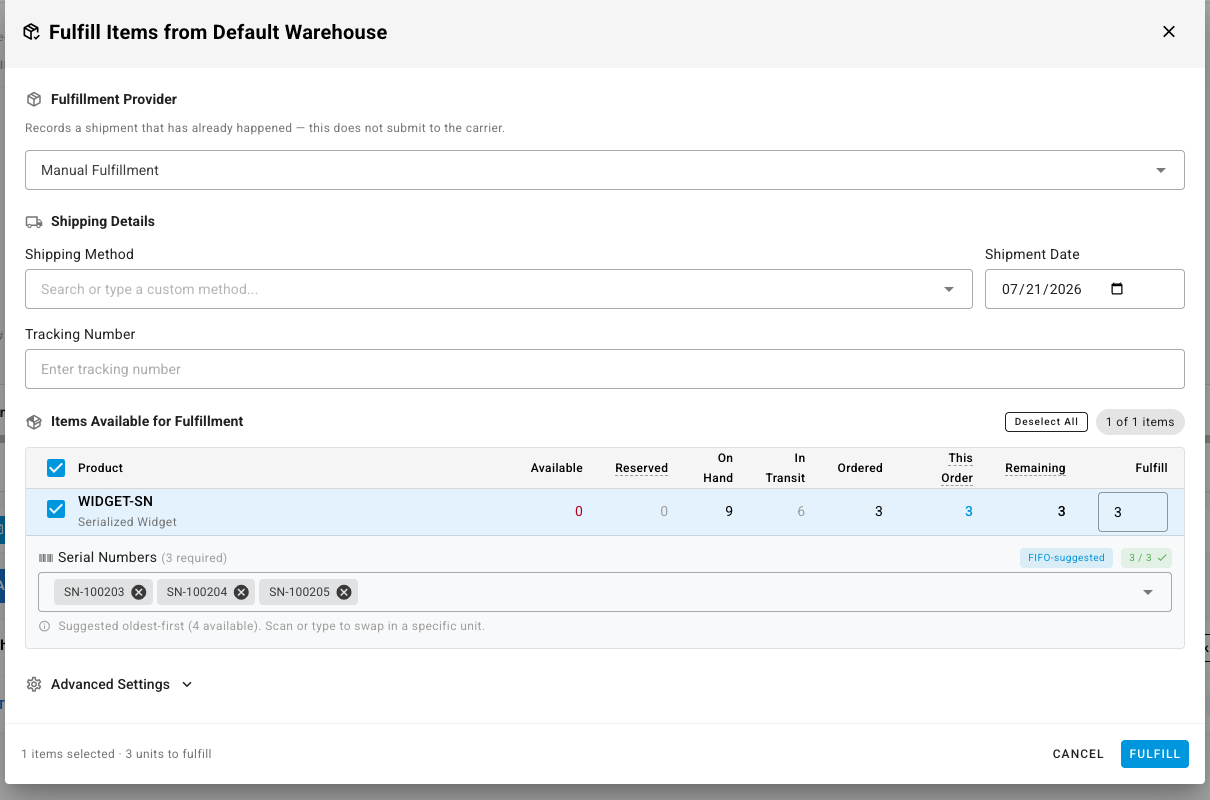
<p>When you ship a serialized product, SKU.io does the choosing for you — and lets you override. The fulfillment dialog suggests serials <strong>oldest-received-first</strong> and counts them against the quantity ("3 / 3"), so a serialized line can't ship a unit short. Need to send a specific one instead? Remove a suggestion and scan or type the serial you're actually pulling. The units you confirm are the ones recorded as shipped against the order — so the trail from receipt to customer is exact.</p>
<p><img decoding="async" loading="lazy" alt="The Fulfill Items dialog for a serialized product, with three FIFO-suggested serials confirmed and a 3-of-3 validity check" src="https://docs.sku.io/assets/images/fulfillment-serial-selection-e1416a255c9fae157daa6df005325b85.png" width="1210" height="800" class="img_ev3q"></p>
<h2 class="anchor anchorTargetStickyNavbar_Vzrq" id="serials-on-your-pick-lists-and-packing-slips">Serials on your pick lists and packing slips<a href="https://docs.sku.io/release-notes/2026/07/21/serial-number-tracking#serials-on-your-pick-lists-and-packing-slips" class="hash-link" aria-label="Direct link to Serials on your pick lists and packing slips" title="Direct link to Serials on your pick lists and packing slips" translate="no">​</a></h2>
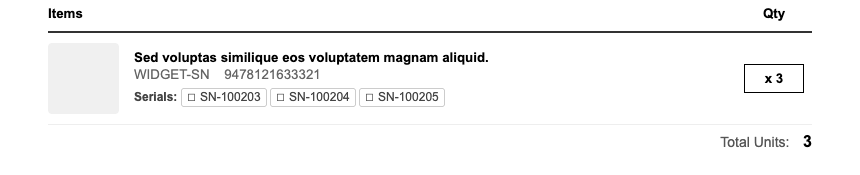
<p>Your warehouse paperwork now carries the detail that matters. Pick lists and packing slips print the specific serials for each line — each with a check-off box — so whoever's packing the box grabs exactly the right units and can tick them off as they go. It happens automatically for serialized products; documents for everything else look exactly as they do today.</p>
<p><img decoding="async" loading="lazy" alt="A packing slip line for a serialized product listing its three serial numbers, each with a scan-verify checkbox" src="https://docs.sku.io/assets/images/document-serials-cfe4c1d46c5d3fc799487231a3f186f8.png" width="860" height="175" class="img_ev3q"></p>
<h2 class="anchor anchorTargetStickyNavbar_Vzrq" id="trace-every-unit--and-pull-one-when-you-need-to">Trace every unit — and pull one when you need to<a href="https://docs.sku.io/release-notes/2026/07/21/serial-number-tracking#trace-every-unit--and-pull-one-when-you-need-to" class="hash-link" aria-label="Direct link to Trace every unit — and pull one when you need to" title="Direct link to Trace every unit — and pull one when you need to" translate="no">​</a></h2>
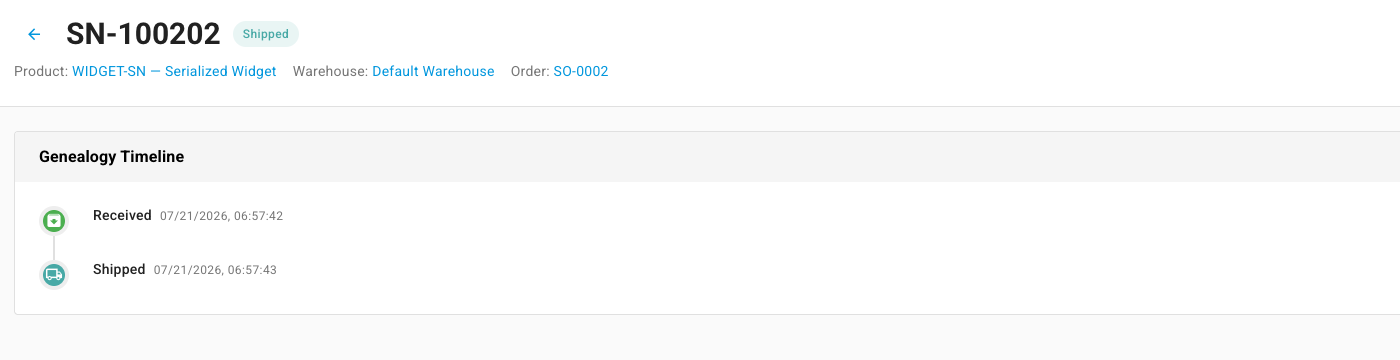
<p>Every serial has its own page with a full <strong>Received → Shipped</strong> timeline, linked back to the product, warehouse, and order it moved through — so a warranty claim, a recall, or a "where did this one go?" question is a single lookup, not an investigation. Browse or search the whole list from <strong>Inventory → Serial Numbers</strong>, filter by status, and when a unit has to come off the shelf — damage, inspection, a recall — <strong>quarantine</strong> it in one click to hold it out of stock, then release it back once it's cleared.</p>
<p><img decoding="async" loading="lazy" alt="A serial number&amp;#39;s detail page showing its genealogy timeline — received then shipped — with links to its product, warehouse, and order" src="https://docs.sku.io/assets/images/serial-history-f549374257666d869a7e8eef4615c026.png" width="1400" height="360" class="img_ev3q"></p>
<h2 class="anchor anchorTargetStickyNavbar_Vzrq" id="where-to-find-it">Where to find it<a href="https://docs.sku.io/release-notes/2026/07/21/serial-number-tracking#where-to-find-it" class="hash-link" aria-label="Direct link to Where to find it" title="Direct link to Where to find it" translate="no">​</a></h2>
<p>Switch it on under <strong>Settings → Inventory → Inventory Tracking</strong>, then enable <strong>Track Serials</strong> on any product from its <strong>Serial &amp; Lot Tracking</strong> tab. From there it flows on its own: every receipt captures serials, every fulfillment lets you choose them, and your pick lists and packing slips print them. Look up any unit anytime from <strong>Inventory → Serial Numbers</strong>. Lot and batch numbers work the same way for products that need expiry or batch traceability instead.</p>]]></content>
        <author>
            <name>SKU.io Product Team</name>
            <uri>https://sku.io</uri>
        </author>
        <category label="Major Feature" term="Major Feature"/>
        <category label="New" term="New"/>
        <category label="Inventory" term="Inventory"/>
        <category label="Fulfillment" term="Fulfillment"/>
    </entry>
    <entry>
        <title type="html"><![CDATA[See the Impact Before You Adjust Stock — full visibility and control]]></title>
        <id>https://docs.sku.io/release-notes/2026/07/21/inventory-adjustment-impact</id>
        <link href="https://docs.sku.io/release-notes/2026/07/21/inventory-adjustment-impact"/>
        <updated>2026-07-21T02:10:00.000Z</updated>
        <summary type="html"><![CDATA[When you add or remove inventory, SKU.io now previews exactly which orders it will affect — filling backorders on a receipt, or backordering committed orders on a removal — before you commit.]]></summary>
        <content type="html"><![CDATA[<p>Adjusting stock used to be a leap of faith. When you removed units — for damage, loss, a recount, or a correction — you couldn't see what that stock was already promised to. Take a few units, and a customer's order could quietly slip into backorder with nobody the wiser. Add stock, and you had no idea which waiting orders it would unblock. <strong>Now every inventory adjustment shows its impact before you commit</strong> — the exact orders it will fill or backorder — so nothing happens behind your back.</p>
<p><strong>✨ What this means for you:</strong></p>
<ul>
<li class=""><strong>Removing stock?</strong> See every order that will drop back to backorder — with the customer and quantity — before you confirm.</li>
<li class=""><strong>Adding stock?</strong> See which backordered orders the new units can fill, and <strong>choose</strong> which ones get filled first.</li>
<li class=""><strong>Never stuck when stock is already committed</strong> — you can send the affected orders to backorder, or even <strong>void the shipping label with the carrier</strong> (when it's still eligible) to free the units.</li>
<li class="">A live <strong>On Hand / Available / Allocated</strong> readout on every adjustment, so you always know what's really free to move.</li>
</ul>
<h2 class="anchor anchorTargetStickyNavbar_Vzrq" id="removing-stock-see-exactly-who-it-affects">Removing stock? See exactly who it affects<a href="https://docs.sku.io/release-notes/2026/07/21/inventory-adjustment-impact#removing-stock-see-exactly-who-it-affects" class="hash-link" aria-label="Direct link to Removing stock? See exactly who it affects" title="Direct link to Removing stock? See exactly who it affects" translate="no">​</a></h2>
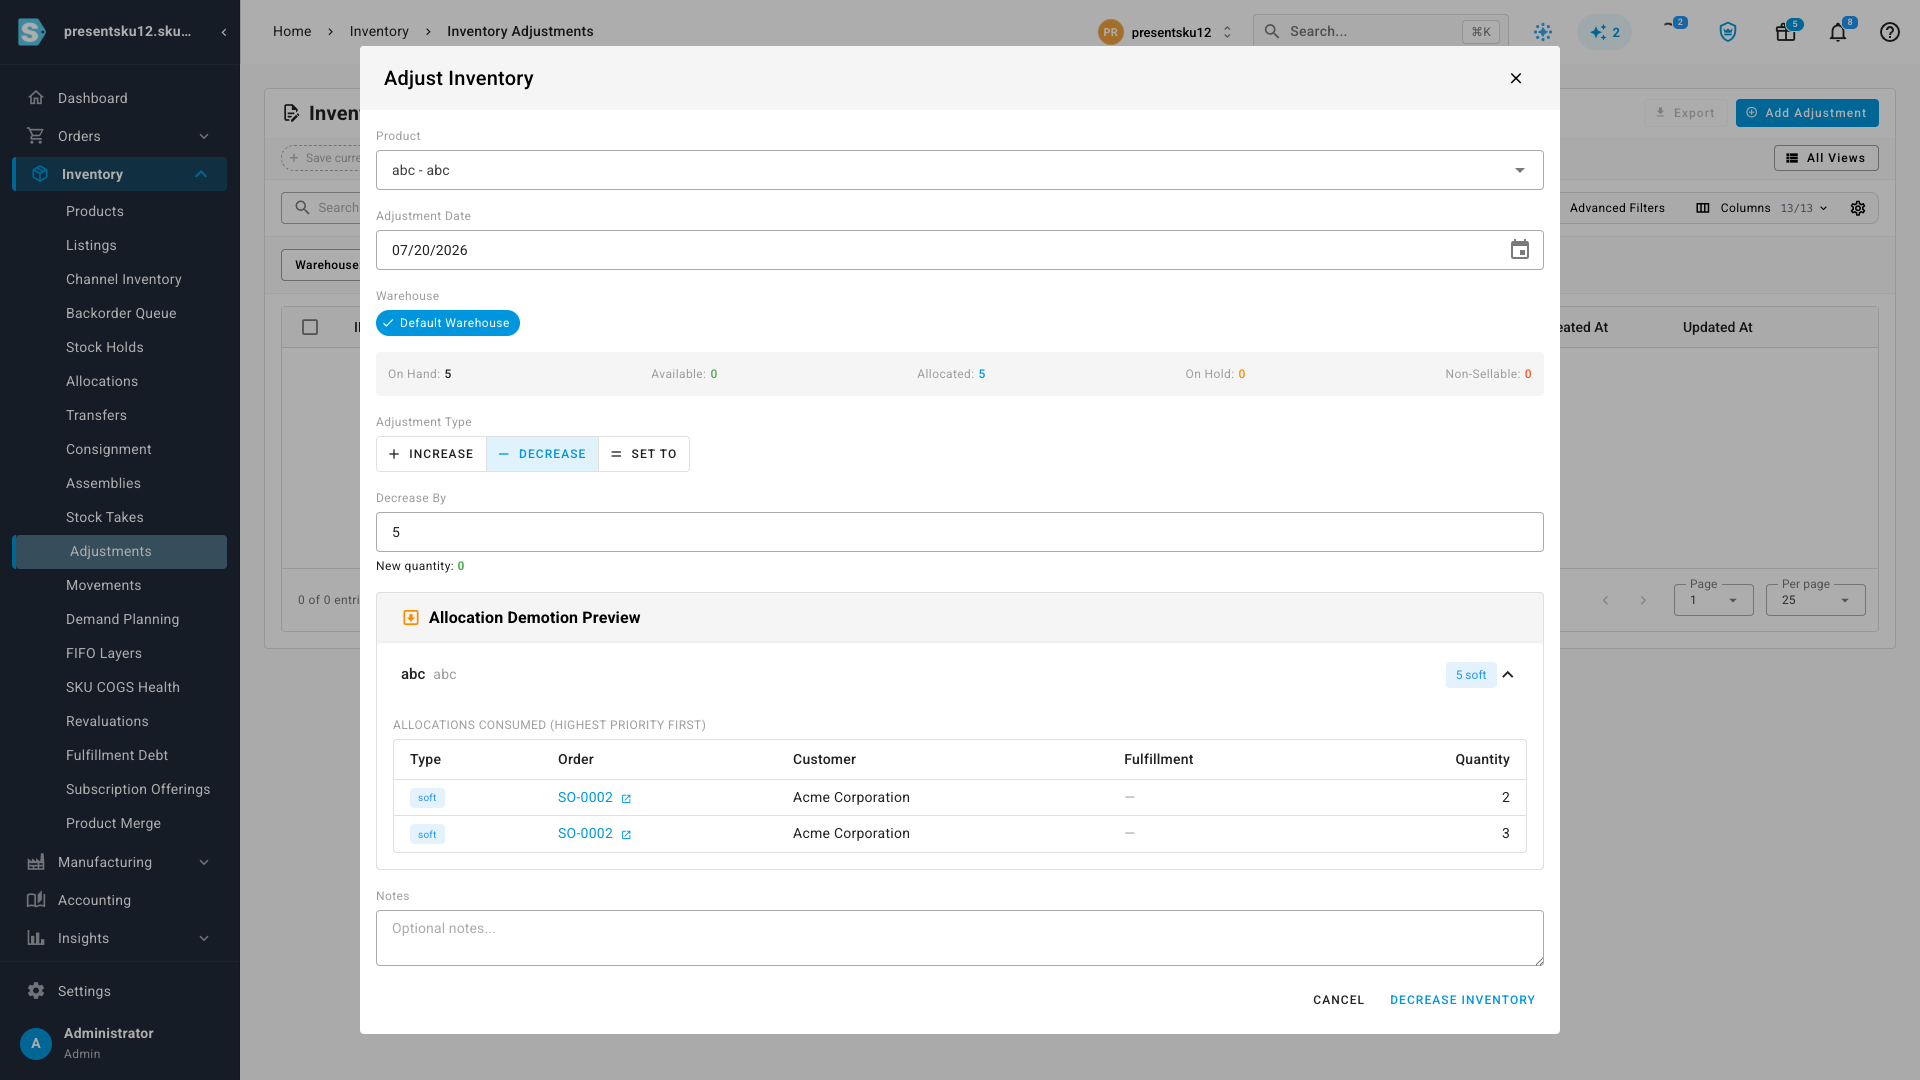
<p>Pick a product and choose <strong>Decrease</strong>, and SKU.io shows an <strong>Allocation Demotion Preview</strong>: the specific orders whose stock you're about to reclaim, each with its customer and quantity, ordered so the least-urgent commitments are consumed first. Instead of discovering a backorder after the fact, you see it before you click — and you can dial the quantity down if the impact is more than you intended.</p>
<p><img decoding="async" loading="lazy" alt="The Adjust Inventory dialog in Decrease mode, showing an Allocation Demotion Preview that lists each order — with customer and quantity — whose stock the removal would send back to backorder" src="https://docs.sku.io/assets/images/demotion-preview-520d779ad8b22fcd6954653038517569.png" width="1920" height="1080" class="img_ev3q"></p>
<h2 class="anchor anchorTargetStickyNavbar_Vzrq" id="adding-stock-choose-which-orders-it-fills">Adding stock? Choose which orders it fills<a href="https://docs.sku.io/release-notes/2026/07/21/inventory-adjustment-impact#adding-stock-choose-which-orders-it-fills" class="hash-link" aria-label="Direct link to Adding stock? Choose which orders it fills" title="Direct link to Adding stock? Choose which orders it fills" translate="no">​</a></h2>
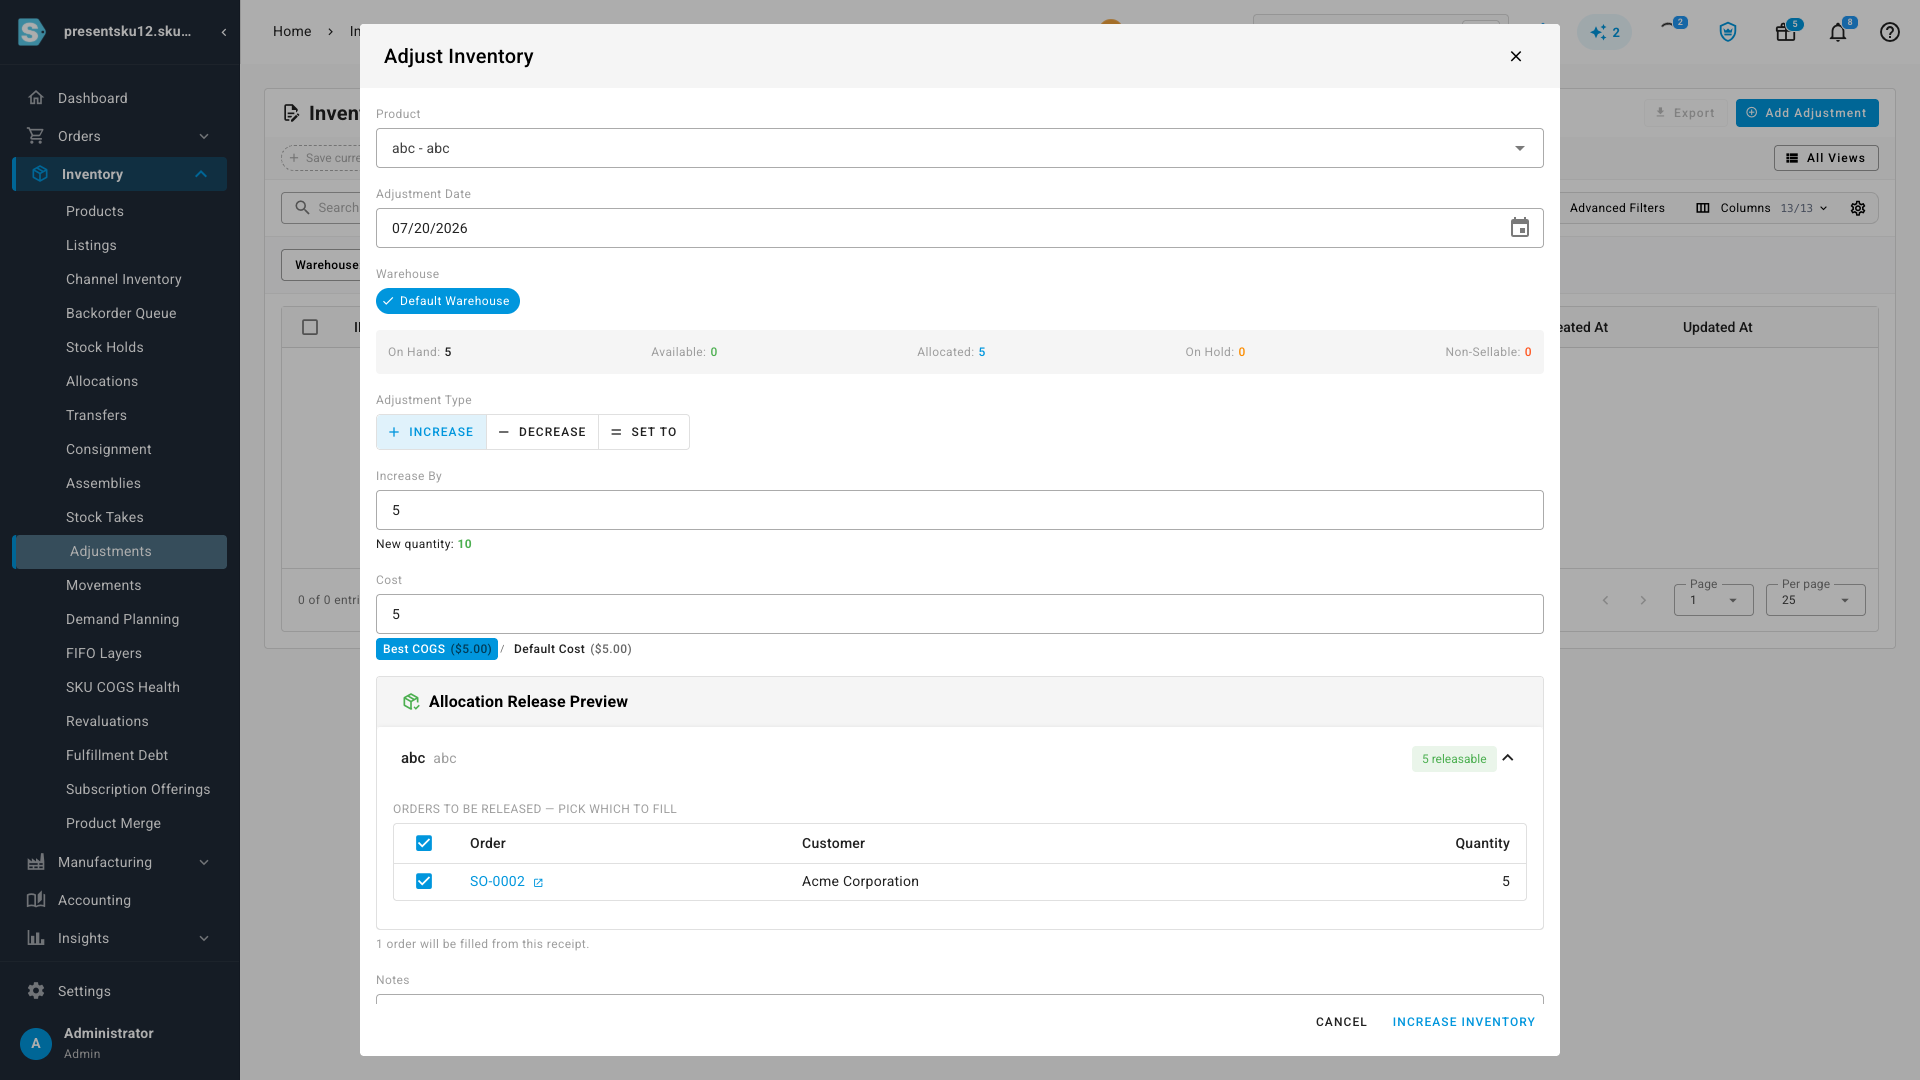
<p>Switch to <strong>Increase</strong> (or receive against a purchase order) and the same panel flips to an <strong>Allocation Release Preview</strong>: it shows the backordered orders your incoming units can unblock, each with a checkbox. Fill them all, or hand-pick which orders get the stock first — you're in control of where the new inventory lands, right at the moment you add it.</p>
<p><img decoding="async" loading="lazy" alt="The Adjust Inventory dialog in Increase mode, showing an Allocation Release Preview with a checkbox list of backordered orders you can choose to fill from the incoming stock" src="https://docs.sku.io/assets/images/release-preview-e3ee1350f376e39f30c5d3ccaa23ab50.png" width="1920" height="1080" class="img_ev3q"></p>
<h2 class="anchor anchorTargetStickyNavbar_Vzrq" id="already-spoken-for-you-still-have-options--not-a-dead-end">Already spoken for? You still have options — not a dead end<a href="https://docs.sku.io/release-notes/2026/07/21/inventory-adjustment-impact#already-spoken-for-you-still-have-options--not-a-dead-end" class="hash-link" aria-label="Direct link to Already spoken for? You still have options — not a dead end" title="Direct link to Already spoken for? You still have options — not a dead end" translate="no">​</a></h2>
<p>Sometimes the stock you're trying to remove is already allocated to orders, so a straight reduction isn't possible. Instead of a hard stop, SKU.io lays out your choices:</p>
<ul>
<li class=""><strong>Reserved-but-not-yet-shipped units</strong> can be sent straight back to backorder — you see exactly which sales orders are affected, and decide whether that trade-off is worth it.</li>
<li class=""><strong>Units already on a printed shipping label</strong> are protected: rather than pulling stock out from under a shipment, SKU.io offers to <strong>void the label with the shipping provider</strong> — when the carrier still allows a cancellation — and return those units to stock. If a label isn't eligible to be voided, you'll be told plainly, so nothing is taken by force and no order gets double-shipped.</li>
</ul>
<p>Either way, when the stock isn't freely available you always have a clear, deliberate path — backorder the order, or void the shipment — chosen by you, with the full consequences in view.</p>
<h2 class="anchor anchorTargetStickyNavbar_Vzrq" id="where-to-find-it">Where to find it<a href="https://docs.sku.io/release-notes/2026/07/21/inventory-adjustment-impact#where-to-find-it" class="hash-link" aria-label="Direct link to Where to find it" title="Direct link to Where to find it" translate="no">​</a></h2>
<p>It's built into the everyday adjustment flow — no new screen to learn. Go to <strong>Inventory → Adjustments → Add Adjustment</strong>, choose a product and a direction, and the impact preview appears as soon as your change would touch allocated stock. The same visibility follows you into receiving against a purchase order, so goods-in and goods-out both tell you what's about to happen before it does.</p>]]></content>
        <author>
            <name>SKU.io Product Team</name>
            <uri>https://sku.io</uri>
        </author>
        <category label="Major Feature" term="Major Feature"/>
        <category label="New" term="New"/>
        <category label="Inventory" term="Inventory"/>
    </entry>
    <entry>
        <title type="html"><![CDATA[Automatic Daily Exchange Rates — current multi-currency, hands-off]]></title>
        <id>https://docs.sku.io/release-notes/2026/07/20/exchange-rates</id>
        <link href="https://docs.sku.io/release-notes/2026/07/20/exchange-rates"/>
        <updated>2026-07-20T06:16:45.000Z</updated>
        <summary type="html"><![CDATA[SKU.io now fetches exchange rates every day and converts every currency to your base currency automatically — with a custom-rate override and a full rate history.]]></summary>
        <content type="html"><![CDATA[<p>If you buy or sell in more than one currency, keeping exchange rates accurate used to be a manual chore — someone had to remember to update the conversion for each currency, and a rate that quietly went stale skewed your margins, costs, and reports. <strong>Automatic Daily Exchange Rates</strong> takes that job off your plate: SKU.io now pulls fresh rates every day and keeps every currency current, converted to <em>your</em> base currency automatically — whatever that base currency is.</p>
<p><strong>✨ What this means for you:</strong></p>
<ul>
<li class="">Exchange rates update <strong>automatically every day</strong> — no more manual entry.</li>
<li class="">Every currency converts to <strong>your</strong> base currency (not just US Dollars), using live cross-rates.</li>
<li class=""><strong>Pin a custom rate</strong> on any currency when you need to — automation leaves it alone.</li>
<li class="">Always know <strong>how fresh</strong> your rates are, and <strong>refresh on demand</strong>.</li>
<li class="">A complete <strong>day-by-day history</strong> of every rate, so you can see how a currency moved over time.</li>
</ul>
<h2 class="anchor anchorTargetStickyNavbar_Vzrq" id="set-it-and-forget-it">Set it and forget it<a href="https://docs.sku.io/release-notes/2026/07/20/exchange-rates#set-it-and-forget-it" class="hash-link" aria-label="Direct link to Set it and forget it" title="Direct link to Set it and forget it" translate="no">​</a></h2>
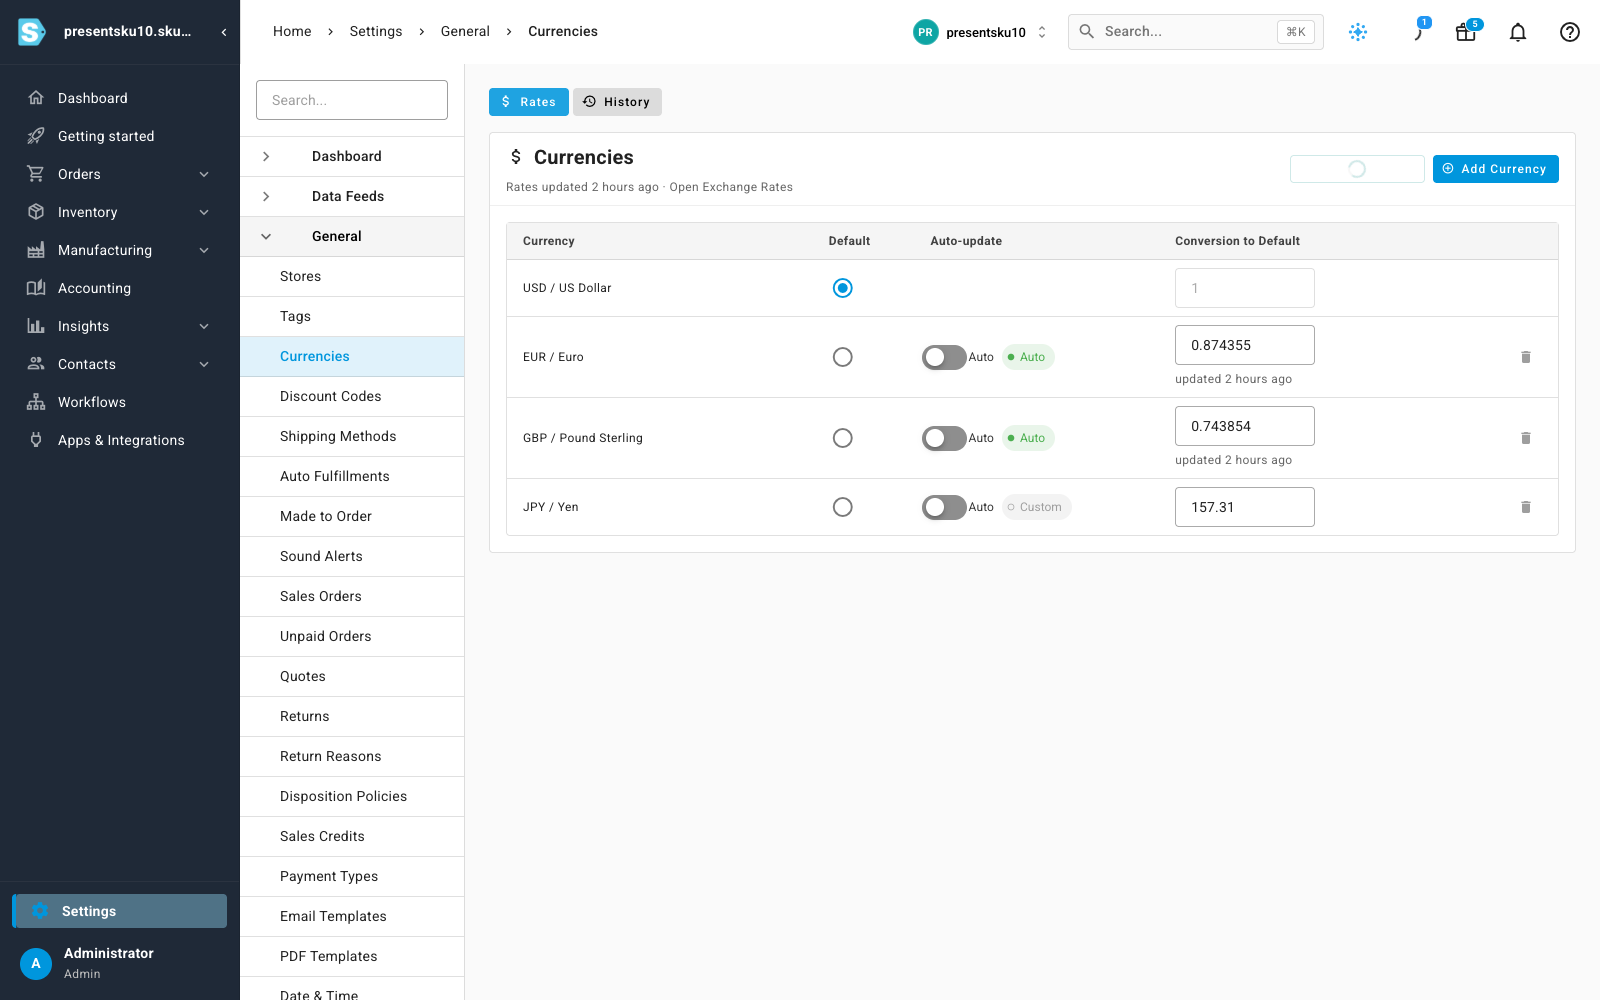
<p>The Currencies screen now shows a live conversion for every foreign currency, refreshed daily and converted to your base currency. A green <strong>Auto</strong> chip means that currency's rate is managed for you, and the header tells you exactly when rates were last updated and where they came from.</p>
<p><img decoding="async" loading="lazy" alt="The Currencies screen showing each currency&amp;#39;s live rate, the Auto-update toggle and chip, and the &amp;quot;Rates updated · Open Exchange Rates&amp;quot; status" src="https://docs.sku.io/assets/images/rates-5b51dd227e8d2979eb8ea5c9928b12ef.png" width="1600" height="1000" class="img_ev3q"></p>
<h2 class="anchor anchorTargetStickyNavbar_Vzrq" id="keep-a-custom-rate-when-you-need-one">Keep a custom rate when you need one<a href="https://docs.sku.io/release-notes/2026/07/20/exchange-rates#keep-a-custom-rate-when-you-need-one" class="hash-link" aria-label="Direct link to Keep a custom rate when you need one" title="Direct link to Keep a custom rate when you need one" translate="no">​</a></h2>
<p>Automation is the default, but you stay in control. Turn a currency's <strong>Auto-update</strong> toggle off to pin your own rate — the daily refresh will never overwrite it (the Yen above is set manually). Flip it back on and it picks up the live rate again on the next update.</p>
<h2 class="anchor anchorTargetStickyNavbar_Vzrq" id="refresh-on-demand-with-honest-status">Refresh on demand, with honest status<a href="https://docs.sku.io/release-notes/2026/07/20/exchange-rates#refresh-on-demand-with-honest-status" class="hash-link" aria-label="Direct link to Refresh on demand, with honest status" title="Direct link to Refresh on demand, with honest status" translate="no">​</a></h2>
<p>Need the latest numbers right now? Click <strong>Refresh Rates</strong>. And if the rate source is ever unreachable, SKU.io tells you plainly and keeps using your last known rates — it never quietly passes off stale numbers as current.</p>
<h2 class="anchor anchorTargetStickyNavbar_Vzrq" id="a-history-you-can-look-back-on">A history you can look back on<a href="https://docs.sku.io/release-notes/2026/07/20/exchange-rates#a-history-you-can-look-back-on" class="hash-link" aria-label="Direct link to A history you can look back on" title="Direct link to A history you can look back on" translate="no">​</a></h2>
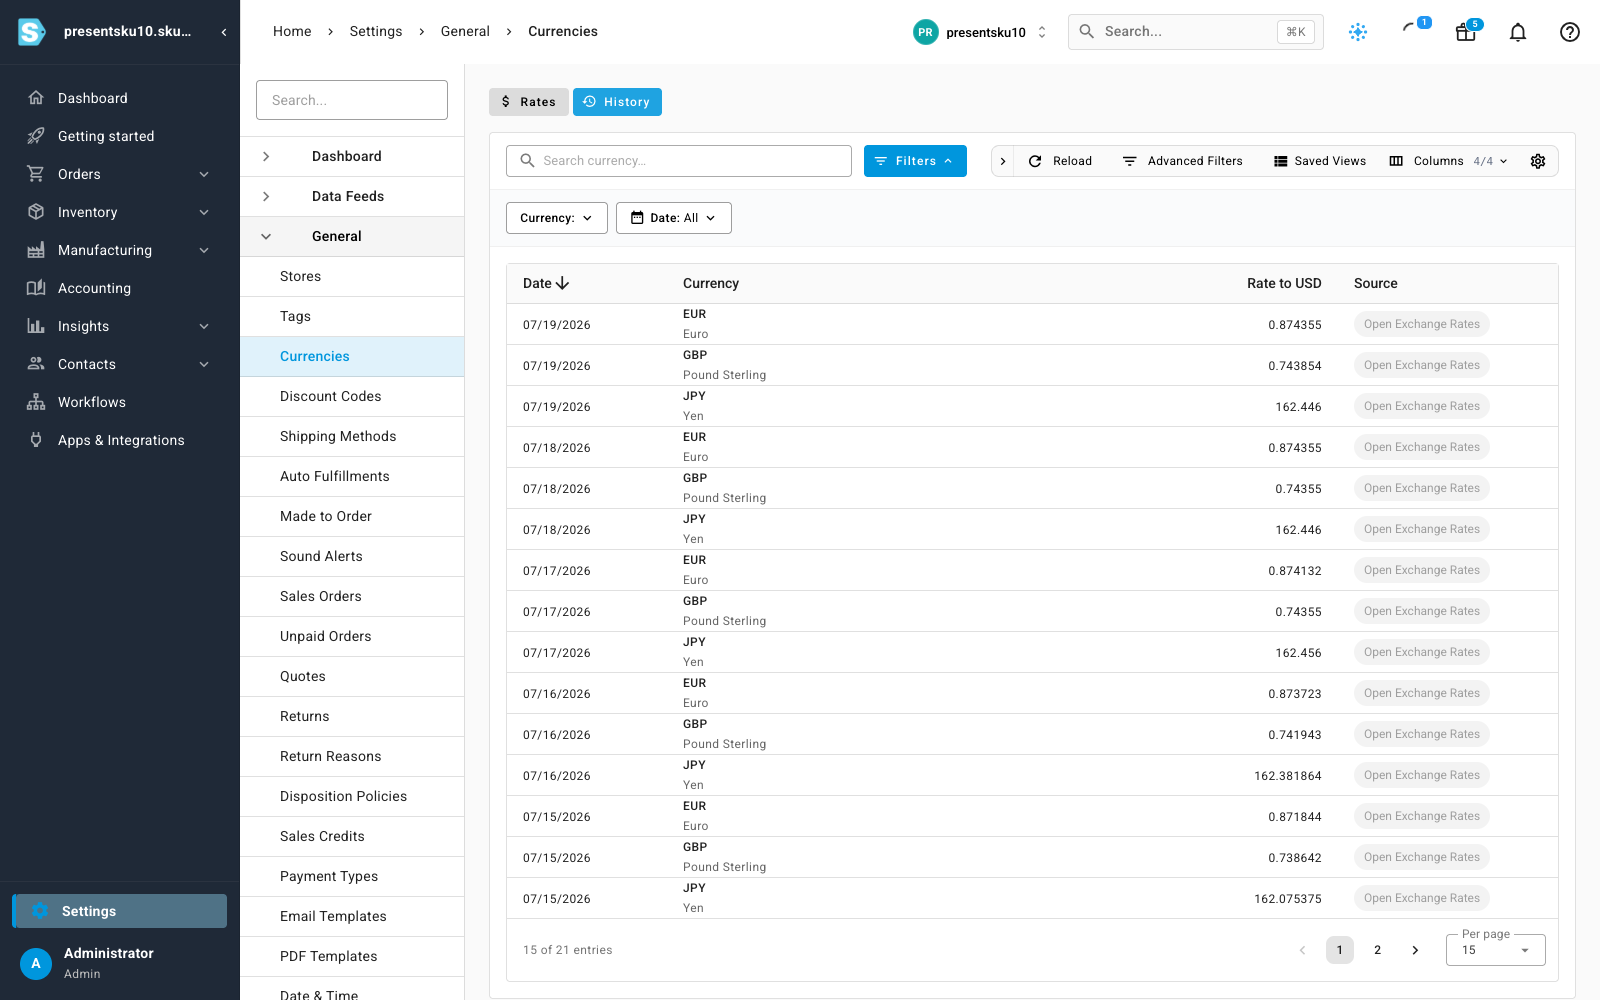
<p>The new <strong>History</strong> tab is a searchable, sortable table of every currency's rate to your base currency, day by day. Filter by currency or by date range to see exactly how a rate moved over time — handy for reconciling foreign‑currency orders, bills, and payouts.</p>
<p><img decoding="async" loading="lazy" alt="The Exchange Rate History tab: a filterable, sortable table of each currency&amp;#39;s daily rate to the base currency" src="https://docs.sku.io/assets/images/history-4bea5e3d5c3c215fb1ef26607935099d.png" width="1600" height="1000" class="img_ev3q"></p>
<h2 class="anchor anchorTargetStickyNavbar_Vzrq" id="where-to-find-it">Where to find it<a href="https://docs.sku.io/release-notes/2026/07/20/exchange-rates#where-to-find-it" class="hash-link" aria-label="Direct link to Where to find it" title="Direct link to Where to find it" translate="no">​</a></h2>
<p>Head to <strong>Settings → General → Currencies</strong>. The live rates, Auto-update controls, and freshness status are on the <strong>Rates</strong> tab; the day‑by‑day rate history is on the <strong>History</strong> tab — which you can bookmark or open in its own tab.</p>]]></content>
        <author>
            <name>SKU.io Product Team</name>
            <uri>https://sku.io</uri>
        </author>
        <category label="Major Feature" term="Major Feature"/>
        <category label="New" term="New"/>
        <category label="Accounting" term="Accounting"/>
    </entry>
    <entry>
        <title type="html"><![CDATA[eBay Payout Accounting — reconcile every eBay payout to your books in one entry]]></title>
        <id>https://docs.sku.io/release-notes/2026/07/19/ebay-payout-accounting</id>
        <link href="https://docs.sku.io/release-notes/2026/07/19/ebay-payout-accounting"/>
        <updated>2026-07-19T11:12:21.000Z</updated>
        <summary type="html"><![CDATA[Sync eBay Managed Payments payouts into SKU and post one clean, deposit-matched summary per payout to your accounting — split by sales, refunds, and fees.]]></summary>
        <content type="html"><![CDATA[<p>If you sell on eBay, you know the pain of month-end reconciliation. An eBay Managed Payments payout is a single net deposit that quietly bundles your gross sales, refunds, final value fees, ad fees, shipping-label costs, and adjustments — so the number that lands in your bank is <em>none</em> of your revenue figures. Matching it back to your books by hand takes hours, and coding the whole deposit to one income account quietly misstates your revenue, fees, and tax.</p>
<p><strong>eBay Payout Accounting</strong> fixes that. SKU now pulls your eBay Managed Payments payouts, breaks each one into its real components, and posts a single deposit-matched summary to your accounting — one entry that reconciles to your bank deposit to the cent.</p>
<p><strong>✨ What this means for you:</strong></p>
<ul>
<li class=""><strong>One summary per payout, not thousands of lines.</strong> Each eBay deposit becomes a single clean accounting entry that matches your bank feed exactly — reconcile in one click instead of rebuilding it from hundreds of orders.</li>
<li class=""><strong>Every component on the right account.</strong> Sales, refunds, final value fees, ad fees, shipping labels, and charges are each split onto the account you choose — no more lumping the deposit into one bucket.</li>
<li class=""><strong>Sync on your terms.</strong> Pull just the new payouts, a custom date range, or run a full re-sync — whatever you need.</li>
<li class=""><strong>Full drill-down.</strong> See exactly what makes up any payout, right down to the individual transaction lines, all searchable.</li>
</ul>
<h2 class="anchor anchorTargetStickyNavbar_Vzrq" id="sync-your-ebay-payouts">Sync your eBay payouts<a href="https://docs.sku.io/release-notes/2026/07/19/ebay-payout-accounting#sync-your-ebay-payouts" class="hash-link" aria-label="Direct link to Sync your eBay payouts" title="Direct link to Sync your eBay payouts" translate="no">​</a></h2>
<p>Head to the eBay <strong>Finance</strong> area and hit <strong>Sync Payouts</strong>. You choose how much to pull — fetch just what's new since your last sync, re-import from a start date, grab a custom date range, or run a full re-sync. SKU pulls each payout together with its underlying transactions.</p>
<p><img decoding="async" loading="lazy" alt="The Sync Payouts dialog with fetch options: new payouts, from start date, custom date range, or full re-sync" src="https://docs.sku.io/assets/images/sync-modal-4a826880b5aa2a98ceae59dd31307a06.png" width="1920" height="1080" class="img_ev3q"></p>
<h2 class="anchor anchorTargetStickyNavbar_Vzrq" id="see-exactly-what-each-payout-is-made-of">See exactly what each payout is made of<a href="https://docs.sku.io/release-notes/2026/07/19/ebay-payout-accounting#see-exactly-what-each-payout-is-made-of" class="hash-link" aria-label="Direct link to See exactly what each payout is made of" title="Direct link to See exactly what each payout is made of" translate="no">​</a></h2>
<p>Open any payout to see its full breakdown — gross sales, refunds, fees, and any charges — alongside the line-level transactions behind it. The summary always ties out to the net deposit, so you can trust the number that hit your bank.</p>
<p><img decoding="async" loading="lazy" alt="An eBay payout detail page showing the summary split and its transaction lines" src="https://docs.sku.io/assets/images/payout-detail-6f77bbdefc90c0f9cb94f866b04cdfe0.png" width="1920" height="1080" class="img_ev3q"></p>
<h2 class="anchor anchorTargetStickyNavbar_Vzrq" id="map-each-component-to-your-accounts">Map each component to your accounts<a href="https://docs.sku.io/release-notes/2026/07/19/ebay-payout-accounting#map-each-component-to-your-accounts" class="hash-link" aria-label="Direct link to Map each component to your accounts" title="Direct link to Map each component to your accounts" translate="no">​</a></h2>
<p>Decide once where every part of a payout should land in your chart of accounts. Map sales, refunds, and each fee type to the right nominal codes, set fallback accounts, and choose whether to book eBay revenue per order or as a payout-matched summary. From then on, every payout posts itself correctly.</p>
<p><img decoding="async" loading="lazy" alt="The Payout Mappings screen for assigning eBay charge types to accounts" src="https://docs.sku.io/assets/images/mappings-28bc0915b96d73d0007a10a75eae64ab.png" width="1920" height="1080" class="img_ev3q"></p>
<h2 class="anchor anchorTargetStickyNavbar_Vzrq" id="browse-every-payout-and-line">Browse every payout and line<a href="https://docs.sku.io/release-notes/2026/07/19/ebay-payout-accounting#browse-every-payout-and-line" class="hash-link" aria-label="Direct link to Browse every payout and line" title="Direct link to Browse every payout and line" translate="no">​</a></h2>
<p>The Payouts list gives you every eBay deposit at a glance — status, accounting state, net amount, and a quick summary — all filterable and searchable. A dedicated Transactions view lets you drill into the individual lines across payouts whenever you need the detail.</p>
<p><img decoding="async" loading="lazy" alt="The eBay Payouts list showing deposits with status, accounting state, and amounts" src="https://docs.sku.io/assets/images/payouts-8d5ed782e461c9933b060b251cf0a13a.png" width="1920" height="1080" class="img_ev3q"></p>
<h2 class="anchor anchorTargetStickyNavbar_Vzrq" id="where-to-find-it">Where to find it<a href="https://docs.sku.io/release-notes/2026/07/19/ebay-payout-accounting#where-to-find-it" class="hash-link" aria-label="Direct link to Where to find it" title="Direct link to Where to find it" translate="no">​</a></h2>
<p>Open <strong>Integrations → eBay → Finance</strong>. The <strong>Payouts</strong> and <strong>Payout Mappings</strong> tabs are right there — start with <strong>Sync Payouts</strong> to pull your history, then set your mappings once and let every future payout reconcile itself.</p>]]></content>
        <author>
            <name>SKU.io Product Team</name>
            <uri>https://sku.io</uri>
        </author>
        <category label="Major Feature" term="Major Feature"/>
        <category label="New" term="New"/>
        <category label="Accounting" term="Accounting"/>
        <category label="Integrations" term="Integrations"/>
    </entry>
    <entry>
        <title type="html"><![CDATA[Your customer page is now an AR command center — see what's owed, chase it, collect it]]></title>
        <id>https://docs.sku.io/release-notes/2026/07/18/customer-ar-command-center</id>
        <link href="https://docs.sku.io/release-notes/2026/07/18/customer-ar-command-center"/>
        <updated>2026-07-18T11:45:00.000Z</updated>
        <summary type="html"><![CDATA[The customer detail page is rebuilt around money owed: outstanding and overdue totals, an aging breakdown, statements, and one-click payment requests.]]></summary>
        <content type="html"><![CDATA[<p>You could always see a customer's orders — but never, in one place, how much
they <em>owed</em> you, how overdue it was, or how to go about collecting it. Chasing
payment meant exporting to a spreadsheet, hand-building a statement, and
sending it from your inbox, all outside SKU.io. <strong>The customer page is now an
accounts-receivable command center</strong> — it opens on money owed, breaks the
balance down by how overdue it is, produces a real statement of account, and
lets you email that statement or a payment request without leaving the page.</p>
<p><strong>✨ What this means for you:</strong></p>
<ul>
<li class=""><strong>Know exactly where a customer stands</strong> — outstanding balance, what's
overdue, open credits and net receivable, right at the top of the page.</li>
<li class=""><strong>See how late it really is</strong> — a current / 1–30 / 31–60 / 61–90 / 90+
aging bar, plus an overdue worklist ordered oldest-first.</li>
<li class=""><strong>A real statement of account</strong> — open-item or activity, as of any date,
ready to view, export to PDF/CSV, or email.</li>
<li class=""><strong>Chase payment in a click</strong> — send the statement or a payment request by
email straight from the customer page, with your credit terms and balance
filled in.</li>
<li class=""><strong>No more spreadsheets</strong> — the whole accounts-receivable workflow now lives
where the customer does.</li>
</ul>
<h2 class="anchor anchorTargetStickyNavbar_Vzrq" id="money-owed-at-a-glance">Money owed, at a glance<a href="https://docs.sku.io/release-notes/2026/07/18/customer-ar-command-center#money-owed-at-a-glance" class="hash-link" aria-label="Direct link to Money owed, at a glance" title="Direct link to Money owed, at a glance" translate="no">​</a></h2>
<p>The customer page opens on the numbers that matter for collections:
<strong>Outstanding</strong>, <strong>Overdue</strong>, <strong>Open Credits</strong>, <strong>Net Receivable</strong> and the
customer's <strong>credit limit</strong> with headroom remaining. An aging bar splits the
balance into current and past-due buckets, and an overdue worklist lists the
late orders oldest-first — each with a <strong>Request Payment</strong> button right there.</p>
<p><img decoding="async" loading="lazy" alt="The customer AR overview — outstanding, overdue, net receivable and credit-limit tiles above an aging bar and an overdue-orders worklist with per-order Request Payment buttons" src="https://docs.sku.io/assets/images/overview-c996d815d475a2e9d5d63bc436fd6e1d.png" width="1920" height="1080" class="img_ev3q"></p>
<h2 class="anchor anchorTargetStickyNavbar_Vzrq" id="a-real-statement-of-account">A real statement of account<a href="https://docs.sku.io/release-notes/2026/07/18/customer-ar-command-center#a-real-statement-of-account" class="hash-link" aria-label="Direct link to A real statement of account" title="Direct link to A real statement of account" translate="no">​</a></h2>
<p>Open the <strong>Receivables → Statement</strong> view to produce a proper statement — as
<strong>Open items</strong> (every unpaid order and its balance due, aged) or as an
<strong>Activity</strong> statement over a date range. Totals foot to net receivable, credits
are netted in, and you can <strong>export</strong> it to PDF or CSV for your records.</p>
<p><img decoding="async" loading="lazy" alt="The customer statement — open items as of today, each order with its due status and balance, footing to total outstanding, credits available and net receivable, with an aging summary" src="https://docs.sku.io/assets/images/statement-198e1b353235b82434235df16c866b37.png" width="1920" height="1080" class="img_ev3q"></p>
<h2 class="anchor anchorTargetStickyNavbar_Vzrq" id="chase-payment-without-leaving-sku">Chase payment without leaving SKU<a href="https://docs.sku.io/release-notes/2026/07/18/customer-ar-command-center#chase-payment-without-leaving-sku" class="hash-link" aria-label="Direct link to Chase payment without leaving SKU" title="Direct link to Chase payment without leaving SKU" translate="no">​</a></h2>
<p>When it's time to collect, hit <strong>Send</strong> — email the statement, or a standalone
<strong>payment request</strong>, straight to the customer. The recipient is pre-filled from
the customer's billing email, and the subject and message support placeholders
like <code>{customer_name}</code>, <code>{total_due}</code> and <code>{payment_instructions}</code> so a
polished, personalized note goes out in seconds.</p>
<p><img decoding="async" loading="lazy" alt="The Send Statement dialog — statement type toggle, recipient pre-filled from the billing email, and optional subject and message fields with customer-name and balance placeholders" src="https://docs.sku.io/assets/images/send-statement-535c020c41dea367c5458e1fc5fe6672.png" width="1920" height="1080" class="img_ev3q"></p>
<h2 class="anchor anchorTargetStickyNavbar_Vzrq" id="where-to-find-it">Where to find it<a href="https://docs.sku.io/release-notes/2026/07/18/customer-ar-command-center#where-to-find-it" class="hash-link" aria-label="Direct link to Where to find it" title="Direct link to Where to find it" translate="no">​</a></h2>
<p>Open any customer under <strong>Contacts → Customers</strong>. The <strong>Overview</strong> tab now
leads with accounts receivable, and the <strong>Receivables</strong> tab holds open orders,
credits, the statement and your sent communications.</p>]]></content>
        <author>
            <name>SKU.io Product Team</name>
            <uri>https://sku.io</uri>
        </author>
        <category label="Major Feature" term="Major Feature"/>
        <category label="New" term="New"/>
        <category label="Accounting" term="Accounting"/>
        <category label="Orders" term="Orders"/>
    </entry>
    <entry>
        <title type="html"><![CDATA[Unpaid orders, handled your way — reserve, draft or open, per sales channel]]></title>
        <id>https://docs.sku.io/release-notes/2026/07/18/unpaid-orders</id>
        <link href="https://docs.sku.io/release-notes/2026/07/18/unpaid-orders"/>
        <updated>2026-07-18T11:40:00.000Z</updated>
        <summary type="html"><![CDATA[Orders that arrive unpaid — bank transfer, purchase order, cash on delivery — can now be held as reserved or draft with an auto-expiry, per sales channel and payment method.]]></summary>
        <content type="html"><![CDATA[<p>When a customer checks out with an offline payment method — a bank transfer,
a purchase order, a "pay on delivery" — the order lands in SKU.io <em>unpaid</em>,
yet until now it behaved exactly like an order you'd already been paid for:
it allocated your stock immediately and could sail straight through to
fulfillment. So a wire that might never arrive could quietly tie up inventory
for weeks, and there was no way to say "hold this until the money's in."
<strong>The new Unpaid Orders settings let you decide, per sales channel, exactly
how an unpaid order is handled</strong> — bring it in as a held <em>reserve</em> with an
automatic expiry, park it as a <em>draft</em> for review, or treat it as <em>open</em> and
let it ship — with per-payment-method overrides and control over when it
reaches your accounting software.</p>
<p><strong>✨ What this means for you:</strong></p>
<ul>
<li class=""><strong>Stop unpaid orders from tying up stock</strong> — hold bank-transfer and PO
orders as <em>reserved</em> or <em>draft</em> instead of allocating and shipping them
like paid orders.</li>
<li class=""><strong>Reservations that clean themselves up</strong> — set an expiry (say, 7 days) and
an unpaid reserved order automatically releases its stock if the money
never comes, so availability stays honest across every channel.</li>
<li class=""><strong>Opens itself the moment you're paid</strong> — when payment lands, the order
flips to open and flows to fulfillment on its own.</li>
<li class=""><strong>Down to the payment method</strong> — cash-on-delivery can ship while a bank
transfer waits; set the rule per method, not just per channel.</li>
<li class=""><strong>Keep your ledger clean</strong> — choose whether unpaid orders push to your
accounting software as chase-ready invoices, or stay out until they're paid.</li>
</ul>
<h2 class="anchor anchorTargetStickyNavbar_Vzrq" id="decide-what-happens-to-an-unpaid-order">Decide what happens to an unpaid order<a href="https://docs.sku.io/release-notes/2026/07/18/unpaid-orders#decide-what-happens-to-an-unpaid-order" class="hash-link" aria-label="Direct link to Decide what happens to an unpaid order" title="Direct link to Decide what happens to an unpaid order" translate="no">​</a></h2>
<p>Each connected store gets one row. Pick how unpaid orders arrive — <strong>Reserve</strong>
(allocate the stock and hold fulfillment), <strong>Draft</strong> (don't allocate until you
approve), or <strong>Open</strong> (treat it like a paid order) — and, for reserved orders,
how many days to hold before the reservation auto-releases. Turn on <strong>Auto-open
on payment</strong> and the order opens itself as soon as the payment is confirmed.</p>
<p><img decoding="async" loading="lazy" alt="The Unpaid Orders settings grid — one row per connected store showing when an unpaid order is imported, the reservation expiry, auto-open on payment, and accounting sync" src="https://docs.sku.io/assets/images/settings-grid-8d936052939b24c0502e25effe935126.png" width="1920" height="1080" class="img_ev3q"></p>
<p>These rules override your account-wide "Set unpaid orders as Reserved" setting
for any channel you configure here — and each row tells you whether it's using
its own rule or following the account default, so there's no guessing which
setting is in charge.</p>
<h2 class="anchor anchorTargetStickyNavbar_Vzrq" id="down-to-the-payment-method">Down to the payment method<a href="https://docs.sku.io/release-notes/2026/07/18/unpaid-orders#down-to-the-payment-method" class="hash-link" aria-label="Direct link to Down to the payment method" title="Direct link to Down to the payment method" translate="no">​</a></h2>
<p>Not every unpaid order should be treated the same. A cash-on-delivery order
<em>ships</em> unpaid by definition, while a bank transfer should be held until it
clears. Expand a channel to set an override per payment method — SKU.io
discovers the methods automatically from your imported orders — and decide,
for each, how the order lands and whether its invoice syncs to accounting.</p>
<p><img decoding="async" loading="lazy" alt="The per-method overrides panel — each payment method (bank transfer, cash on delivery, credit card, check) mapped to how its unpaid orders are handled and synced to accounting" src="https://docs.sku.io/assets/images/per-method-ce0b7481abac4fd1d35d69caa0e311fb.png" width="1920" height="1080" class="img_ev3q"></p>
<h2 class="anchor anchorTargetStickyNavbar_Vzrq" id="keep-your-accounting-clean">Keep your accounting clean<a href="https://docs.sku.io/release-notes/2026/07/18/unpaid-orders#keep-your-accounting-clean" class="hash-link" aria-label="Direct link to Keep your accounting clean" title="Direct link to Keep your accounting clean" translate="no">​</a></h2>
<p>Unpaid orders and your books are two different questions. For each channel you
can choose to <strong>send unpaid orders as awaiting-payment invoices</strong> — so you can
chase them from Xero or QuickBooks — or <strong>hold them out of accounting until
they're paid</strong>, or simply follow the channel's usual setting. You get the
awaiting-payment invoices you want for collections without cluttering your
ledger with money you may never see.</p>
<h2 class="anchor anchorTargetStickyNavbar_Vzrq" id="works-across-your-channels">Works across your channels<a href="https://docs.sku.io/release-notes/2026/07/18/unpaid-orders#works-across-your-channels" class="hash-link" aria-label="Direct link to Works across your channels" title="Direct link to Works across your channels" translate="no">​</a></h2>
<p>The policy is channel-agnostic. It's available today for <strong>Magento 1, Magento
2, Shopify, and WooCommerce</strong> stores — so the offline-payment orders those
storefronts send you all land the way you intend.</p>
<h2 class="anchor anchorTargetStickyNavbar_Vzrq" id="where-to-find-it">Where to find it<a href="https://docs.sku.io/release-notes/2026/07/18/unpaid-orders#where-to-find-it" class="hash-link" aria-label="Direct link to Where to find it" title="Direct link to Where to find it" translate="no">​</a></h2>
<p>Go to <strong>Settings → Unpaid Orders</strong>. Edit the row for any connected store, set
how its unpaid orders should be handled, and click <strong>Save</strong> for that channel.
Changes apply to newly imported orders.</p>]]></content>
        <author>
            <name>SKU.io Product Team</name>
            <uri>https://sku.io</uri>
        </author>
        <category label="Major Feature" term="Major Feature"/>
        <category label="New" term="New"/>
        <category label="Orders" term="Orders"/>
        <category label="Integrations" term="Integrations"/>
        <category label="Accounting" term="Accounting"/>
    </entry>
    <entry>
        <title type="html"><![CDATA[Overhead costs now shape your Profitability Report — with a full margin ladder]]></title>
        <id>https://docs.sku.io/release-notes/2026/07/18/cost-entries-profitability</id>
        <link href="https://docs.sku.io/release-notes/2026/07/18/cost-entries-profitability"/>
        <updated>2026-07-18T11:17:13.000Z</updated>
        <summary type="html"><![CDATA[The marketing, fees and overhead you record as cost entries now flow into the Profitability Report, turning it into a full margin ladder from gross profit down to operating profit.]]></summary>
        <content type="html"><![CDATA[<p>You went to the trouble of entering your marketing spend, 3PL fees, software
subscriptions and Amazon storage costs, and allocating them to the right
products and brands — but your Profitability Report acted like none of it
existed. It stopped at gross profit, so a brand that looked healthy on paper
could be underwater once its share of overhead landed. <strong>The Profitability
Report now includes the cost entries you allocate</strong> — every marketing
campaign, fee and overhead cost folds into the report as a distinct,
auditable cost line, and the bottom line becomes a full <strong>margin ladder</strong>:
Revenue → Gross Profit → <strong>Contribution Margin</strong> → <strong>Operating Profit</strong>.</p>
<p><strong>✨ What this means for you:</strong></p>
<ul>
<li class=""><strong>See true profitability, not just gross margin</strong> — your allocated
marketing, fees and overhead are now subtracted right in the report, so
the profit number reflects what you actually keep.</li>
<li class=""><strong>An industry-standard margin ladder</strong> — Gross Profit, Contribution
Margin and Operating Profit are named exactly as your accountant expects,
with the percentages alongside each.</li>
<li class=""><strong>Every number explains itself</strong> — a click shows the exact cost entries
behind any figure, so there are no mystery numbers.</li>
<li class=""><strong>Overhead broken out by type</strong> — see marketing vs advertising vs
software as their own columns, per brand, SKU or supplier.</li>
<li class=""><strong>Compare against last period</strong> — each figure carries a change chip
versus the previous period or prior year.</li>
</ul>
<h2 class="anchor anchorTargetStickyNavbar_Vzrq" id="a-margin-ladder-from-revenue-to-operating-profit">A margin ladder, from revenue to operating profit<a href="https://docs.sku.io/release-notes/2026/07/18/cost-entries-profitability#a-margin-ladder-from-revenue-to-operating-profit" class="hash-link" aria-label="Direct link to A margin ladder, from revenue to operating profit" title="Direct link to A margin ladder, from revenue to operating profit" translate="no">​</a></h2>
<p>The summary now reads as a ladder. Start with <strong>Revenue</strong>, subtract COGS to
get <strong>Gross Profit</strong>, subtract your direct and indirect costs to get
<strong>Contribution Margin</strong>, then subtract the overhead you haven't tied to a
specific product to get <strong>Operating Profit</strong> — the company-level bottom
line. Each tile shows the dollars and the margin percentage, and a small
change chip tells you how it moved versus the period before.</p>
<p><img decoding="async" loading="lazy" alt="The Profitability Report summary showing the margin ladder — Revenue, Gross Profit, Contribution Margin and Operating Profit — each with its margin percentage and a period-over-period change chip" src="https://docs.sku.io/assets/images/margin-ladder-e17a92e1f2dd75050e72fb48f0547963.png" width="1920" height="1080" class="img_ev3q"></p>
<h2 class="anchor anchorTargetStickyNavbar_Vzrq" id="overhead-broken-out-by-cost-type">Overhead, broken out by cost type<a href="https://docs.sku.io/release-notes/2026/07/18/cost-entries-profitability#overhead-broken-out-by-cost-type" class="hash-link" aria-label="Direct link to Overhead, broken out by cost type" title="Direct link to Overhead, broken out by cost type" translate="no">​</a></h2>
<p>In the Cost Breakdown view, your allocated overhead appears as an <strong>Indirect
Costs</strong> column that folds into total cost and contribution margin. Expand it
and it splits into a column per cost type — Marketing, Amazon Advertising,
Software and any type you've created — for every brand, SKU or supplier.
Costs that can't be tied to a specific row (a brand-wide fee, or a cost
allocated to a product with no sales this period) roll into a clearly
labelled <strong>Non-Product / Unallocated</strong> line, so the totals always add up.</p>
<p><img decoding="async" loading="lazy" alt="The Cost Breakdown table with the Indirect Costs column expanded into per-type columns — Marketing, Amazon Advertising and Software — across each brand, with a Non-Product / Unallocated row and grand total" src="https://docs.sku.io/assets/images/cost-breakdown-by-type-137043b0600d73e294975e980f2be2aa.png" width="1920" height="1080" class="img_ev3q"></p>
<h2 class="anchor anchorTargetStickyNavbar_Vzrq" id="click-any-figure-to-see-exactly-where-it-came-from">Click any figure to see exactly where it came from<a href="https://docs.sku.io/release-notes/2026/07/18/cost-entries-profitability#click-any-figure-to-see-exactly-where-it-came-from" class="hash-link" aria-label="Direct link to Click any figure to see exactly where it came from" title="Direct link to Click any figure to see exactly where it came from" translate="no">​</a></h2>
<p>No figure is a black box. Click the indirect cost on any row and you get the
exact cost entries behind it — the campaign or fee, its type, what it was
allocated to, the effective period and the amount — and the list totals to
the cell you clicked. The Operating Profit tile does the same for the
overhead that hasn't been allocated yet, each row linking straight to its
cost entry.</p>
<p><img decoding="async" loading="lazy" alt="A drill-down showing the individual cost entries behind a brand&amp;#39;s indirect costs — description, cost type, allocation target, effective period and amount — totalling to the figure in the report" src="https://docs.sku.io/assets/images/cost-drilldown-e8eb72767de20c306416445807dc339a.png" width="1920" height="1080" class="img_ev3q"></p>
<h2 class="anchor anchorTargetStickyNavbar_Vzrq" id="down-to-the-individual-order--and-your-profit-alerts">Down to the individual order — and your profit alerts<a href="https://docs.sku.io/release-notes/2026/07/18/cost-entries-profitability#down-to-the-individual-order--and-your-profit-alerts" class="hash-link" aria-label="Direct link to Down to the individual order — and your profit alerts" title="Direct link to Down to the individual order — and your profit alerts" translate="no">​</a></h2>
<p>The same overhead is prorated down onto individual sales orders, so an
order's Profit tab now shows its <strong>contribution profit</strong> — the order's
profit after its share of allocated overhead — right beneath the usual
profit figure. And if you turn it on in your financial-alert settings,
profit alerts can watch contribution margin instead of raw profit, flagging
orders that only look profitable before overhead is applied.</p>
<h2 class="anchor anchorTargetStickyNavbar_Vzrq" id="where-to-find-it">Where to find it<a href="https://docs.sku.io/release-notes/2026/07/18/cost-entries-profitability#where-to-find-it" class="hash-link" aria-label="Direct link to Where to find it" title="Direct link to Where to find it" translate="no">​</a></h2>
<p>Open <strong>Insights → Reports → Profitability Report</strong>. Everything is on by
default — pick your date range and dimension and click Generate. Use the
<strong>Include indirect costs</strong> toggle to compare margins before and after
overhead, and the per-order contribution profit shows on any sales order's
<strong>Profit</strong> tab.</p>]]></content>
        <author>
            <name>SKU.io Product Team</name>
            <uri>https://sku.io</uri>
        </author>
        <category label="Major Feature" term="Major Feature"/>
        <category label="New" term="New"/>
        <category label="Reporting" term="Reporting"/>
        <category label="Accounting" term="Accounting"/>
    </entry>
    <entry>
        <title type="html"><![CDATA[Tracking Categories — see your profit and loss by sales channel]]></title>
        <id>https://docs.sku.io/release-notes/2026/07/18/tracking-categories</id>
        <link href="https://docs.sku.io/release-notes/2026/07/18/tracking-categories"/>
        <updated>2026-07-18T03:27:09.000Z</updated>
        <summary type="html"><![CDATA[Tag the invoices and cost-of-goods journals SKU.io sends to Xero and QuickBooks with a tracking category or class per sales channel, so you can report profit and loss by channel.]]></summary>
        <content type="html"><![CDATA[<p>If you sell on more than one channel, your Xero or QuickBooks profit and
loss report probably can't tell you which channel actually makes money —
Amazon revenue, Shopify revenue and your wholesale orders all land in the
same sales and cost-of-goods accounts. Until now the only way to split
them out was to create a separate account for every channel, which bloats
your chart of accounts and makes month-end a chore. <strong>SKU.io now supports
Tracking Categories</strong> — map each of your sales channels to a Xero tracking
category option (or a QuickBooks class), and every invoice, credit and
cost-of-goods journal we post carries that tag. Run your provider's normal
P&amp;L-by-tracking-category report and your numbers are already split by
channel — no extra accounts required.</p>
<p><strong>✨ What this means for you:</strong></p>
<ul>
<li class=""><strong>Profit and loss by channel</strong> — see revenue <em>and</em> margin for Amazon
vs Shopify vs wholesale in your own Xero or QuickBooks reports, using
the tags SKU.io attaches automatically.</li>
<li class=""><strong>COGS by channel, not just revenue</strong> — the cost-of-goods journals
SKU.io generates from your real fulfilment costs carry the channel tag
too, so you get true gross margin per channel — not just top-line sales.</li>
<li class=""><strong>No account proliferation</strong> — one tracking category with an option per
channel replaces a whole column of duplicate sales and COGS accounts.</li>
<li class=""><strong>Set it once</strong> — map each channel to an option in a single settings
screen; from then on every synced document is tagged for you.</li>
<li class=""><strong>Works with what you already have</strong> — pulls your existing Xero
tracking categories (or QuickBooks classes) so you map to the ones your
accountant already uses.</li>
</ul>
<h2 class="anchor anchorTargetStickyNavbar_Vzrq" id="map-each-channel-to-a-tracking-category">Map each channel to a tracking category<a href="https://docs.sku.io/release-notes/2026/07/18/tracking-categories#map-each-channel-to-a-tracking-category" class="hash-link" aria-label="Direct link to Map each channel to a tracking category" title="Direct link to Map each channel to a tracking category" translate="no">​</a></h2>
<p>Open the new <strong>Tracking Categories</strong> tab in your accounting settings.
Pick the Xero tracking category you want to segment by — most sellers use
one named "Sales Channel" — and match each of your connected channels to
one of its options. Anything left unmapped is flagged so nothing gets
tagged by accident, and you can set a fallback for channels you haven't
mapped yet.</p>
<p><img decoding="async" loading="lazy" alt="The Tracking Categories settings screen, mapping each sales channel to a Xero tracking category option" src="https://docs.sku.io/assets/images/tracking-categories-panel-fc4f8752662117c59e699f1fb7f13aa3.png" width="1920" height="1080" class="img_ev3q"></p>
<p>Choose exactly which documents get tagged — revenue, cost of goods, and
Amazon settlement postings — with a simple set of toggles, so the tagging
matches how you want to read your reports.</p>
<h2 class="anchor anchorTargetStickyNavbar_Vzrq" id="create-options-without-leaving-skuio">Create options without leaving SKU.io<a href="https://docs.sku.io/release-notes/2026/07/18/tracking-categories#create-options-without-leaving-skuio" class="hash-link" aria-label="Direct link to Create options without leaving SKU.io" title="Direct link to Create options without leaving SKU.io" translate="no">​</a></h2>
<p>Missing an option for a channel? You don't have to jump over to Xero and
back. Create the tracking option — or a whole new tracking category —
right from the settings screen, and SKU.io creates it in Xero for you and
maps it in one step. (SKU.io respects Xero's limit of two active tracking
categories, so it'll tell you when you've reached it.)</p>
<h2 class="anchor anchorTargetStickyNavbar_Vzrq" id="quickbooks-online-too">QuickBooks Online too<a href="https://docs.sku.io/release-notes/2026/07/18/tracking-categories#quickbooks-online-too" class="hash-link" aria-label="Direct link to QuickBooks Online too" title="Direct link to QuickBooks Online too" translate="no">​</a></h2>
<p>On a QuickBooks connection the same screen maps your channels to
<strong>classes</strong> instead of tracking categories, so QuickBooks sellers get the
same profit-and-loss-by-channel view using class tracking.</p>
<h2 class="anchor anchorTargetStickyNavbar_Vzrq" id="where-to-find-it">Where to find it<a href="https://docs.sku.io/release-notes/2026/07/18/tracking-categories#where-to-find-it" class="hash-link" aria-label="Direct link to Where to find it" title="Direct link to Where to find it" translate="no">​</a></h2>
<p>Go to <strong>Accounting → Settings → Tracking Categories</strong> (it appears once
you've connected Xero or QuickBooks Online). Map your channels, save, and
your next synced invoices and cost-of-goods journals will be tagged.</p>]]></content>
        <author>
            <name>SKU.io Product Team</name>
            <uri>https://sku.io</uri>
        </author>
        <category label="Major Feature" term="Major Feature"/>
        <category label="New" term="New"/>
        <category label="Accounting" term="Accounting"/>
    </entry>
    <entry>
        <title type="html"><![CDATA[Shopify Payouts — accounting that matches your bank deposits]]></title>
        <id>https://docs.sku.io/release-notes/2026/07/18/shopify-payouts</id>
        <link href="https://docs.sku.io/release-notes/2026/07/18/shopify-payouts"/>
        <updated>2026-07-18T02:48:34.000Z</updated>
        <summary type="html"><![CDATA[SKU.io now syncs every Shopify Payments payout and posts one summarized accounting entry that matches the bank deposit to the cent — reconciliation in one click instead of hours.]]></summary>
        <content type="html"><![CDATA[<p>The number Shopify deposits into your bank account is never your sales
number. Every payout bundles sales, refunds, processing fees, and
adjustments into a single net amount — so at month end someone has to
reconstruct each deposit from dozens of individual invoices, or worse,
book the whole thing to one income account and quietly misstate revenue,
tax, and fees. <strong>SKU.io now syncs your Shopify Payments payouts</strong> and
can post one summarized accounting entry per payout — sales, refunds,
fees, and adjustments each routed to the right ledger account, with the
net matching your bank deposit to the cent. When the deposit appears in
your bank feed, it reconciles in one click.</p>
<p><strong>✨ What this means for you:</strong></p>
<ul>
<li class=""><strong>Every payout, synced</strong> — each Shopify Payments payout appears in
SKU.io with its status, net amount, and the full breakdown of what
made up the deposit.</li>
<li class=""><strong>Matches the bank to the cent</strong> — the summarized entry always equals
the deposited amount, so bank reconciliation is a match, not a
reconstruction.</li>
<li class=""><strong>Split, never lumped</strong> — sales, refunds, processing fees, and
adjustments each post to the account you choose, keeping revenue,
tax, and expenses accurate.</li>
<li class=""><strong>A clean ledger</strong> — one summary per payout instead of thousands of
per-order lines a month, with per-order posting still available if
that's how you work.</li>
<li class=""><strong>No double counting</strong> — switching between per-order and
payout-matched accounting is guarded, so revenue is only ever
recognized one way.</li>
</ul>
<h2 class="anchor anchorTargetStickyNavbar_Vzrq" id="see-every-payout-at-a-glance">See every payout at a glance<a href="https://docs.sku.io/release-notes/2026/07/18/shopify-payouts#see-every-payout-at-a-glance" class="hash-link" aria-label="Direct link to See every payout at a glance" title="Direct link to See every payout at a glance" translate="no">​</a></h2>
<p>The new <strong>Finance</strong> area in your Shopify integration lists every payout
with its payout ID, date, status, net amount, and the charges, refunds,
and fees behind it. Filter by payout or accounting status, search by
payout ID, and sort any column — held payouts (still in transit at
Shopify) are clearly marked and never post until they're paid.</p>
<p><img decoding="async" loading="lazy" alt="The Shopify Payouts list showing payout IDs, statuses, net amounts, and accounting states" src="https://docs.sku.io/assets/images/payouts-list-14c87d1dba32c7a99a8a6f358fd75217.png" width="1920" height="1080" class="img_ev3q"></p>
<h2 class="anchor anchorTargetStickyNavbar_Vzrq" id="drill-into-any-deposit">Drill into any deposit<a href="https://docs.sku.io/release-notes/2026/07/18/shopify-payouts#drill-into-any-deposit" class="hash-link" aria-label="Direct link to Drill into any deposit" title="Direct link to Drill into any deposit" translate="no">​</a></h2>
<p>Click a payout to open its detail page: the summary split shows exactly
how charges, fees, refunds, and adjustments add up to the deposit, with
a clear confirmation when the numbers balance. Below it, every balance
transaction in the payout is listed line by line, linked back to the
order it came from.</p>
<p><img decoding="async" loading="lazy" alt="A payout detail page with the summary split balancing exactly to the bank deposit" src="https://docs.sku.io/assets/images/payout-detail-27608d1632a9ae84c242df0fd141ae99.png" width="1920" height="1080" class="img_ev3q"></p>
<h2 class="anchor anchorTargetStickyNavbar_Vzrq" id="route-every-line-to-the-right-account">Route every line to the right account<a href="https://docs.sku.io/release-notes/2026/07/18/shopify-payouts#route-every-line-to-the-right-account" class="hash-link" aria-label="Direct link to Route every line to the right account" title="Direct link to Route every line to the right account" translate="no">​</a></h2>
<p><strong>Payout Mappings</strong> is where you decide where the money goes. Group
payout line types into invoice and bill documents, map each financial
code to a ledger account, and set fallback accounts so nothing is ever
dropped — unmapped lines are flagged and routed to your fallback
revenue or expense account until you map them.</p>
<p><img decoding="async" loading="lazy" alt="The Payout Mappings screen with mapping groups, account assignments, and finance settings" src="https://docs.sku.io/assets/images/payout-mappings-6b0ef727f3368ab9222b450ee55d6e3a.png" width="1920" height="1080" class="img_ev3q"></p>
<h2 class="anchor anchorTargetStickyNavbar_Vzrq" id="choose-how-revenue-posts--safely">Choose how revenue posts — safely<a href="https://docs.sku.io/release-notes/2026/07/18/shopify-payouts#choose-how-revenue-posts--safely" class="hash-link" aria-label="Direct link to Choose how revenue posts — safely" title="Direct link to Choose how revenue posts — safely" translate="no">​</a></h2>
<p>Prefer payout-matched summaries? Flip the accounting sync mode from
<strong>Per Order</strong> to <strong>Per Payout</strong> in the finance settings. Because that
changes how revenue is recognized, SKU.io asks for confirmation first
and explains exactly what will happen — per-order invoices are
suppressed while payout summaries carry your revenue, so nothing is
ever counted twice. A payout accounting start date lets you choose the
exact point the new mode takes effect.</p>
<p><img decoding="async" loading="lazy" alt="The confirmation dialog shown before changing the accounting sync mode" src="https://docs.sku.io/assets/images/mode-switch-modal-487f2ed189f305a57aec01e2a594ee03.png" width="1920" height="1080" class="img_ev3q"></p>
<h2 class="anchor anchorTargetStickyNavbar_Vzrq" id="where-to-find-it">Where to find it<a href="https://docs.sku.io/release-notes/2026/07/18/shopify-payouts#where-to-find-it" class="hash-link" aria-label="Direct link to Where to find it" title="Direct link to Where to find it" translate="no">​</a></h2>
<p>Open <strong>Apps &amp; Integrations → Shopify → Finance</strong>. The <strong>Payouts</strong> tab
lists every synced payout (use <strong>Sync Payouts</strong> to pull the latest from
Shopify), and the <strong>Payout Mappings</strong> tab holds your account mappings
and accounting sync mode. Reconnect your Shopify store once to grant
the new payouts permission, and SKU.io takes it from there.</p>]]></content>
        <author>
            <name>SKU.io Product Team</name>
            <uri>https://sku.io</uri>
        </author>
        <category label="Major Feature" term="Major Feature"/>
        <category label="New" term="New"/>
        <category label="Integrations" term="Integrations"/>
        <category label="Accounting" term="Accounting"/>
    </entry>
    <entry>
        <title type="html"><![CDATA[Product Swatches — show colour and pattern, not just words]]></title>
        <id>https://docs.sku.io/release-notes/2026/07/18/product-swatches</id>
        <link href="https://docs.sku.io/release-notes/2026/07/18/product-swatches"/>
        <updated>2026-07-18T02:39:24.000Z</updated>
        <summary type="html"><![CDATA[Give a product attribute's options a colour chip or image, and SKU.io shows real swatches on your variant products and sends them to channels that support them.]]></summary>
        <content type="html"><![CDATA[<p>When a product comes in five colours, "Red", "Blue" and "Green" in a
dropdown tell you almost nothing — is that red a crimson or a brick? And
for anything with a pattern or texture, a word can't describe it at all.
Shoppers pick with their eyes, and so do the marketplaces you list on.
<strong>SKU.io now supports swatches</strong> — give each option of a product
attribute a colour chip or a small image, and that swatch shows up on
your variant products and flows out to the channels that support variant
swatches, like Walmart and Shopify. No more guessing which "Red" is
which.</p>
<p><strong>✨ What this means for you:</strong></p>
<ul>
<li class=""><strong>See the colour, not the word</strong> — every option can carry a hex
colour or an image, rendered as a real swatch chip.</li>
<li class=""><strong>Images for patterns and textures</strong> — a plain colour can't show a
floral print or a wood grain; point an option at an image URL and the
swatch shows the real thing.</li>
<li class=""><strong>Set it once, use it everywhere</strong> — a swatch lives on the option
itself, so every product that uses that option inherits it
automatically.</li>
<li class=""><strong>Flows to your channels</strong> — variant listings carry their per-variant
swatch images to marketplaces that support them, starting with Walmart
and Shopify.</li>
<li class=""><strong>One place to manage variants</strong> — declare which attributes vary
across a product's variations and edit their swatches together, in a
single dialog.</li>
</ul>
<h2 class="anchor anchorTargetStickyNavbar_Vzrq" id="turn-any-attribute-into-a-swatch">Turn any attribute into a swatch<a href="https://docs.sku.io/release-notes/2026/07/18/product-swatches#turn-any-attribute-into-a-swatch" class="hash-link" aria-label="Direct link to Turn any attribute into a swatch" title="Direct link to Turn any attribute into a swatch" translate="no">​</a></h2>
<p>Every product attribute now has a <strong>Display as</strong> setting. Leave it as a
plain dropdown for descriptive attributes like Size, or switch it to
<strong>Swatch</strong> for anything visual like Colour or Material. Once it's a
swatch, each option gets two optional fields: a hex colour and an image
URL. Enter <code>#E53935</code> for a red chip, or paste an image URL to show a
pattern or texture — the preview updates as you type.</p>
<p><img decoding="async" loading="lazy" alt="Editing a Colour attribute in Settings, with Display-as set to Swatch and a colour and image set for each option" src="https://docs.sku.io/assets/images/swatch-editor-d1f7a55a4bd9bb7f53e2a6c7ce7565ee.png" width="1920" height="1080" class="img_ev3q"></p>
<p>You'll find this under <strong>Settings → Products → Attributes</strong> — open an
attribute, tick <em>Has Options</em>, and choose <em>Swatch</em> under <strong>Display as</strong>.</p>
<h2 class="anchor anchorTargetStickyNavbar_Vzrq" id="declare-your-variants-and-their-swatches-in-one-place">Declare your variants and their swatches in one place<a href="https://docs.sku.io/release-notes/2026/07/18/product-swatches#declare-your-variants-and-their-swatches-in-one-place" class="hash-link" aria-label="Direct link to Declare your variants and their swatches in one place" title="Direct link to Declare your variants and their swatches in one place" translate="no">​</a></h2>
<p>On a product with variations, the <strong>Variant Axes &amp; Swatches</strong> dialog
does two jobs at once: it declares which attributes actually vary across
the variants (Colour, Size, or both), and it lets you edit that
attribute's swatches right there — no jumping back to Settings.</p>
<p><img decoding="async" loading="lazy" alt="The Variant Axes and Swatches dialog on a variant product, with Colour selected and its Red, Blue and Green swatches editable inline" src="https://docs.sku.io/assets/images/variant-axes-swatches-b3beebf3f0c94229e09b5dadb6bb627e.png" width="1920" height="1080" class="img_ev3q"></p>
<p>Open it from a variant product's <strong>Overview</strong> tab — in the <strong>Variations</strong>
panel, click <strong>Attributes to Compare</strong>. Tick the attributes that vary,
adjust their swatches, and hit <strong>Apply</strong>.</p>
<h2 class="anchor anchorTargetStickyNavbar_Vzrq" id="real-swatches-on-your-variant-products">Real swatches on your variant products<a href="https://docs.sku.io/release-notes/2026/07/18/product-swatches#real-swatches-on-your-variant-products" class="hash-link" aria-label="Direct link to Real swatches on your variant products" title="Direct link to Real swatches on your variant products" translate="no">​</a></h2>
<p>Because the swatch lives on the option, every variant that selects that
option shows the same chip automatically — nothing to re-enter per child.
When you publish a variant product to a channel that supports variant
swatches, SKU.io sends each variant's swatch image along with it, so your
listing shows shoppers the actual colours and patterns.</p>
<p><img decoding="async" loading="lazy" alt="A variant product overview showing its variations and the Attributes to Compare button" src="https://docs.sku.io/assets/images/matrix-product-b207a39b277e2f9f2533e138a140f83e.png" width="1920" height="1080" class="img_ev3q"></p>
<h2 class="anchor anchorTargetStickyNavbar_Vzrq" id="where-to-find-it">Where to find it<a href="https://docs.sku.io/release-notes/2026/07/18/product-swatches#where-to-find-it" class="hash-link" aria-label="Direct link to Where to find it" title="Direct link to Where to find it" translate="no">​</a></h2>
<ul>
<li class=""><strong>Set up swatches:</strong> Settings → Products → Attributes → open an
attribute → <em>Display as: Swatch</em>, then set a colour or image per
option.</li>
<li class=""><strong>Manage a product's variants:</strong> open a variant product → <strong>Overview</strong>
→ <strong>Variations</strong> panel → <strong>Attributes to Compare</strong>.</li>
</ul>]]></content>
        <author>
            <name>SKU.io Product Team</name>
            <uri>https://sku.io</uri>
        </author>
        <category label="Major Feature" term="Major Feature"/>
        <category label="New" term="New"/>
        <category label="Inventory" term="Inventory"/>
        <category label="Integrations" term="Integrations"/>
    </entry>
    <entry>
        <title type="html"><![CDATA[Accounting Lock Dates — close your books and keep them closed]]></title>
        <id>https://docs.sku.io/release-notes/2026/07/17/accounting-lock-dates</id>
        <link href="https://docs.sku.io/release-notes/2026/07/17/accounting-lock-dates"/>
        <updated>2026-07-17T00:00:00.000Z</updated>
        <summary type="html"><![CDATA[Lock your accounting periods in SKU.io — late activity posts to the first open day, flagged and fully reportable, so a closed month never quietly changes.]]></summary>
        <content type="html"><![CDATA[<p>You close the books for a month, reconcile everything to QuickBooks or
Xero, and move on — and then a customer return, a late supplier bill, or
a marketplace settlement shows up dated back in that closed period. Do
you let it silently change a month you've already reported? Block it and
lose the transaction entirely? Neither is a good answer. <strong>SKU.io now has
first-class accounting lock dates</strong> — set the date your books are closed
through, and any activity that arrives afterward dated on or before it is
automatically posted to the first open day instead, with its original
date preserved and clearly flagged. Your closed periods stay closed, and
nothing falls through the cracks.</p>
<p><strong>✨ What this means for you:</strong></p>
<ul>
<li class=""><strong>Your closed months stay closed</strong> — SKU.io won't rewrite accounting
entries dated on or before your lock date.</li>
<li class=""><strong>Nothing gets dropped</strong> — late returns, bills, and settlements still
land on your books; they just post to the first open day.</li>
<li class=""><strong>In sync with QuickBooks &amp; Xero</strong> — SKU.io reads your accounting
platform's own lock date and offers it as a one-click suggestion.</li>
<li class=""><strong>Full visibility</strong> — every displaced entry is badged, explains
itself, and rolls up into a dedicated exceptions report.</li>
</ul>
<h2 class="anchor anchorTargetStickyNavbar_Vzrq" id="set-your-books-lock-date">Set your books' lock date<a href="https://docs.sku.io/release-notes/2026/07/17/accounting-lock-dates#set-your-books-lock-date" class="hash-link" aria-label="Direct link to Set your books' lock date" title="Direct link to Set your books' lock date" translate="no">​</a></h2>
<p>In <strong>Accounting → Settings → General</strong> you'll find a new <strong>Financial
tracking &amp; sync</strong> card. Set your <strong>Accounting Lock Date</strong> — the date
your books are closed through — and SKU.io stops rewriting anything
before it. The card shows who set the lock and when, so there's always a
clear trail.</p>
<p>If you have QuickBooks Online or Xero connected, SKU.io imports the lock
date from your accounting platform and shows it as a suggestion you can
apply in one click — you stay in control of your own lock date, with the
provider's simply offered as a starting point. The <strong>Effective lock
date</strong> line always tells you exactly what's in force: the later of your
own date and any provider lock you've chosen to enforce.</p>
<p><img decoding="async" loading="lazy" alt="The accounting lock date settings card, showing the lock date, a QuickBooks suggestion, the enforced provider lock, and the effective lock date" src="https://docs.sku.io/assets/images/lock-date-settings-0629e4ae1f8c1658a32e4970fcc1c238.png" width="1920" height="1080" class="img_ev3q"></p>
<h2 class="anchor anchorTargetStickyNavbar_Vzrq" id="late-activity-keeps-flowing">Late activity keeps flowing<a href="https://docs.sku.io/release-notes/2026/07/17/accounting-lock-dates#late-activity-keeps-flowing" class="hash-link" aria-label="Direct link to Late activity keeps flowing" title="Direct link to Late activity keeps flowing" translate="no">​</a></h2>
<p>When something dated in a locked period arrives — a return against an old
order, a supplier bill for goods received last month, an Amazon
settlement — SKU.io books it on the <strong>first open day</strong> rather than
refusing it or quietly editing a closed month. The entry keeps a record
of the date it <em>should</em> have had, and it's marked with a lock badge and a
struck-through original date right in your ledger, so it's obvious at a
glance which entries were moved and why.</p>
<p><img decoding="async" loading="lazy" alt="The ledger entries list, where displaced entries show a lock badge and their original date struck through beneath the posted date" src="https://docs.sku.io/assets/images/displaced-entries-6d21fb65a9c95b34af0fe5f35c872d08.png" width="1920" height="1080" class="img_ev3q"></p>
<p>Open any moved entry and it explains itself in plain language — the date
it was posted, the date its source document carried, and that it fell in
a locked period.</p>
<p><img decoding="async" loading="lazy" alt="An entry detail page with a banner explaining it was posted on the first open day because its source date fell in a locked period" src="https://docs.sku.io/assets/images/entry-banner-cb5599cc53694457e4f1a53d72b3506f.png" width="1920" height="1080" class="img_ev3q"></p>
<h2 class="anchor anchorTargetStickyNavbar_Vzrq" id="a-clear-record-of-everything-that-moved">A clear record of everything that moved<a href="https://docs.sku.io/release-notes/2026/07/17/accounting-lock-dates#a-clear-record-of-everything-that-moved" class="hash-link" aria-label="Direct link to A clear record of everything that moved" title="Direct link to A clear record of everything that moved" translate="no">​</a></h2>
<p>At month-end you need to answer one question: <em>what changed after I
closed?</em> The new <strong>Lock Date Exceptions</strong> report answers it directly. It
lists every displaced entry with its original date, its posted date, and
how many days it moved — grouped by type, with net totals and a running
count — so you can see the full picture and reconcile with confidence.</p>
<p><img decoding="async" loading="lazy" alt="The Lock Date Exceptions report, showing displaced entries grouped by type with totals and a table of original vs. posted dates" src="https://docs.sku.io/assets/images/exceptions-report-b792db9f958a1c3b9052d88afd4d0401.png" width="1920" height="1080" class="img_ev3q"></p>
<h2 class="anchor anchorTargetStickyNavbar_Vzrq" id="where-to-find-it">Where to find it<a href="https://docs.sku.io/release-notes/2026/07/17/accounting-lock-dates#where-to-find-it" class="hash-link" aria-label="Direct link to Where to find it" title="Direct link to Where to find it" translate="no">​</a></h2>
<ul>
<li class=""><strong>Set your lock date:</strong> Accounting → <strong>Settings → General</strong> → the
<em>Financial tracking &amp; sync</em> card.</li>
<li class=""><strong>See what moved:</strong> Accounting → <strong>Reports</strong> → the <strong>Lock exceptions</strong>
tab. Displaced entries are also badged throughout the <strong>Transactions</strong>
list, and explained on each entry's detail page.</li>
</ul>]]></content>
        <author>
            <name>SKU.io Product Team</name>
            <uri>https://sku.io</uri>
        </author>
        <category label="Major Feature" term="Major Feature"/>
        <category label="New" term="New"/>
        <category label="Accounting" term="Accounting"/>
    </entry>
    <entry>
        <title type="html"><![CDATA[Shopify Cost Sync — keep your Shopify profit reports accurate, automatically]]></title>
        <id>https://docs.sku.io/release-notes/2026/07/17/shopify-cost-sync</id>
        <link href="https://docs.sku.io/release-notes/2026/07/17/shopify-cost-sync"/>
        <updated>2026-07-17T00:00:00.000Z</updated>
        <summary type="html"><![CDATA[SKU.io now pushes each product's average cost to Shopify's Cost per item, so Shopify profit reports and margin apps stay accurate without manual updates.]]></summary>
        <content type="html"><![CDATA[<p>Shopify's profit and margin reports are only as good as the <strong>Cost per
item</strong> you enter on each product — and that number goes stale the moment
your costs change. Keeping it up to date by hand across a whole catalog
is tedious, easy to forget, and the reason so many Shopify profit
reports quietly drift out of line with reality. <strong>SKU.io now syncs your
costs to Shopify for you.</strong> Turn on Cost Sync for a Shopify store and
SKU.io pushes each mapped product's real average cost into Shopify's
"Cost per item" field — so Shopify's own profit reports, and any margin
app that reads that field, finally show the truth.</p>
<p><strong>✨ What this means for you:</strong></p>
<ul>
<li class=""><strong>Accurate Shopify profit reports</strong> — Shopify calculates gross profit
from Cost per item at the time of sale. Keep it current and your
margin numbers are finally trustworthy.</li>
<li class=""><strong>No more manual cost entry</strong> — set it once per store; SKU.io keeps
every mapped listing's cost in sync as your costs move.</li>
<li class=""><strong>Bundles and kits handled for you</strong> — a bundle's cost is built from
the real cost of its components, automatically.</li>
<li class=""><strong>Your data is protected</strong> — SKU.io never pushes a zero or empty cost,
so a product you haven't costed yet can't wipe a value you set in
Shopify by hand.</li>
<li class=""><strong>Runs on its own</strong> — push on demand, on a daily schedule, and
automatically within minutes of a cost changing.</li>
</ul>
<h2 class="anchor anchorTargetStickyNavbar_Vzrq" id="turn-it-on-per-store">Turn it on per store<a href="https://docs.sku.io/release-notes/2026/07/17/shopify-cost-sync#turn-it-on-per-store" class="hash-link" aria-label="Direct link to Turn it on per store" title="Direct link to Turn it on per store" translate="no">​</a></h2>
<p>Cost Sync is off by default and enabled per Shopify store, so you decide
exactly which stores it manages. Flip on <strong>Push costs to Shopify</strong> in the
store's Sync controls, and the new Cost Sync tab takes over from there.</p>
<p><img decoding="async" loading="lazy" alt="Shopify Sync controls with the new &amp;quot;Push costs to Shopify&amp;quot; capability" src="https://docs.sku.io/assets/images/sync-capabilities-9a6b9d63aed9ccb4e0bc3600c43458e0.png" width="1600" height="1000" class="img_ev3q"></p>
<p>Enabling it overwrites the Cost per item in your Shopify admin for every
mapped listing — so the Cost Sync tab is upfront about that, and about
the safeguards that keep it from doing anything destructive.</p>
<p><img decoding="async" loading="lazy" alt="The Cost Sync settings tab for a Shopify store" src="https://docs.sku.io/assets/images/cost-sync-settings-863e09c94559b84a421cd87cef623abf.png" width="1600" height="1000" class="img_ev3q"></p>
<h2 class="anchor anchorTargetStickyNavbar_Vzrq" id="the-right-cost-safely">The right cost, safely<a href="https://docs.sku.io/release-notes/2026/07/17/shopify-cost-sync#the-right-cost-safely" class="hash-link" aria-label="Direct link to The right cost, safely" title="Direct link to The right cost, safely" translate="no">​</a></h2>
<p>SKU.io pushes each product's <strong>average cost</strong> — the real, landed cost
derived from what you actually paid, not a guess. A few rules keep it
honest:</p>
<ul>
<li class=""><strong>Bundles and kits</strong> get a cost built from the sum of their
components' costs, so a bundle's margin reflects what's really inside
it. If any component isn't costed yet, SKU.io skips that bundle rather
than push a half-right number.</li>
<li class=""><strong>No zeros, ever</strong> — a product with no average cost yet is skipped, not
zeroed. A cost you entered in Shopify by hand stays put until SKU.io
has a real number to replace it with.</li>
<li class=""><strong>Multi-currency aware</strong> — if your Shopify store's currency differs
from your base currency, costs are converted before they're sent.</li>
<li class=""><strong>No wasted work</strong> — costs already matching Shopify are skipped, so a
sync only touches what actually changed.</li>
</ul>
<p>Every run reports back exactly what happened — how many costs were
pushed, and how many were skipped and why — so there's never a mystery
about what Cost Sync did.</p>
<h2 class="anchor anchorTargetStickyNavbar_Vzrq" id="push-now-or-let-it-run-itself">Push now, or let it run itself<a href="https://docs.sku.io/release-notes/2026/07/17/shopify-cost-sync#push-now-or-let-it-run-itself" class="hash-link" aria-label="Direct link to Push now, or let it run itself" title="Direct link to Push now, or let it run itself" translate="no">​</a></h2>
<p>Use <strong>Sync Costs Now</strong> whenever you want an immediate push. Beyond that,
Cost Sync keeps working on its own: a daily sweep catches anything that
drifted, and a cost change on a product triggers a targeted re-push of
just that product (and any bundle it belongs to) within minutes — so
Shopify reflects your latest costs without you thinking about it.</p>
<h2 class="anchor anchorTargetStickyNavbar_Vzrq" id="where-to-find-it">Where to find it<a href="https://docs.sku.io/release-notes/2026/07/17/shopify-cost-sync#where-to-find-it" class="hash-link" aria-label="Direct link to Where to find it" title="Direct link to Where to find it" translate="no">​</a></h2>
<p>Open <strong>Apps &amp; Integrations → Shopify → Settings</strong>, then the <strong>Cost Sync</strong>
tab. Enable <strong>Push costs to Shopify</strong> under the <strong>Sync</strong> tab's controls
first, then use <strong>Sync Costs Now</strong> for an immediate push.</p>]]></content>
        <author>
            <name>SKU.io Product Team</name>
            <uri>https://sku.io</uri>
        </author>
        <category label="Major Feature" term="Major Feature"/>
        <category label="New" term="New"/>
        <category label="Integrations" term="Integrations"/>
        <category label="Inventory" term="Inventory"/>
    </entry>
    <entry>
        <title type="html"><![CDATA[Zapier Integration & Outbound Webhooks — connect SKU.io to thousands of apps]]></title>
        <id>https://docs.sku.io/release-notes/2026/07/17/zapier-integration</id>
        <link href="https://docs.sku.io/release-notes/2026/07/17/zapier-integration"/>
        <updated>2026-07-17T00:00:00.000Z</updated>
        <summary type="html"><![CDATA[SKU.io now pushes real-time events to Zapier or any HTTPS endpoint — automate orders, inventory, and purchasing workflows with no code.]]></summary>
        <content type="html"><![CDATA[<p>Until now, getting data <em>out</em> of SKU.io meant polling the API, exporting
spreadsheets, or asking a developer to build something custom. Want a
Slack message when goods are received? A Google Sheets row for every new
sales order? A customer added to your email tool the moment they first
buy? Each one was a mini engineering project. <strong>SKU.io now has a native
Zapier integration, powered by a new outbound webhooks platform</strong> — when
something happens in SKU.io, SKU.io tells the outside world about it,
in real time. Connect the official <a href="https://zapier.com/apps/skuio/integrations" target="_blank" rel="noopener noreferrer" class="">SKU.io app on
Zapier</a> — now live in the
Zapier App Directory in beta — and build those automations in minutes,
or point a webhook at your own endpoint and build anything you like.</p>
<p><strong>✨ What this means for you:</strong></p>
<ul>
<li class=""><strong>Automate without code</strong> — connect SKU.io to Slack, Google Sheets,
email, your CRM, and thousands of other apps through Zapier.</li>
<li class=""><strong>Instant triggers, not polling</strong> — SKU.io pushes each event the
moment it happens, so Zaps run in seconds, not on a 15-minute poll.</li>
<li class=""><strong>Ten events to build on</strong> — new, shipped, and cancelled sales
orders; new, approved, submitted, and received purchase orders;
inventory adjustments; new products; new customers.</li>
<li class=""><strong>Zapier actions and searches too</strong> — create sales orders, purchase
orders, products, customers, and suppliers, or adjust inventory in
SKU.io from any other app's trigger.</li>
<li class=""><strong>Webhooks for your own systems</strong> — the same platform works with any
HTTPS endpoint, with signed payloads and a full delivery log for
self-serve debugging.</li>
</ul>
<h2 class="anchor anchorTargetStickyNavbar_Vzrq" id="start-zaps-from-skuio-events">Start Zaps from SKU.io events<a href="https://docs.sku.io/release-notes/2026/07/17/zapier-integration#start-zaps-from-skuio-events" class="hash-link" aria-label="Direct link to Start Zaps from SKU.io events" title="Direct link to Start Zaps from SKU.io events" translate="no">​</a></h2>
<p>The official SKU.io Zapier app includes ten instant triggers: New Sales
Order, Sales Order Shipped, Sales Order Cancelled, New Purchase Order,
Purchase Order Approved, Purchase Order Submitted, Goods Received,
Inventory Adjusted, New Product, and New Customer. They're <em>instant</em>
triggers — SKU.io delivers each event to Zapier the moment it happens,
so a "text the warehouse manager when goods are received" Zap fires
while the truck is still at the dock.</p>
<p>Payloads are flat and Zapier-friendly, and include fields like the
warehouse and store names — so you can add a Zapier Filter step to act
only on, say, orders from your Shopify store or adjustments in one
warehouse.</p>
<h2 class="anchor anchorTargetStickyNavbar_Vzrq" id="push-data-the-other-way-too">Push data the other way, too<a href="https://docs.sku.io/release-notes/2026/07/17/zapier-integration#push-data-the-other-way-too" class="hash-link" aria-label="Direct link to Push data the other way, too" title="Direct link to Push data the other way, too" translate="no">​</a></h2>
<p>Triggers are half the story. The Zapier app also ships <strong>seven
actions</strong> — Create Sales Order, Create Purchase Order, Create Product,
Update Product, Create Customer, Create Supplier, and Adjust
Inventory — plus <strong>four searches</strong> to find products by SKU, customers
by email, sales orders by number, and suppliers by name. That means
flows <em>into</em> SKU.io as well: create a sales order from a form
submission, add products from a spreadsheet, or adjust inventory when
another system says so.</p>
<p>Connecting is a standard OAuth flow — you sign in, see exactly which
account and permissions you're granting, and you're done. No API keys
to copy around, and you can revoke the connection any time from
<strong>Settings → Developer → Connected Apps</strong>.</p>
<h2 class="anchor anchorTargetStickyNavbar_Vzrq" id="webhooks-for-everyone--not-just-zapier">Webhooks for everyone — not just Zapier<a href="https://docs.sku.io/release-notes/2026/07/17/zapier-integration#webhooks-for-everyone--not-just-zapier" class="hash-link" aria-label="Direct link to Webhooks for everyone — not just Zapier" title="Direct link to Webhooks for everyone — not just Zapier" translate="no">​</a></h2>
<p>The engine behind the Zapier app is a general-purpose <strong>outbound
webhooks platform</strong>, and it's yours to use directly. The new
<strong>Settings → Developer → Webhooks</strong> page lists every subscription on
your account — whether it was created by a connected app like Zapier or
by your own API call — with its event, target URL, source, status, and
the result of the last delivery.</p>
<p><img decoding="async" loading="lazy" alt="The Webhooks page listing subscriptions with event, target URL, source, status, and last delivery" src="https://docs.sku.io/assets/images/webhooks-page-7d46e6e1ac6a41a244f3b94f1eb160d6.png" width="1920" height="1080" class="img_ev3q"></p>
<p>Creating a webhook takes two fields: pick an event, paste an HTTPS URL.</p>
<p><img decoding="async" loading="lazy" alt="The Create webhook dialog with the event dropdown open, showing events like New Sales Order and Goods Received" src="https://docs.sku.io/assets/images/create-webhook-6299408a6532d5439325d1de08c589a7.png" width="1920" height="1080" class="img_ev3q"></p>
<p>Every subscription gets a signing secret, shown once at creation. Each
delivery carries an <code>X-SKU-Signature</code> HMAC header computed with that
secret, so your endpoint can verify that every payload genuinely came
from SKU.io.</p>
<p><img decoding="async" loading="lazy" alt="The webhook-created dialog showing the one-time signing secret with a copy button" src="https://docs.sku.io/assets/images/signing-secret-f2b5e27072de0791fd593627adbda1e4.png" width="1920" height="1080" class="img_ev3q"></p>
<h2 class="anchor anchorTargetStickyNavbar_Vzrq" id="watch-every-delivery">Watch every delivery<a href="https://docs.sku.io/release-notes/2026/07/17/zapier-integration#watch-every-delivery" class="hash-link" aria-label="Direct link to Watch every delivery" title="Direct link to Watch every delivery" translate="no">​</a></h2>
<p>No more "did the webhook fire?" mysteries. Click any subscription to
open its delivery log: every attempt with its HTTP status, response
time, and attempt number, plus the exact payload that was sent. A
<strong>Send test</strong> button posts a sample delivery on demand, so you can
verify your endpoint before wiring it into anything real.</p>
<p><img decoding="async" loading="lazy" alt="The subscription drawer showing target URL, status, and a delivery log entry with a 200 response" src="https://docs.sku.io/assets/images/delivery-log-f049c70b2c674347db51841e9a270386.png" width="1920" height="1080" class="img_ev3q"></p>
<p>Failed deliveries are retried automatically with backoff. If an
endpoint keeps failing, SKU.io disables the subscription after 25
consecutive failures and notifies you — so a dead endpoint never
silently swallows weeks of events.</p>
<h2 class="anchor anchorTargetStickyNavbar_Vzrq" id="where-to-find-it">Where to find it<a href="https://docs.sku.io/release-notes/2026/07/17/zapier-integration#where-to-find-it" class="hash-link" aria-label="Direct link to Where to find it" title="Direct link to Where to find it" translate="no">​</a></h2>
<p>Go to <strong>Settings → Developer → Webhooks</strong> to view and manage webhook
subscriptions, or click <strong>Create Webhook</strong> to point events at your own
endpoint. To connect Zapier, find <a href="https://zapier.com/apps/skuio/integrations" target="_blank" rel="noopener noreferrer" class="">SKU.io in the Zapier App
Directory</a> and sign in —
the connection and everything it creates shows up under <strong>Settings →
Developer</strong> in Connected Apps and Webhooks.</p>]]></content>
        <author>
            <name>SKU.io Product Team</name>
            <uri>https://sku.io</uri>
        </author>
        <category label="Major Feature" term="Major Feature"/>
        <category label="New" term="New"/>
        <category label="Developer & AI" term="Developer & AI"/>
        <category label="Integrations" term="Integrations"/>
    </entry>
</feed>